Sacred Threads has posted a video of the Eye Contact exhibit that was held in July. Here is a link to the video: http://www.sacredthreadsquilts.com/html/iseeyou.html
What a cool way to display these little quilts!

Sacred Threads has posted a video of the Eye Contact exhibit that was held in July. Here is a link to the video: http://www.sacredthreadsquilts.com/html/iseeyou.html
What a cool way to display these little quilts!
I will be teaching a beginning landscape quilt class at Quality Sewing in Silverdale in September and I am doing the preparation work for the class. Recently I taught a practice class at Creative Union in Port Townsend and it was very useful to me, plus my students created some great quilts.
The class uses the book “Lovely Landscapes” by Cathy Geier as the basis. The objective of the quilt design for this class is to make it easy for beginners and simple enough that the students can accomplish most of the assembly process in class. So I decided to use a sunset scene with a silhouetted tree.
My first prototype is shown below.

I decided this one was too dark and the tree needed more detail. Also the water wasn’t right — the horizon was too high and the water wasn’t interesting.
So I altered the foreground design and lightened up the sky some. Also added a silhouetted sailboat for a little more interest.

I still think the sky needs to be lighter yet, and the change in the water is more interesting but adds quite a bit of time to the assembly process. I will need to simplify the design further by reducing the number of strips. Also the area where the sand meets the horizon line is not good and needs some adjustment.
And here is the quilt made by one of my students and fellow guild members, Susan Sawatsky. She decided to go with a daylight scene and did some wonderful collage work with embroidery thread to make the leaves in the tree. Didn’t she do great?

I will post more later as I evolve the design for the class.
I am working on another quilt with Kamon, or Japanese family crests. These crest designs are quite intricate and are a real challenge to fusible webs. They need a really good adhesive to keep the pieces in shape.
Recently I read about a fusible web I have not used before. It is by June Tailor and is sold in 8 1/2 by 11 inch sheets and can be run through your inkjet printer. The obvious advantage is that, for the right size applique pieces, you can copy or print the shapes right on to the paper back of the web — no tracing of the designs required! The main disadvantage (compared to Steam-A-Seam, for example) is that the adhesive is not “sticky” before ironing. So you can’t stick down all the pieces, repositioning them as needed, and then permanently adhere them by pressing them with a hot iron. I have found that it works better to place one or two pieces and press them with the iron, then go to the next couple of pieces, etc.
I had completed a couple of blocks using Steam A Seam and wasn’t satisfied with the results. The particular fabrics I chose were regular cotton and tended to fray on the edges. One way to solve this problem is to use batiks, which fray much less than regular cottons. But since I am experimenting with these block designs, I just grabbed fabrics from my scrap bins and some of them were not batiks.
Here is the result of the fusing with Steam A Seam. You can see the frayed edges.

frayed edges show with Steam A Seam fusible.
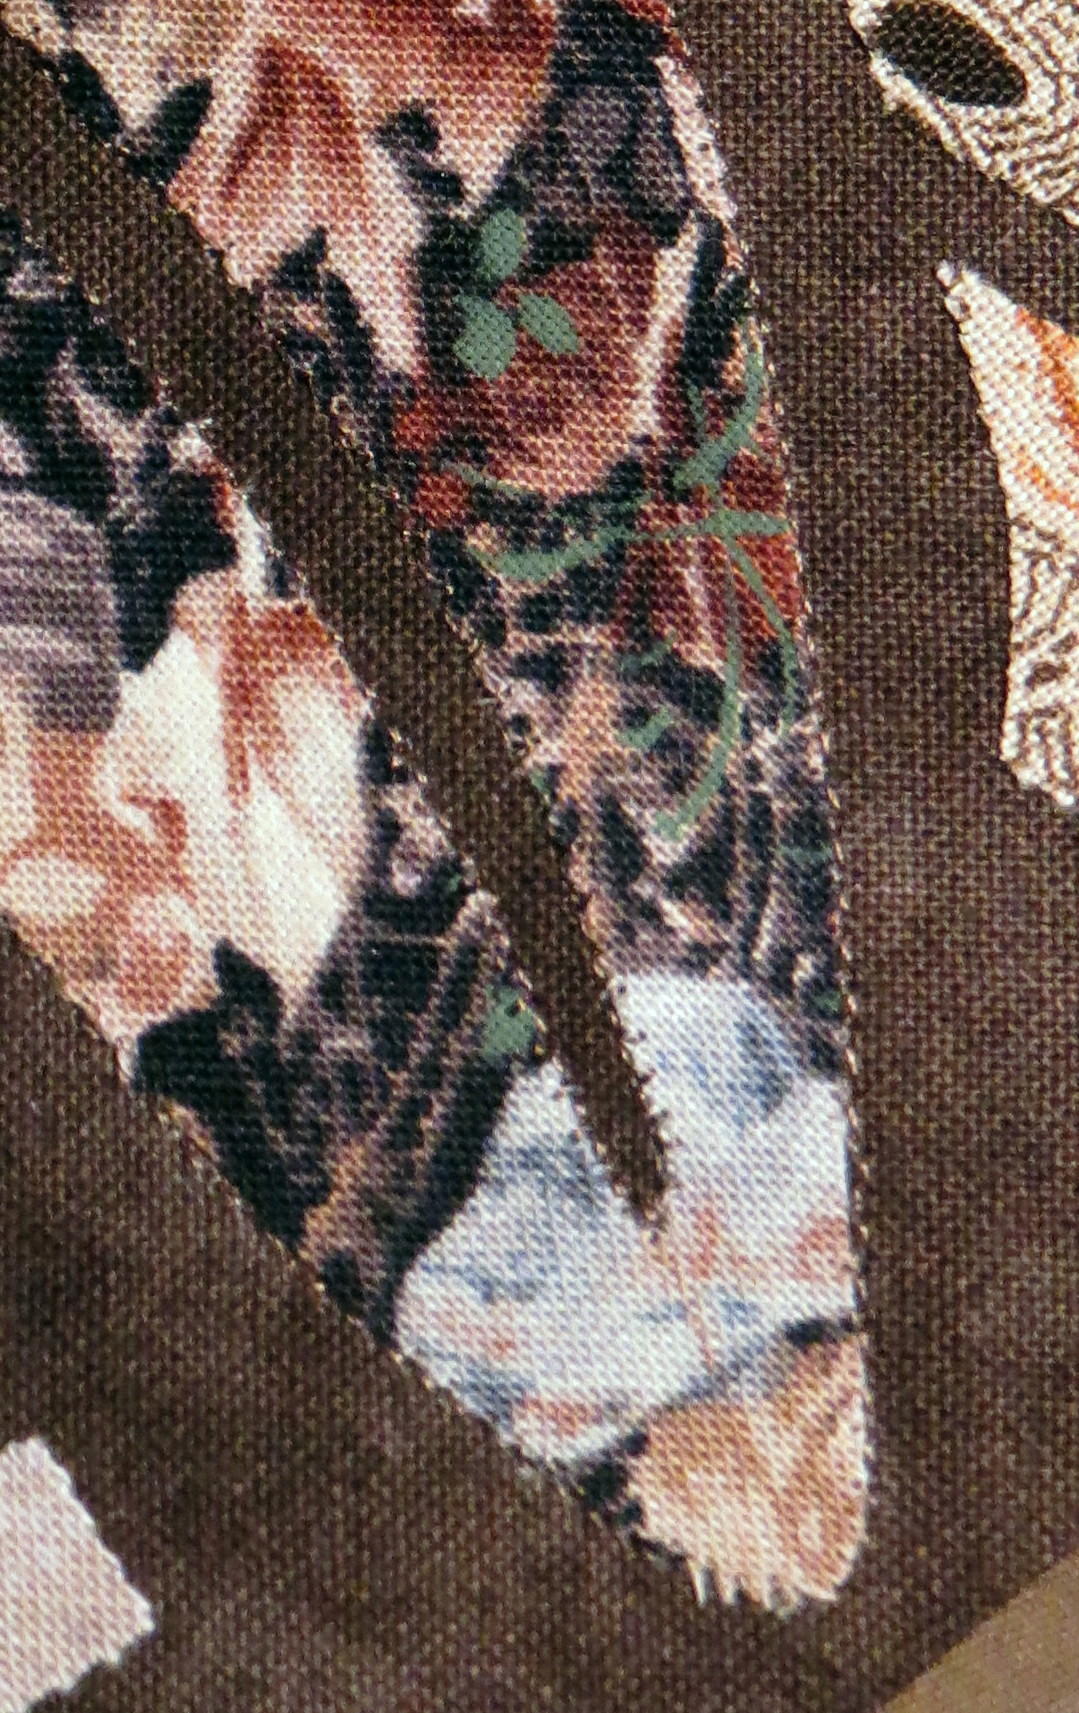
And here is the same block fused with the June Tailor product. The edges are much cleaner.

much less fraying with the June Tailor fusible web
For these intricate designs, I will be using the June Tailor fusible web in the future. It is more expensive than other fusibles, so I will be ordering it from a wholesale source to get the price down. But it can be purchased easily either at your local shops or through Amazon at the following link: June Tailor 8-1/2-Inch by 11-Inch Ink Jet Printable Fusible Web, 6-Pack .
Continuing on with my progress in the “Working In Series” class. I did numerous sketches of fractured circles, split circles, etc. I went looking for photographs of circular things, and walked around with my camera taking pictures of circular things. I printed out some shaded circles from my drawing program. I made some very uninspired sketches and mockups. A few seemed promising, but didn’t get me excited.
Finally, I found some photos of some interesting old circular gears by searching online. I printed out the photos and sliced them up, reassembling them into a collage of sorts. I liked the feel of it and decided to pursue the idea. I am not showing my cut and paste mockup here because the original photos are copyright protected. But I will show you where I went from that mockup.
Here is my first mockup, using a watercolor painted background and some shaded spheres printed out from my drawing program:

Sliced blue spheres on white strips
You will see the quilt I made from this mockup in a later posting.
I began working on this quilt (I did an earlier post on how I used paint to shade the spheres) but at the same time I was working on variations of the design. Following are a few sketches that I decided show promise. Some of them ended up as quilts, and others are waiting to be developed further.

Fractured Circle Study 3
Fractured circle study 4

Fractured circle study 10
After these sketches I did some of the designs with turned applique and some with fused raw edge applique. Stay tuned for the finished quilts!
In the last post I mentioned that I was going to try spray starching my block instead of using a tear away stabilizer on the back. I did try that, and it worked beautifully. So no more stabilizer! That saves a tedious step in the process. I would still want to use the stabilizer if I were doing a satin stitch, but for the blanket stitch it is not necessary. After starching all the light squares for my quilt, I finished the stitching on all the applique. For these blocks, I had spray starched the applique fabric (on the front, to avoid affecting the fusing process) and thus had a minimal amount of fraying around the pieces.
I am now working on the dark blocks. In my rush to make the blocks, I managed to forget about starching the applique fabrics ahead of time. My first machine stitching resulted in a lot of fraying and I was not happy with the result. So the next thing I tried was to spray starch the whole block, front and back. This avoided the need for the stabilizer and also resulted in a much cleaner look to the applique on the front, as you can see by comparing the two photos below.

Applique fabric not starched
I think there is going to be a lot more spray starch in my future. Before committing to it I will have to rinse out a couple of blocks and make sure the fraying doesn’t happen later, but so far I am pleased with the results. This is a much faster way to get a good result. Of course if you do this be careful about breathing the fumes!
I am still working on my Japanese Kamon (family crest) blocks. Right now I am stitching around the edges of the fused applique pieces – since I never trust the fusible to be permanent. For these pieces, I want the stitching to blend into the fabric as much as possible. I use size 100 silk thread for this purpose, since it is very fine. I use silk thread made by YLI and also by Superior Threads. Your local quilt shop may carry this thread for use in hand applique, or you may have to buy it on line. The YLI version can be purchased through Amazon (like almost anything else you could want!) at this link: Silk Thread 100 Weight 200 Meters-
Polyester size 100 thread is also available, but I prefer the silk. The photo below shows a couple of spools of this thread. Note the number 100 on the top of each spool.
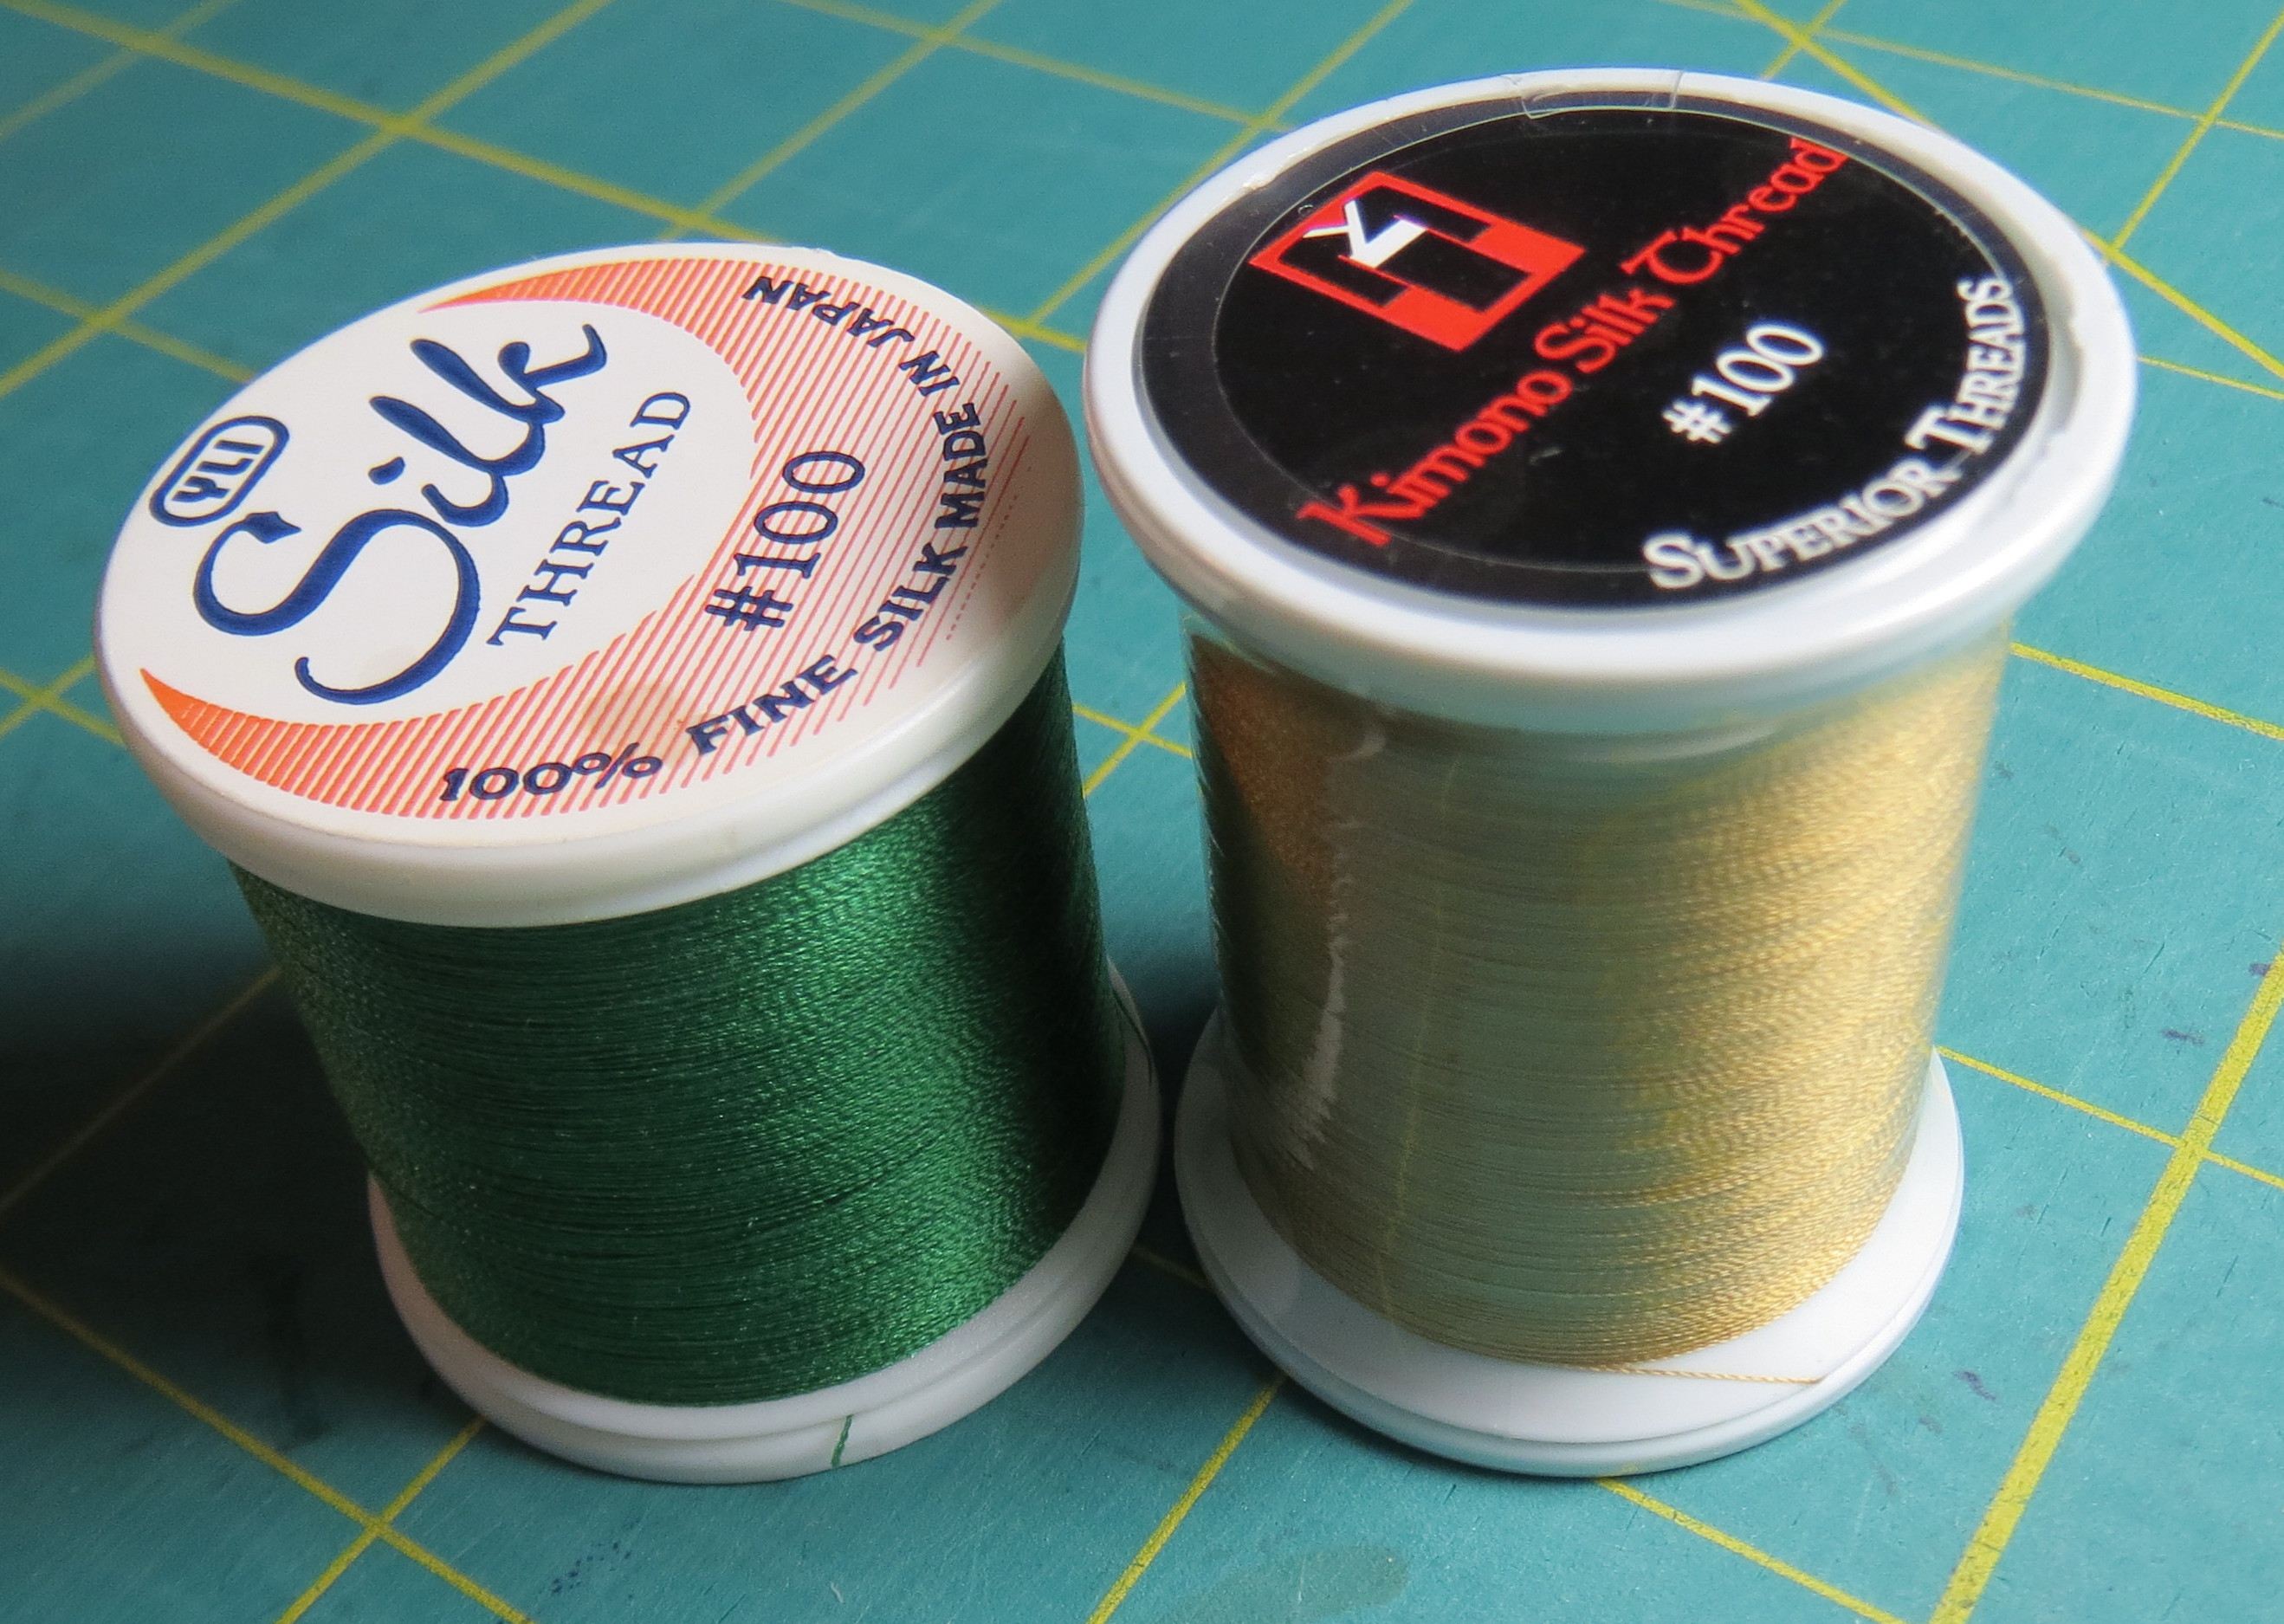
YLI and Superior make size 100 silk threads, good for applique and machine quilting
I iron a piece of Totally Stable (by Sulky) on the back of my block. Totally Stable irons on like freezer paper, but is tearaway so it can be removed reasonably easily. Other stabilizers or even newsprint could be used but would have to be pinned in place. You may also just use starch or sizing on the back of the block to stiffen it up; for the blanket stitching I am using here, that would probably be enough to keep the fabric from puckering. I may try that on a couple of blocks and see if I can recommend it, since it would eliminate the tearaway step. But today I am using the Totally Stable. Incidentally, Totally Stable comes in various sizes – 8 1/2 by 11 sheets, 8, 12, or 20 inch wide rolls, etc. I think the 12 inch wide roll is probably the most convenient for most quilters, and you can buy it at your local quilting/craft store or here at Amazon: Sulky 12-Inch by 12-Yard Totally Stable Iron-On Tear-Away Stabilizer Roll
After the Totally Stable is in place, thread your machine with size 100 silk in both the top and bobbin. Check the tension – I like a setting of about 2 for my Bernina, but your machine may be different. The bobbin thread should not show on the top if the tension is correct.
I set the stitch length to 1.5 and the stitch width to about 0.7. I am using the built in blanket stitch (stitch 329 on my Bernina 180). I like a pretty narrow stitch so it doesn’t show much. The resulting stitch shows below on the lower leaf of this block; the other leaf hasn’t been stitched yet. In this closeup view you can see the stitching. From a little further away, it is nearly invisible.

Lower leaf has been machine stitch appliqued (blanket stitch with silk thread)
I think this method is a good compromise. The stitching is inconspicuous and it is fairly fast, so I will make reasonable progress. If I try a block without the Totally Stable, I will report here how that went.
I love many things about Japanese design. One of the aspects of Japanese design that has always intrigued me are the many variations of Japanese family crests, and I have been intending to make a quilt using the designs for at least a couple of decades. Now I am finally doing it. This is a progress report of the pattern drafting process.
On a trip to Japan at least 30 years ago, I purchased a book entitled “”The Elements of Japanese Design – A Handbook of Family Crests, Heraldry & Symbolism” by John W. Dower. My copy of the book was published in 1971, but I also see a 1990 edition for sale on Amazon now. I have made a few failed attempts to use the designs in the past, but was stopped by the difficulty of the drafting process. Here is how I have finally solved that problem – and now I wonder why I didn’t do this many years ago. I think it was mostly because I lacked the confidence to enlarge the designs. I am pleased with the results so I am going to describe the simple process I used.
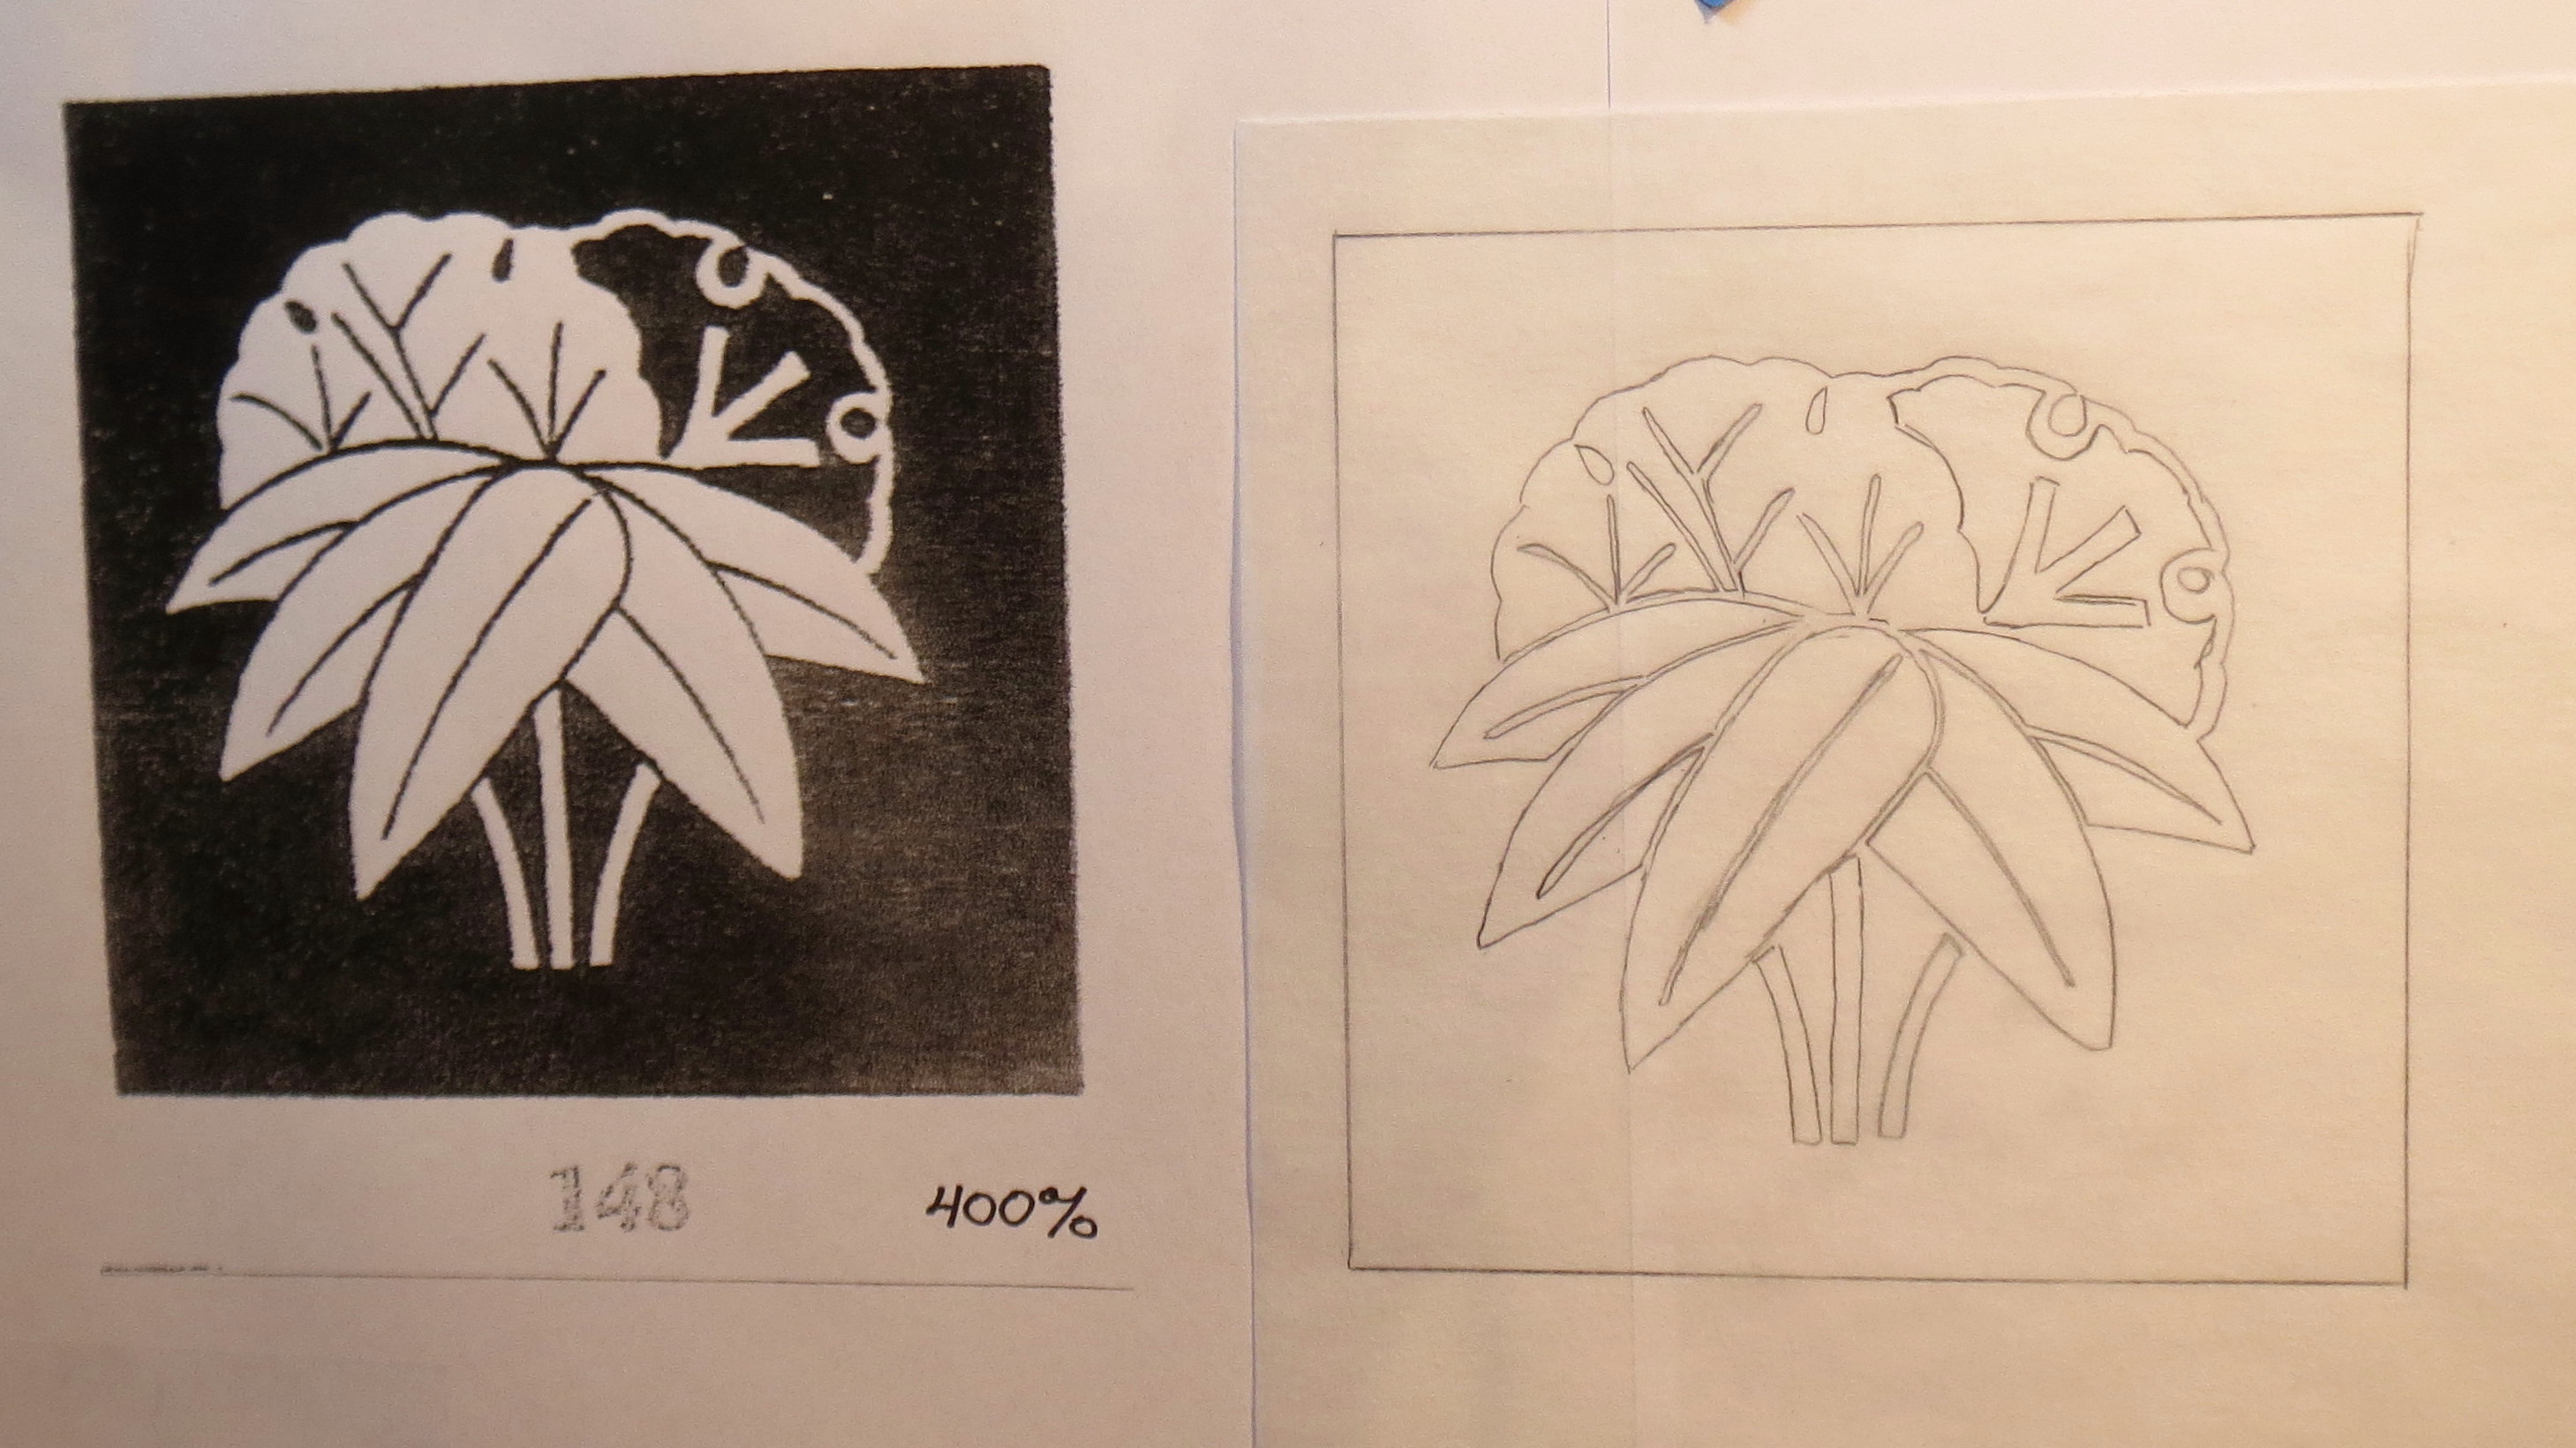
The source of my problem was that the pictures in the book are so tiny. Each kamon drawing is about 15/16 inch in diameter. How to turn that into a 9 inch design for a quilt block? The first photo below shows a page from the book with 25 different kamon, and the enlarged drawings that increased the size to about 3 1/2 inches. I had to enlarge it twice using my copier, since my copier is limited to a maximum enlargement of 200 % at a time.

Using a copier to enlarge the drawing
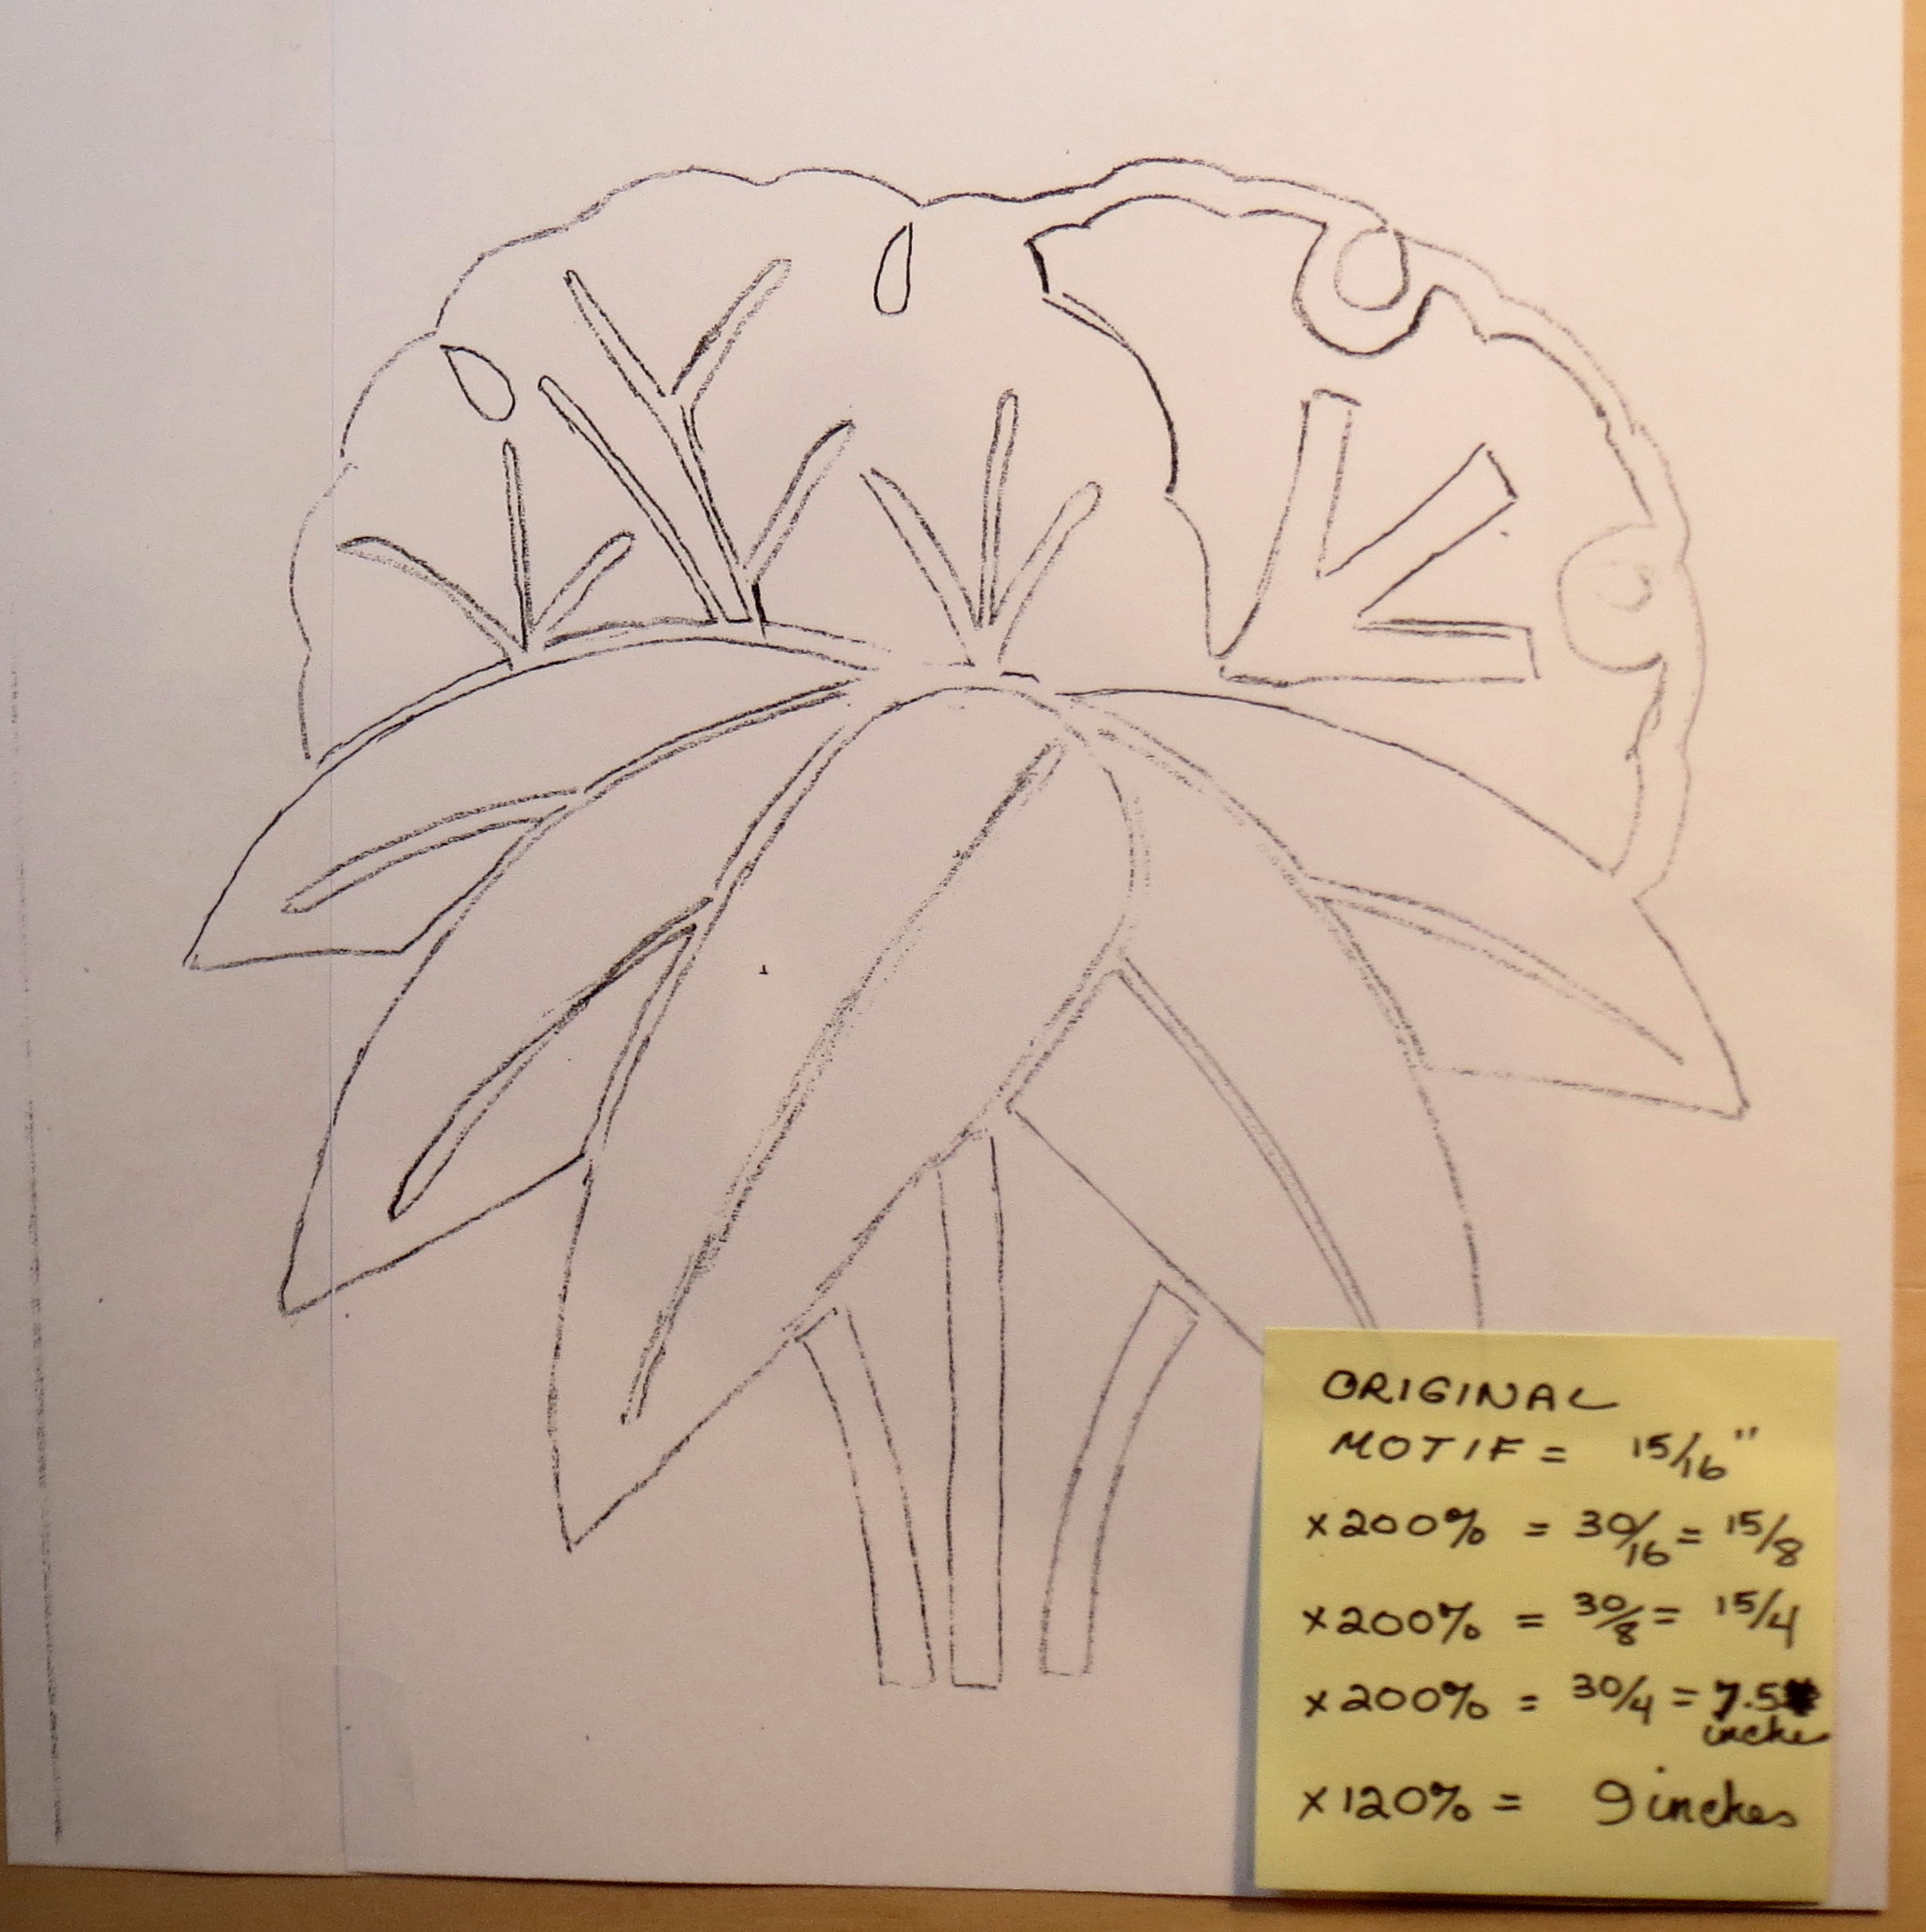
Next I put tracing paper over the top of the design and traced the shapes, as shown in the next photo. I did the tracing at this step primarily to switch the design from white on black to black on white, so I wouldn’t waste so much ink. This tracing was done with pencil (a good mechanical pencil is best). No point in getting very precise at this stage, so I did the drawing freehand. Be sure you have a good eraser on hand – I like the white ones because they don’t seem to leave a residue and they don’t get hard over time. The three different kinds of curves in the upper right of the photo can be used to get smoother curved lines; I used them later on the final drawing.
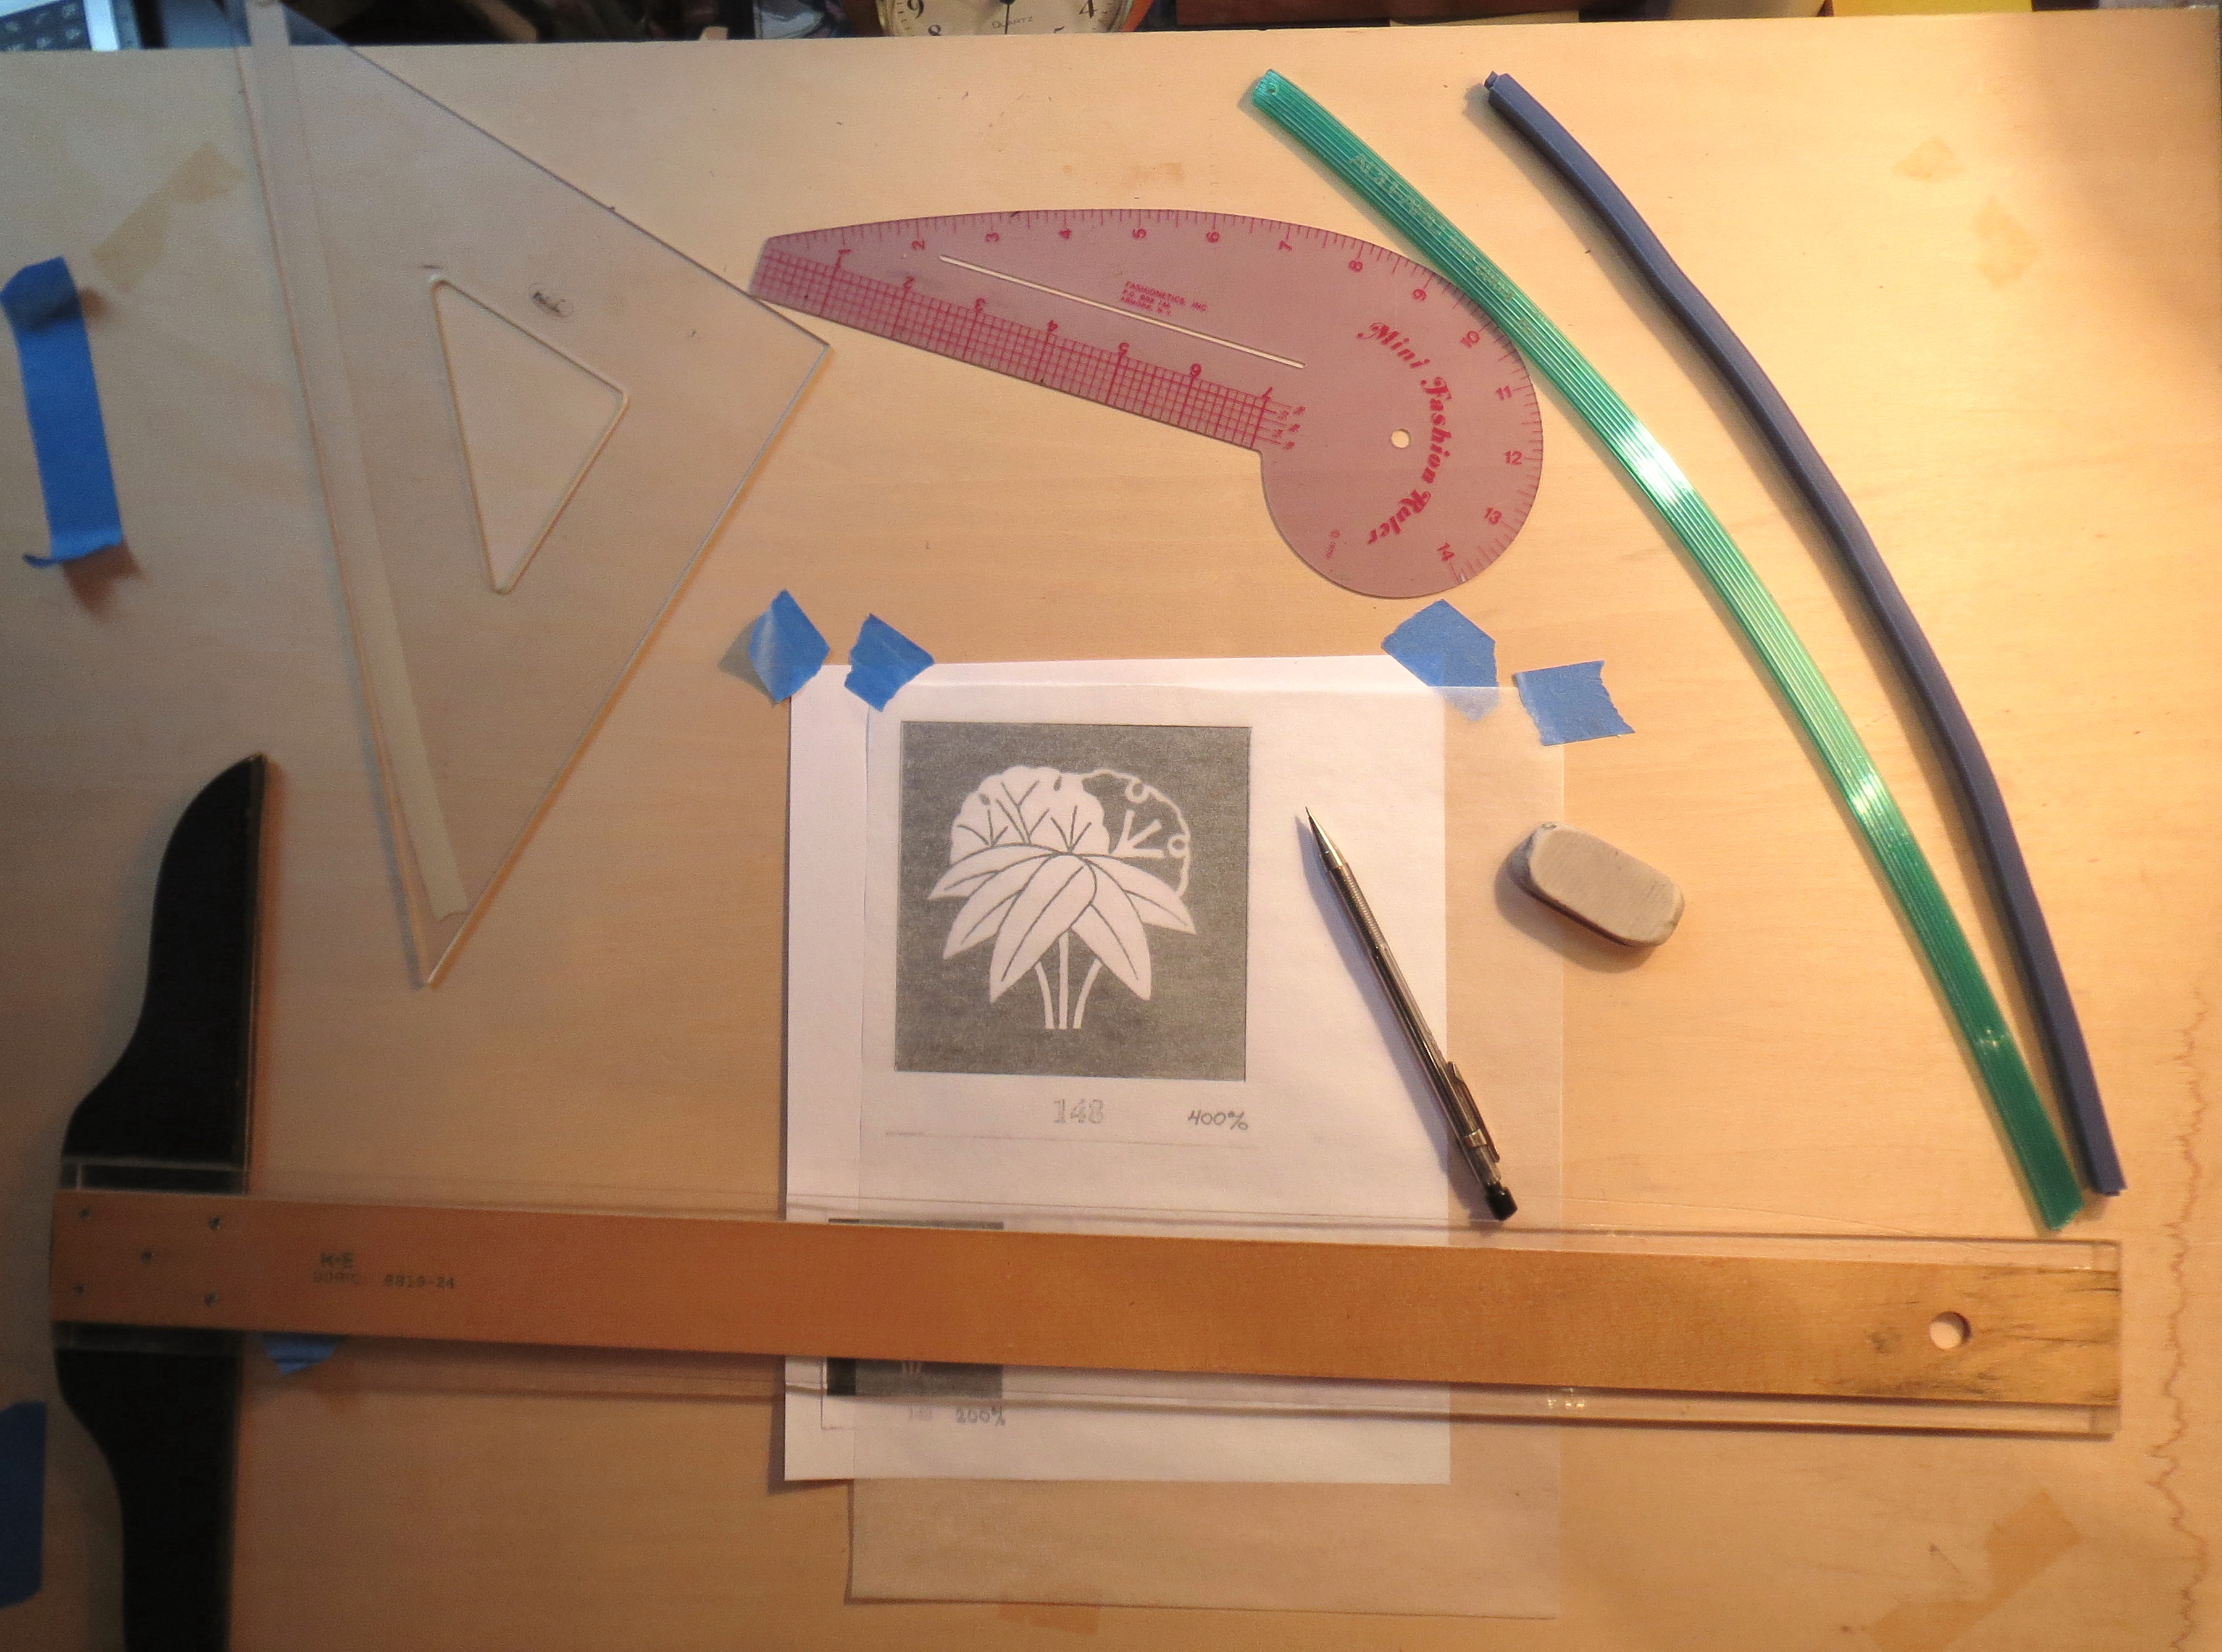
Tools needed for tracing the pattern.
The traced design is shown below.
Once the tracing was complete, I put it back into the copier and enlarged it another 200%. A few of the lines were faint and had to be darkened. The design was now 7 1/2 inches across. The final enlargement was at 120%, to get a 9 inch diameter design. Since I only have 8 1/2 inch wide paper, I had to copy the design in two pieces and tape them together as shown in the photo.
The full sized free hand design
Now I am ready to produce a finished design. I placed vellum on top of the copied design. Vellum is a higher quality drafting paper. It is still transparent but can stand up to more drawing and erasing than tracing paper. I actually taped the copied design to the back of a sheet of 11 x 17 inch vellum, using blue painter’s tape. The reason I did this is because it is much easier to draw a smooth curved line if you can rest part of your palm on the table while you draw the curve. This requires moving the paper frequently to get the curve oriented right relative to your hand, so taping the vellum and drawing to the drawing board doesn’t work very well. The photo below shows the vellum with the design underneath.
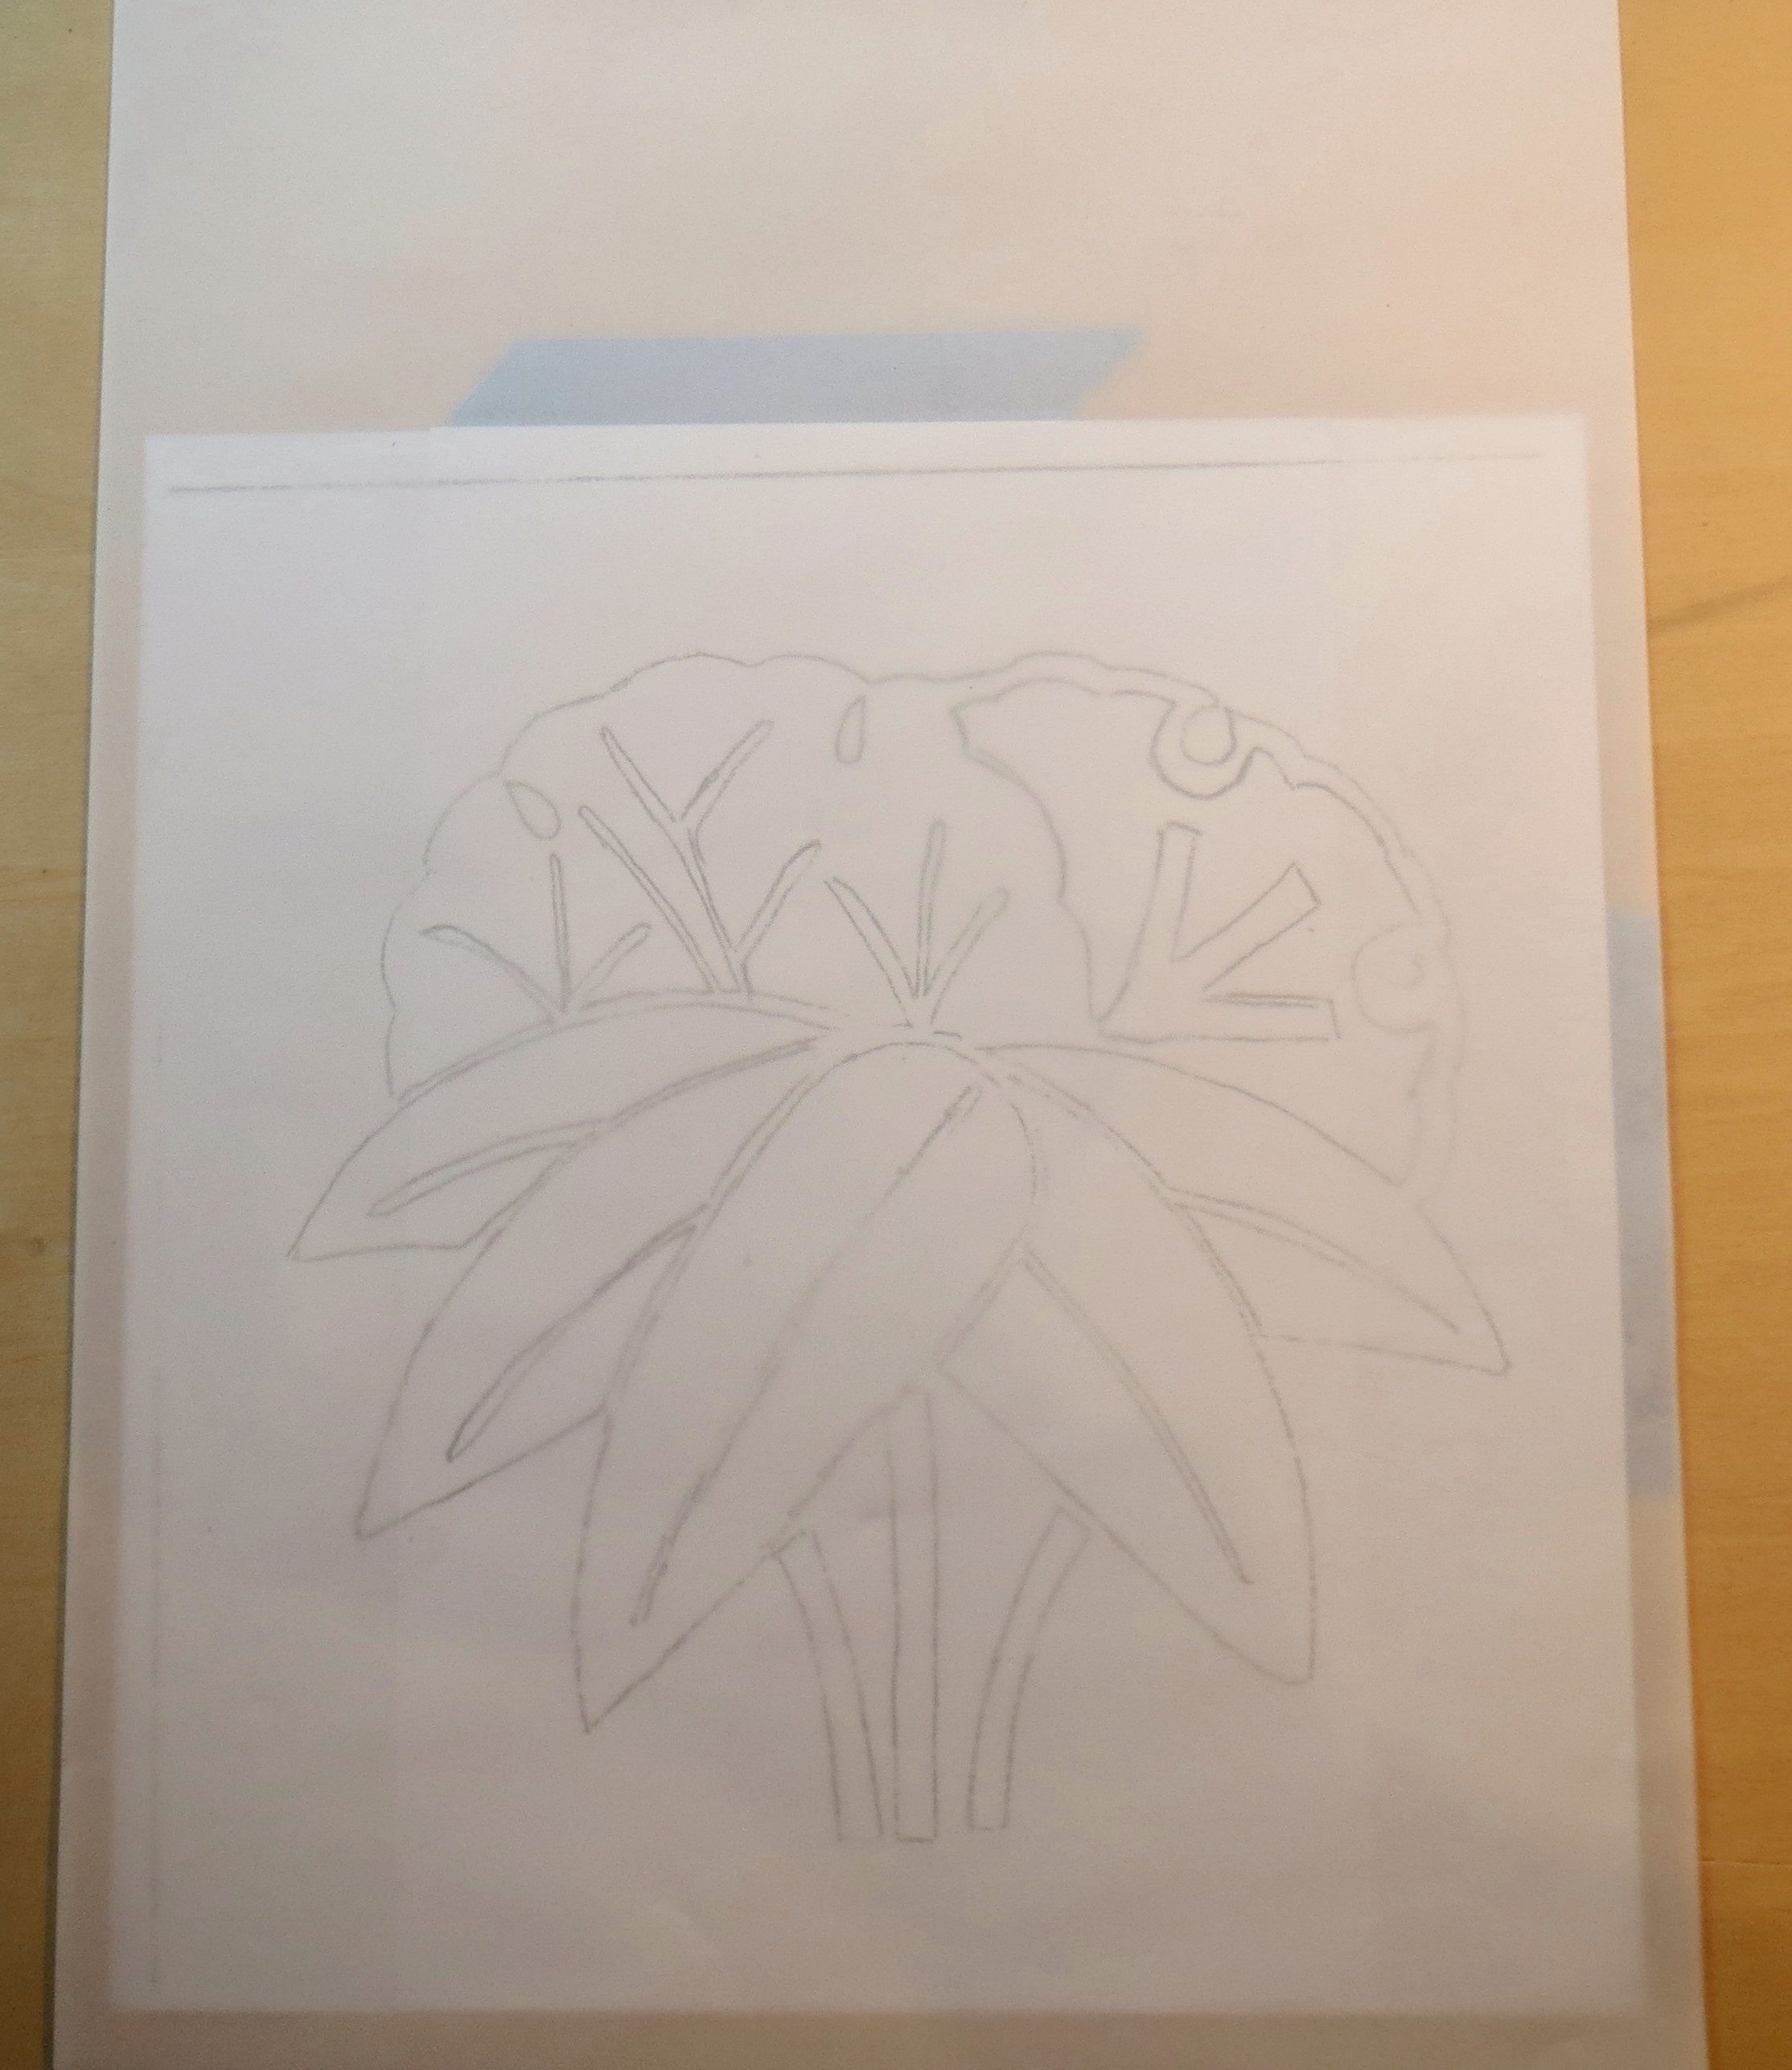
vellum taped on top of the full sized free hand drawing
Using a mechanical pencil and a curved template where necessary, I traced the design carefully. At this stage I modified the design slightly to get large enough pieces for applique, to get the spacing between pieces consistent, and to simplify the design where I could. Not much was required for this particular design – some of the others I have done needed more modification. So the photo below shows the completed pencil drawing.
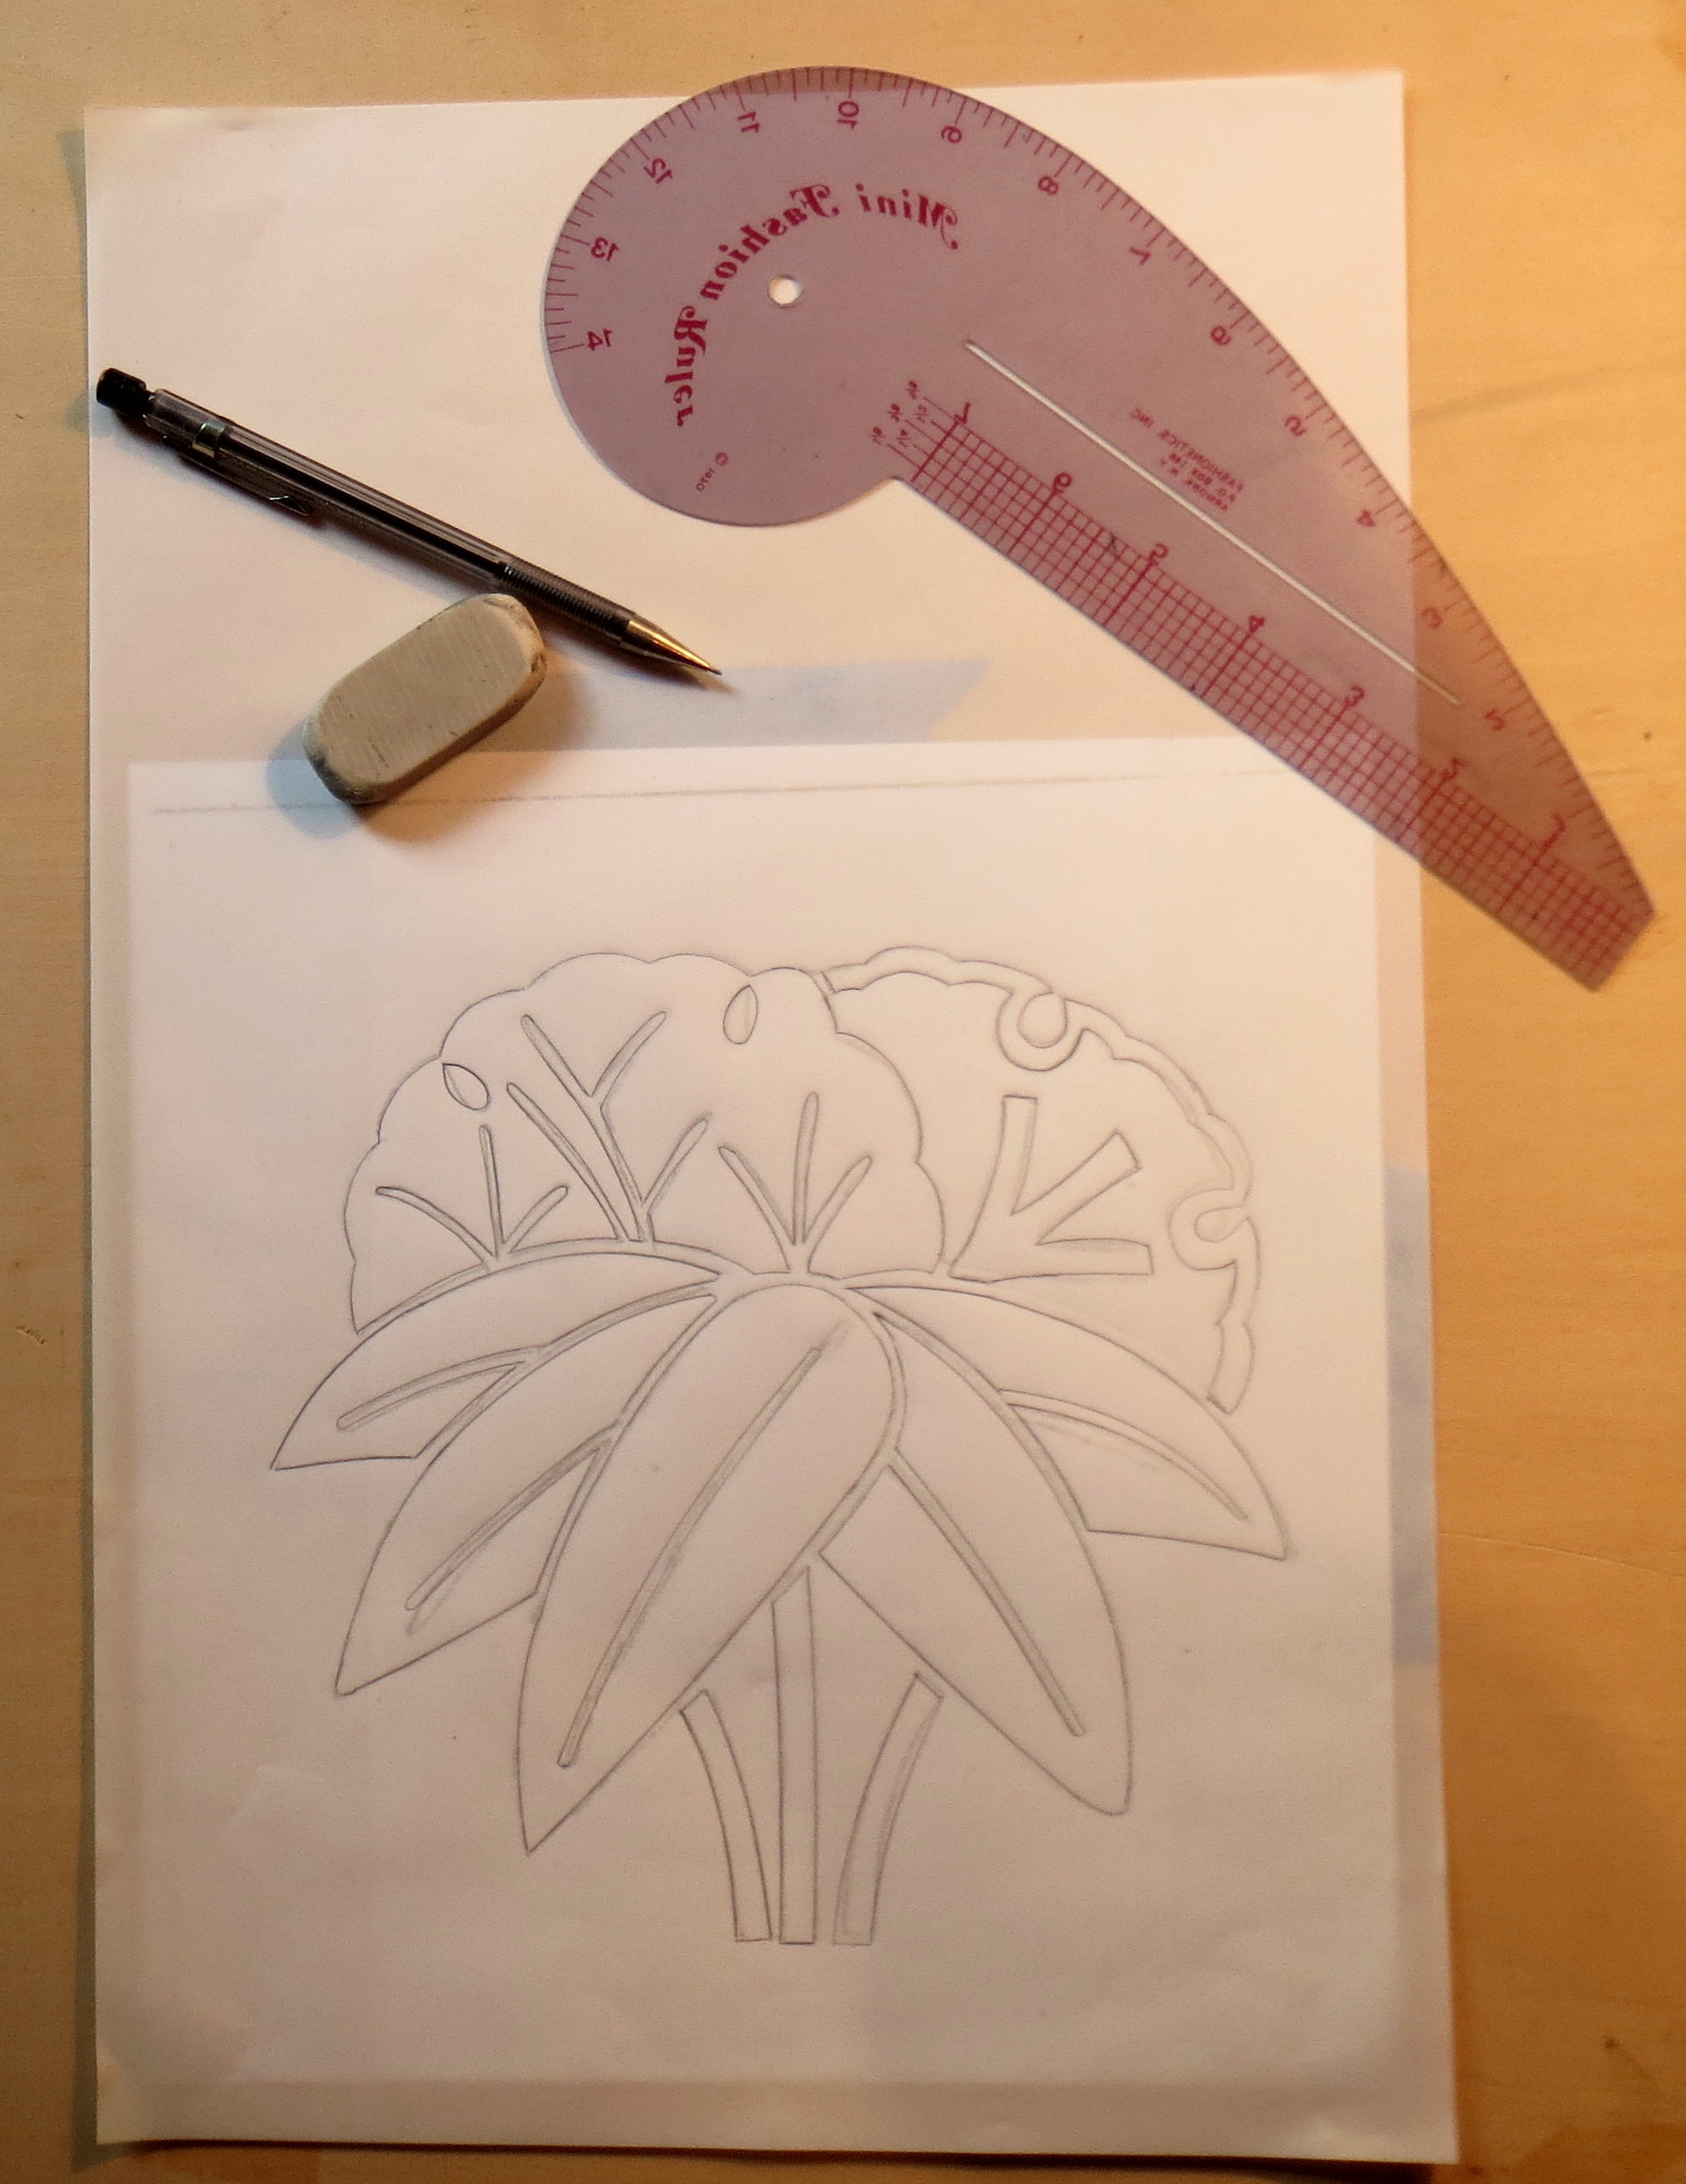
the finished pencil drawing
Although I could proceed using only a pencil drawing, I wanted a sharper (and permanent) design that would show through the vellum (since the fusible web I am using requires me to draw the pattern pieces in reverse). So I used a .05 black Sakura pigma pen to draw the lines again. The resulting ink drawing is shown below. I numbered the pattern and also labeled the reverse side so I wouldn’t get confused.
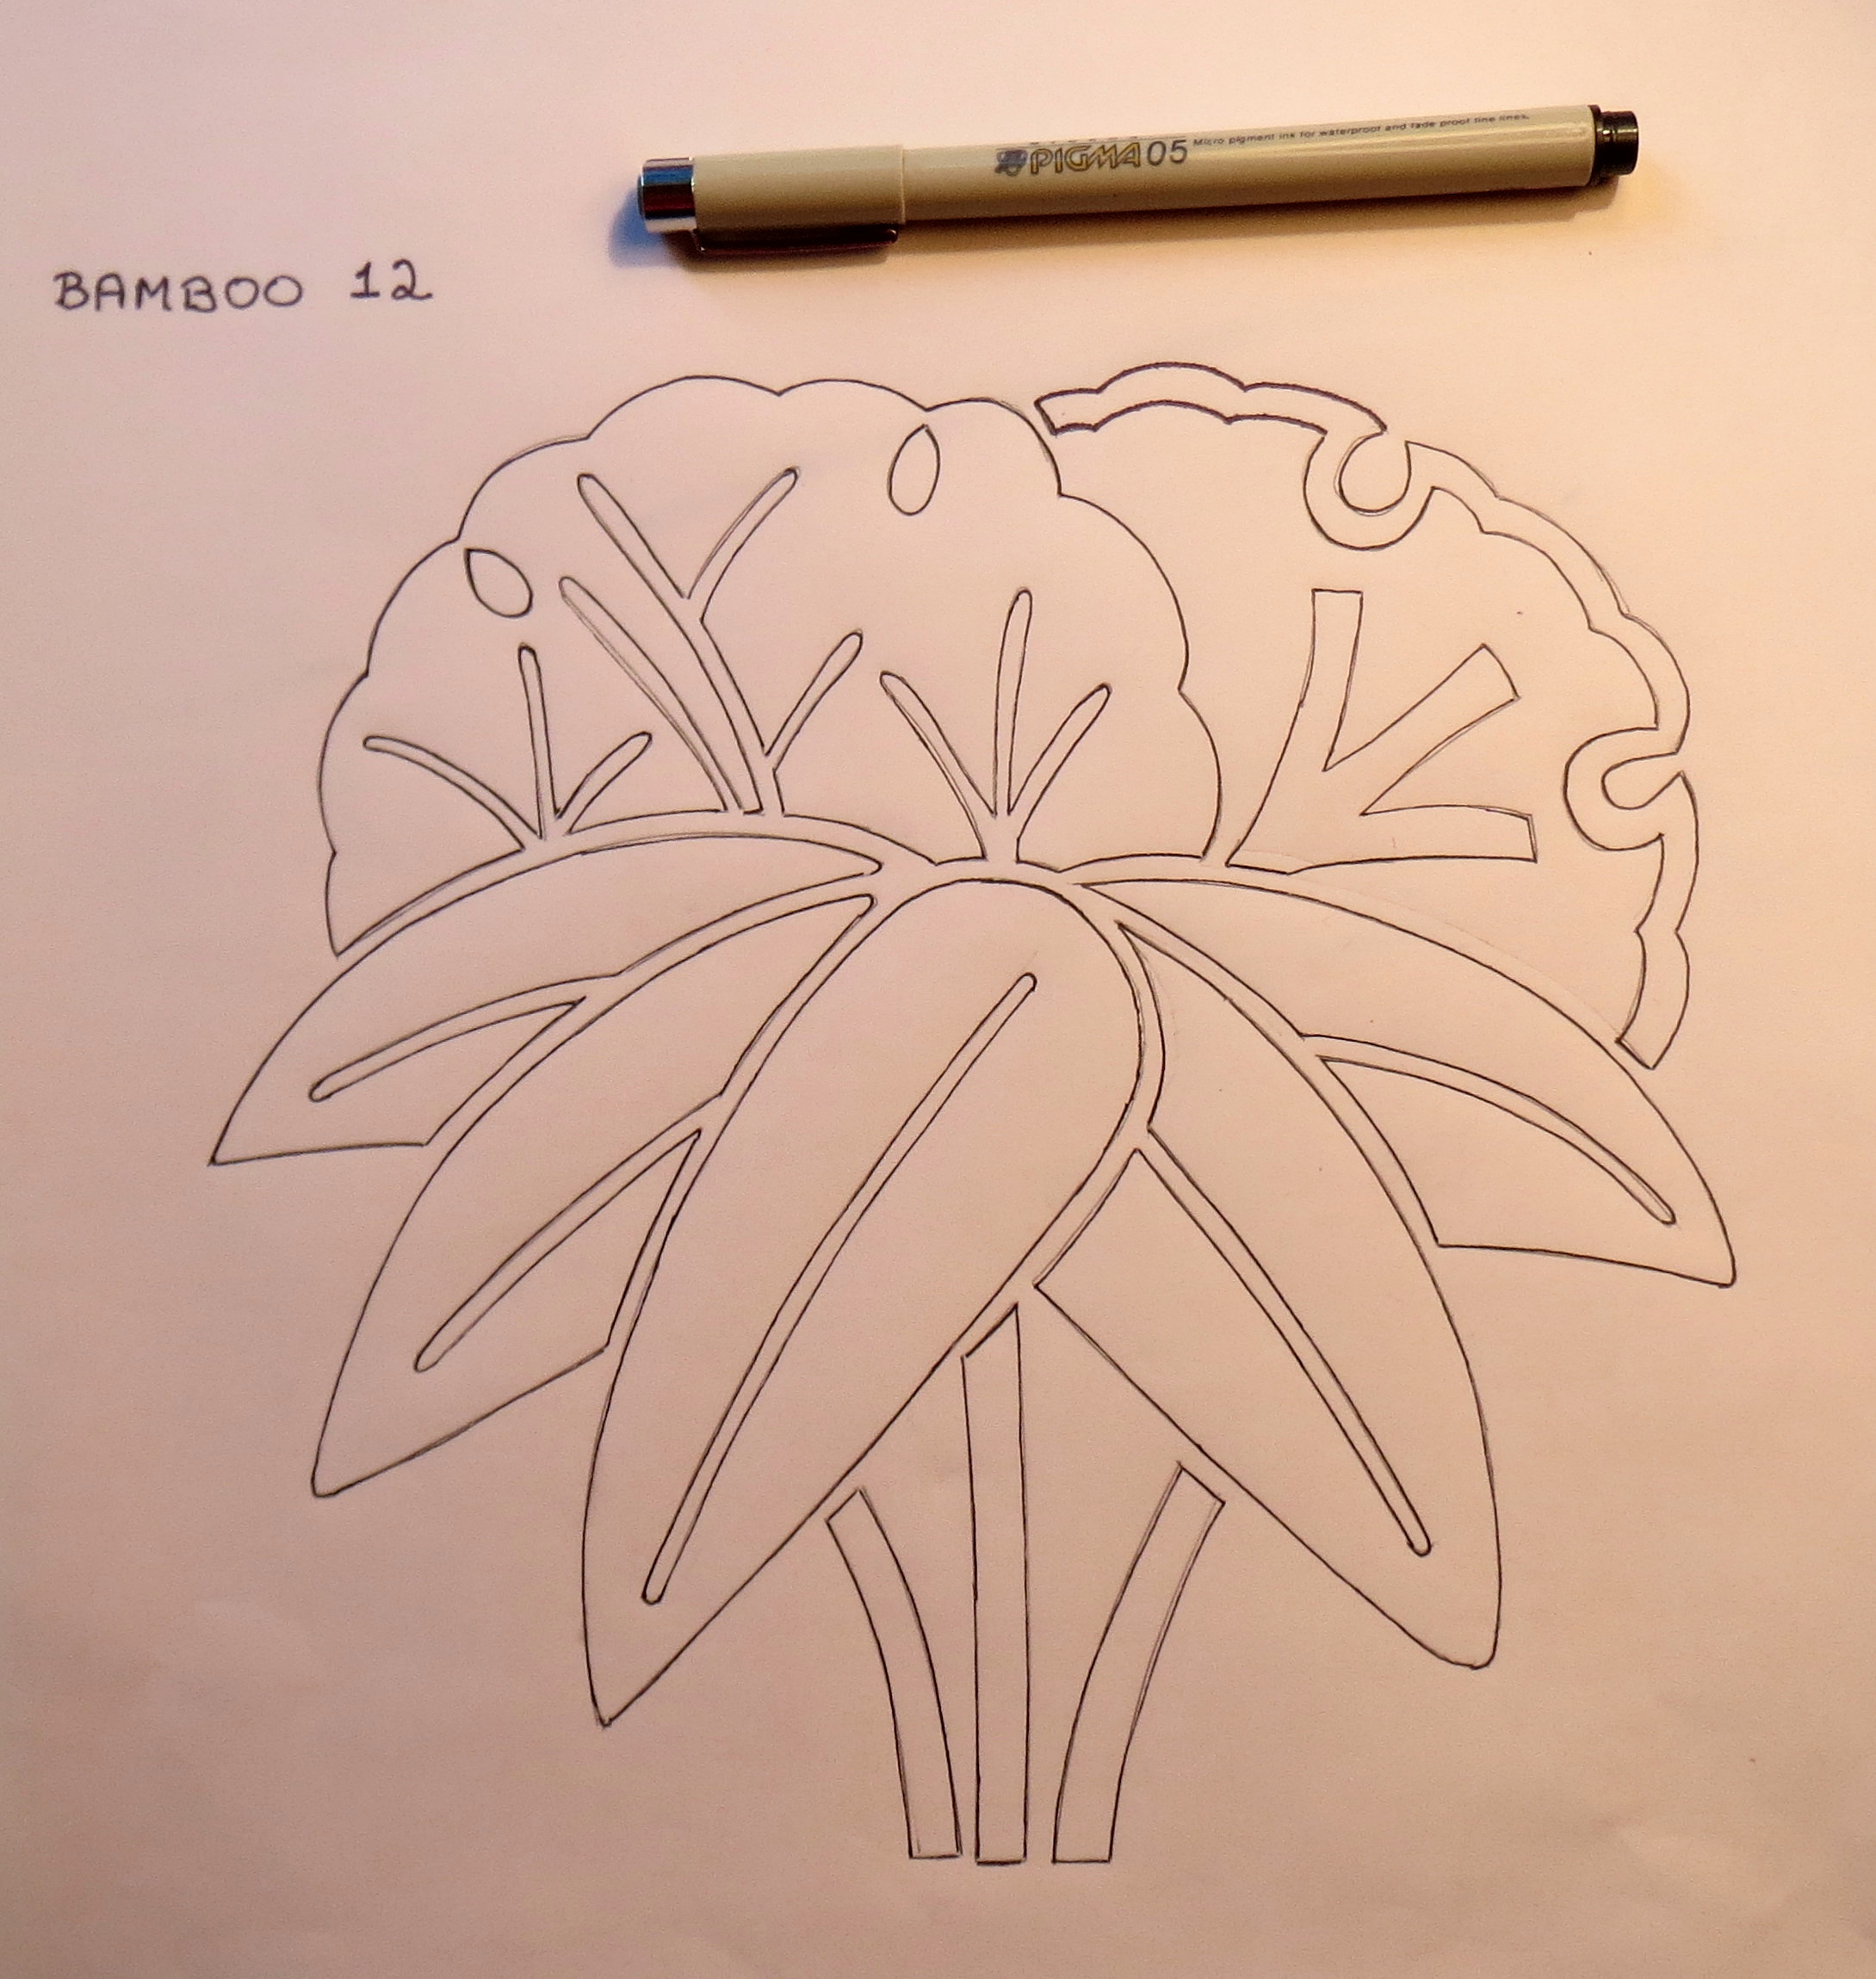
the inked drawing
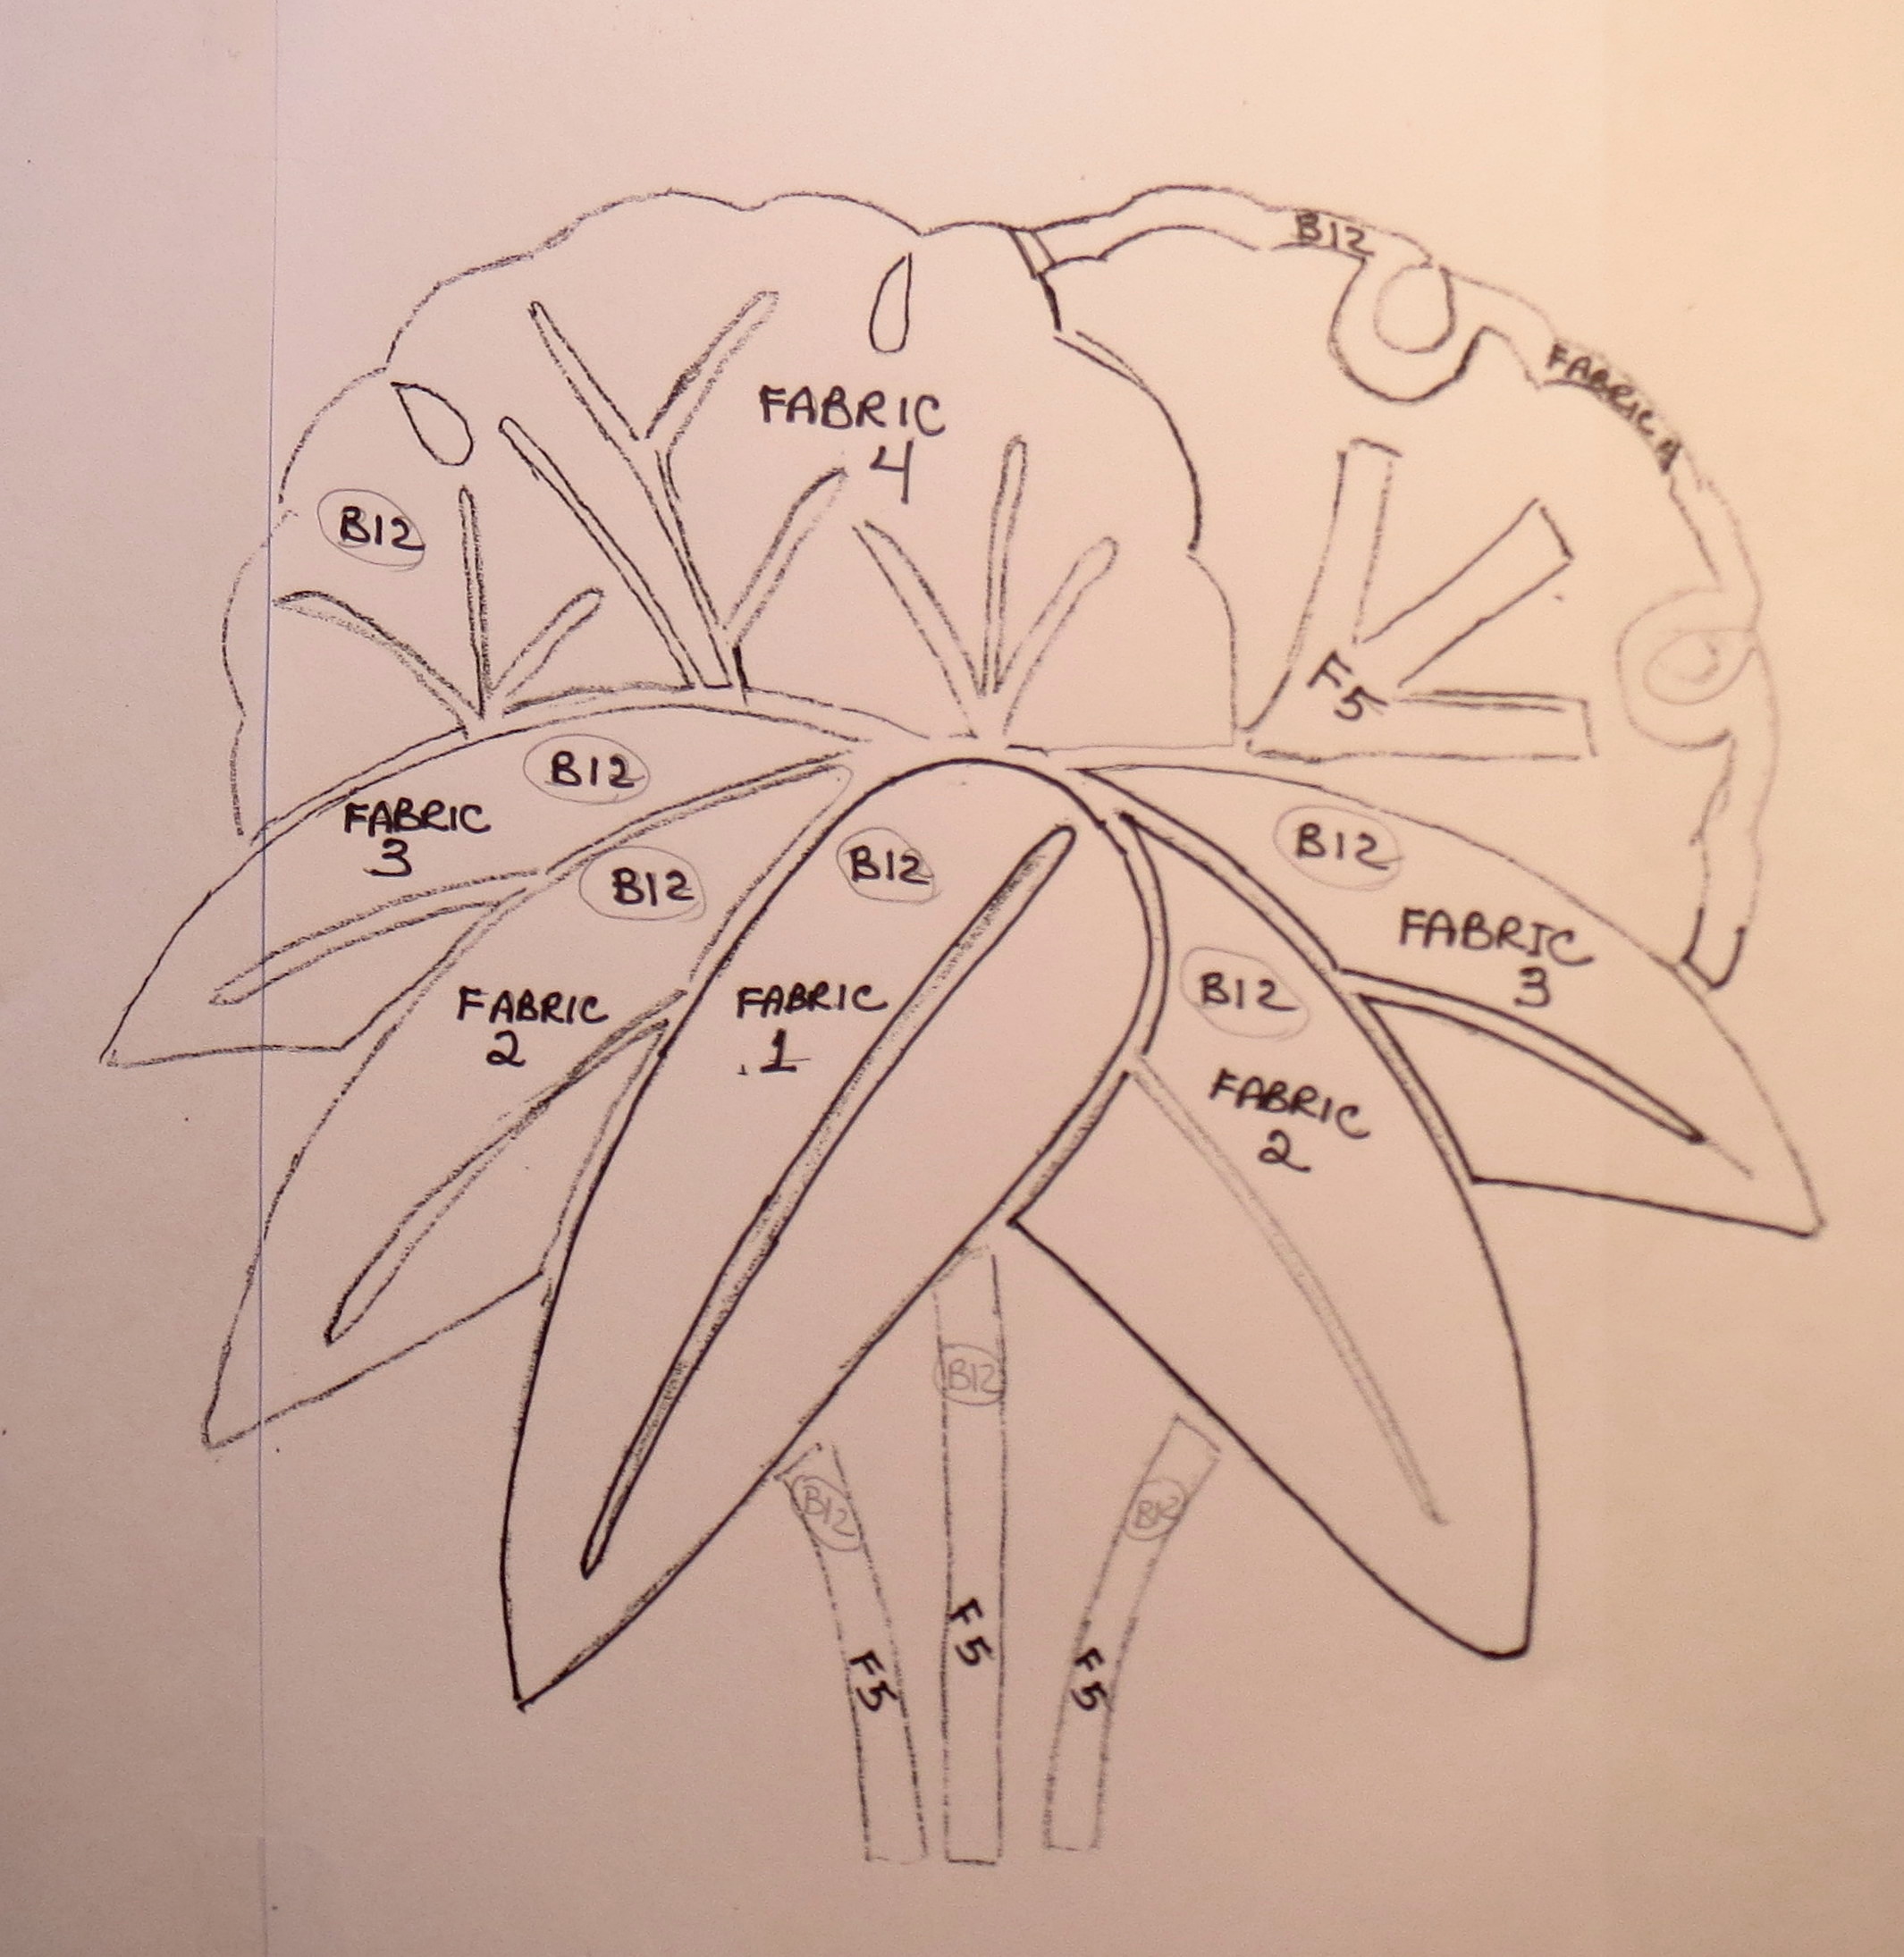
Each pattern piece should be labeled with the pattern and the fabric to be used. For this design, the pieces are labeled “B12” because this is the 12th bamboo pattern I have drawn. I chose which pieces would be made from one fabric, and then labeled them 2a, 2b, etc where the number is the fabric number and each piece using that fabric is separately identified with a letter. As shown below for this pattern, I wrote these labels on the original pattern copy before the final drafting and used that as a reference as I traced the applique pieces.
Then I placed the design right side down on my light table (which is a piece of plexiglass held up by some wood 2×4 scraps). I slide an Ott light underneath, which has to be moved around a bit to light up the part of the design I am working on. Then I placed some Steam A Seam 2 on top, making sure the adhesive was fastened to the paper side that I am tracing on. I drew all the pieces that will be made from the same fabric together and transferred the pattern, fabric, and piece numbers to each piece. The pieces for this block pattern are shown below.

pattern pieces transferred to the fusible web
I cut the fusible web in sections to keep all the pieces using one fabric together.
The unmarked paper is then peeled off and the tacky side placed on the wrong side of the chosen fabric. The Steam A Seam and the fabric are cut on the outside lines of each pattern piece, using very sharp fine scissors.
The overall block pattern is replaced back on the light table with the right side up this time. The background fabric for the block is placed on top and centered. The paper is peeled off a each applique piece just before it is put into position on the background. Once all the pieces are in place, the block is carried to the ironing board and fused in place following the manufacturer’s directions. The photos below show a couple of my fused blocks.
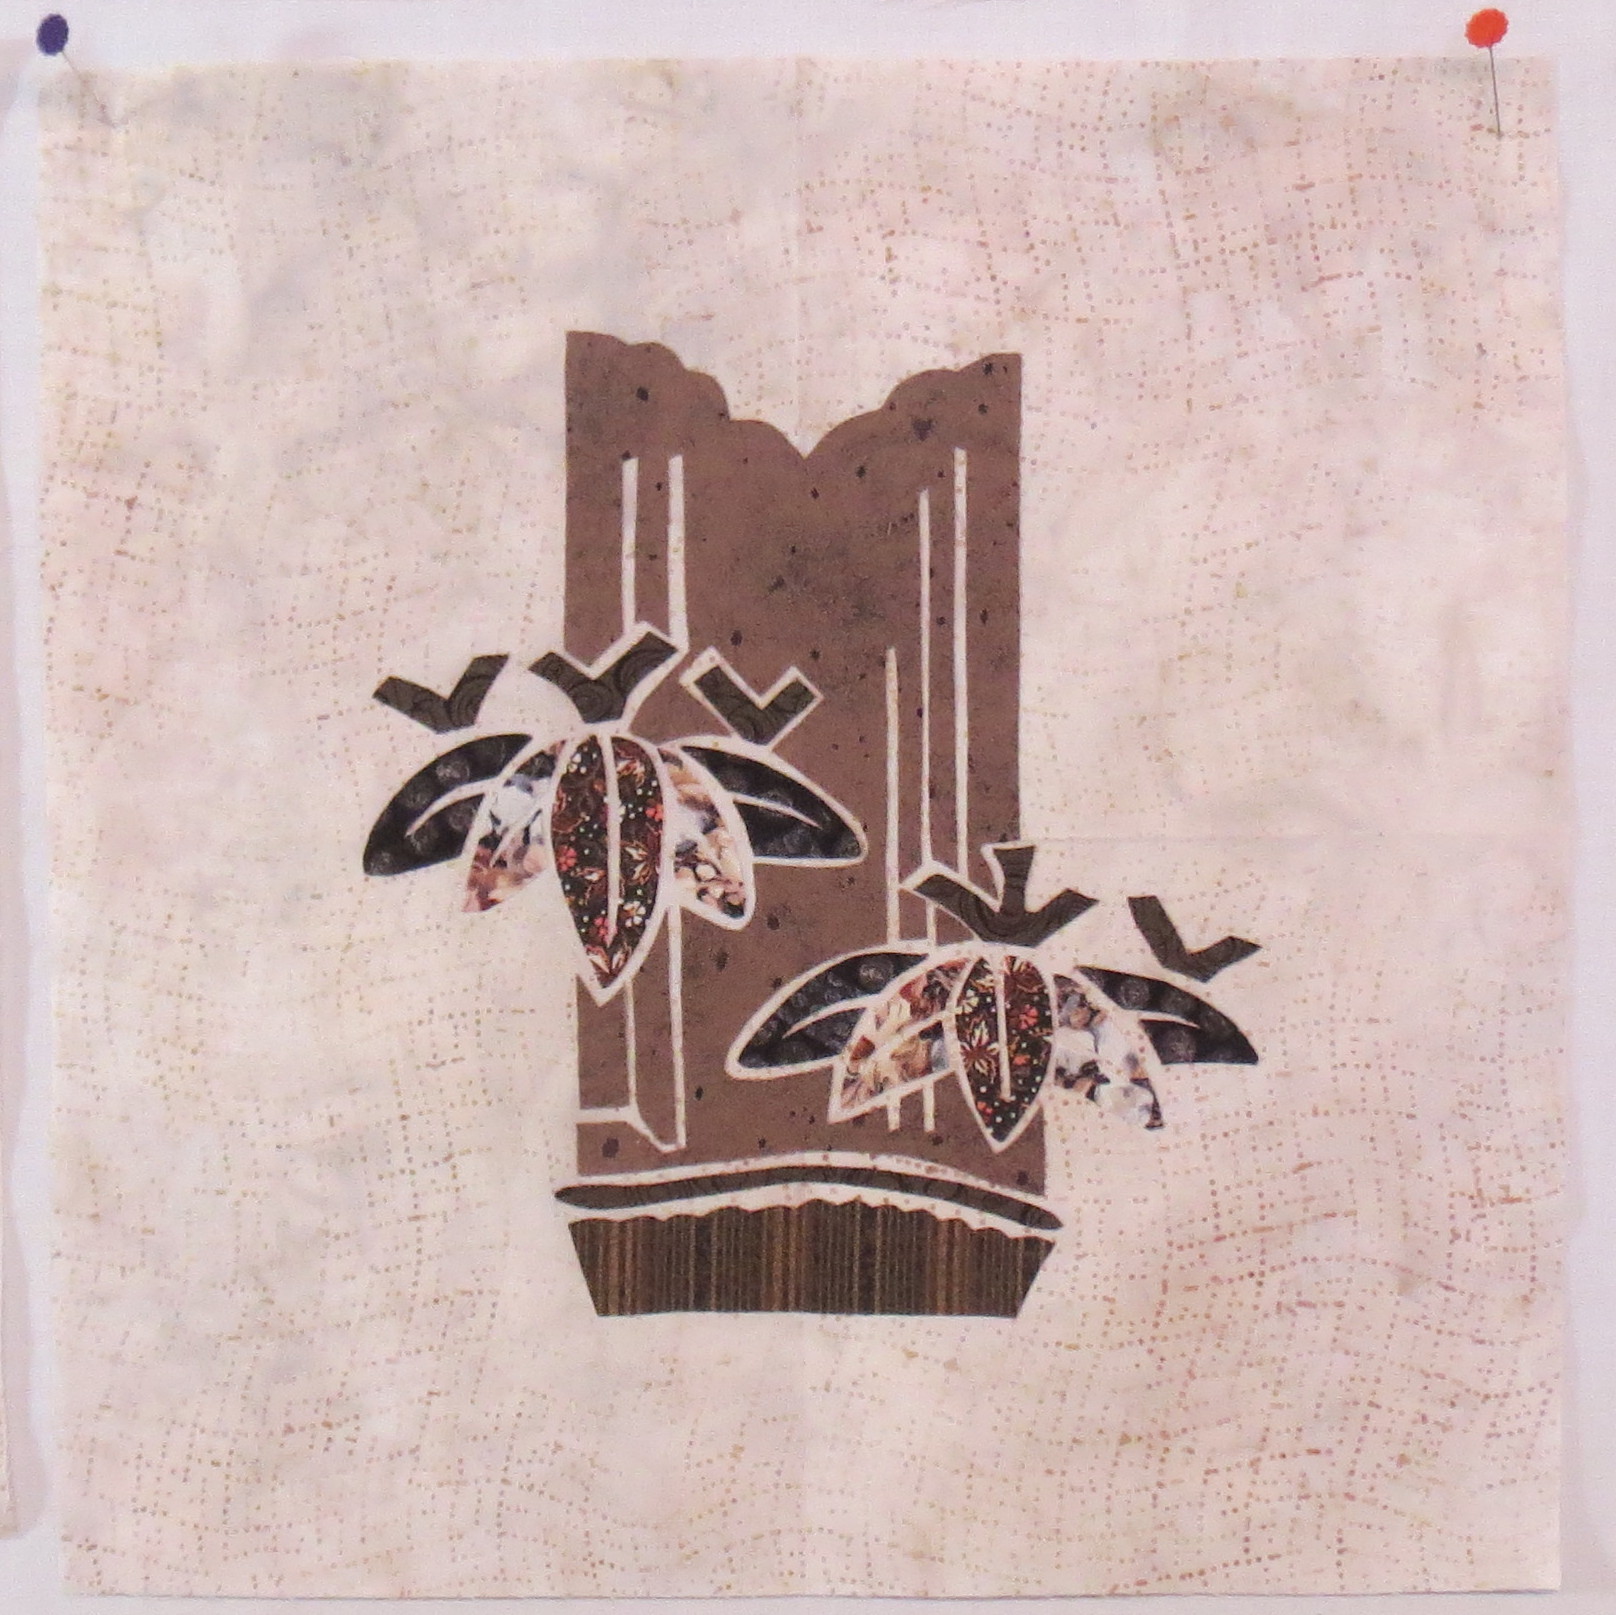
Fused bamboo kamon block
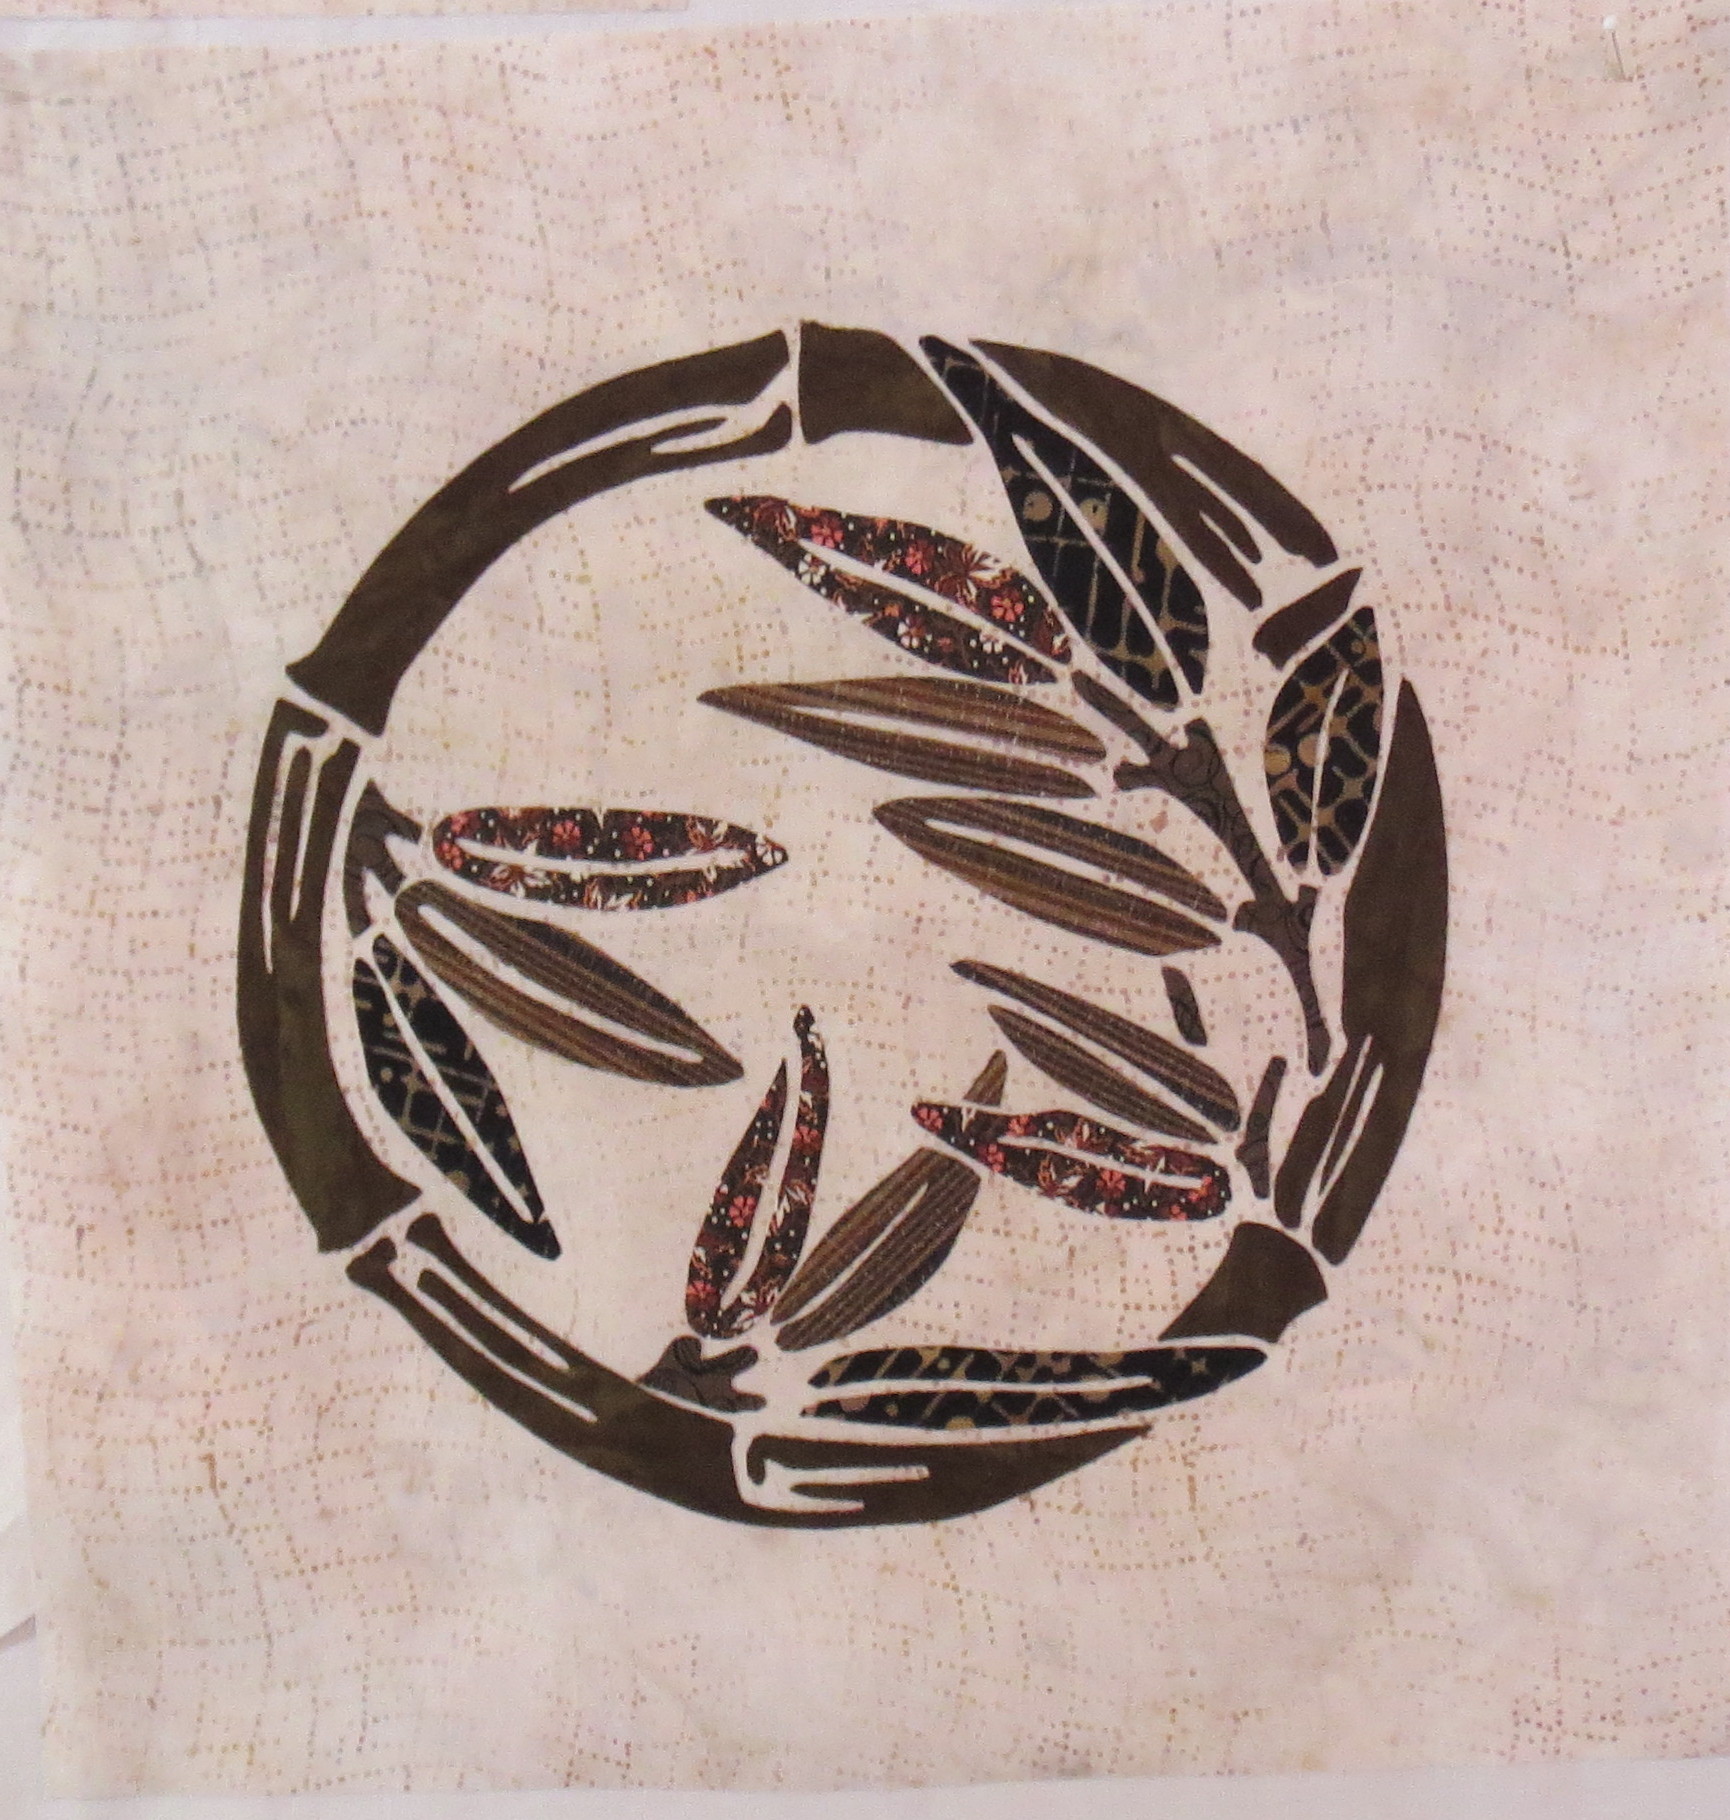
second fused bamboo kamon block
Still lots to be done, but I like the look of these blocks. I have fused the six light background blocks. The remaining blocks for this quilt will have a dark background. The fabric is backordered so I am hoping it will arrive shortly and I can complete the remaining blocks. In the meantime I can stitch down the edges of the applique on the first six.
Last spring I took an online art quilt class at Quilt University from Marilyn Belford (www.marilynbelford.com) . I posted photos of some of my class homework at the time. I have finally completed several of these class projects and am including photos here. All of these projects were done on fusible web. As a reminder, each project started with a large shape such as a circle, triangle, or rectangle being cut out of one fabric (with fusible web attached). Then that large shape was fractured into a bunch of smaller shapes, which were then “stretched out” on top of a second fabric and fused down. For the later exercises, shapes were cut from more than one fabric.
I did a lot of these exercises in the class and I still have three more to finish. In all cases, the little quilts were completely finished from my fabric stash. For the finished projects shown here, most of the pieces were machine appliqued using a fine thread and a small blanket stitch.
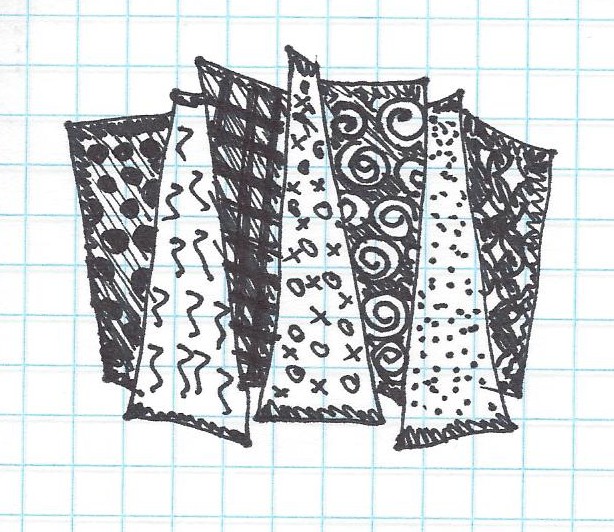
And now the quilts. This first one has “fractured” triangles and other assorted shapes:

Multicolor geometric shapes
And the next one has a fractured circle and fractured triangles:
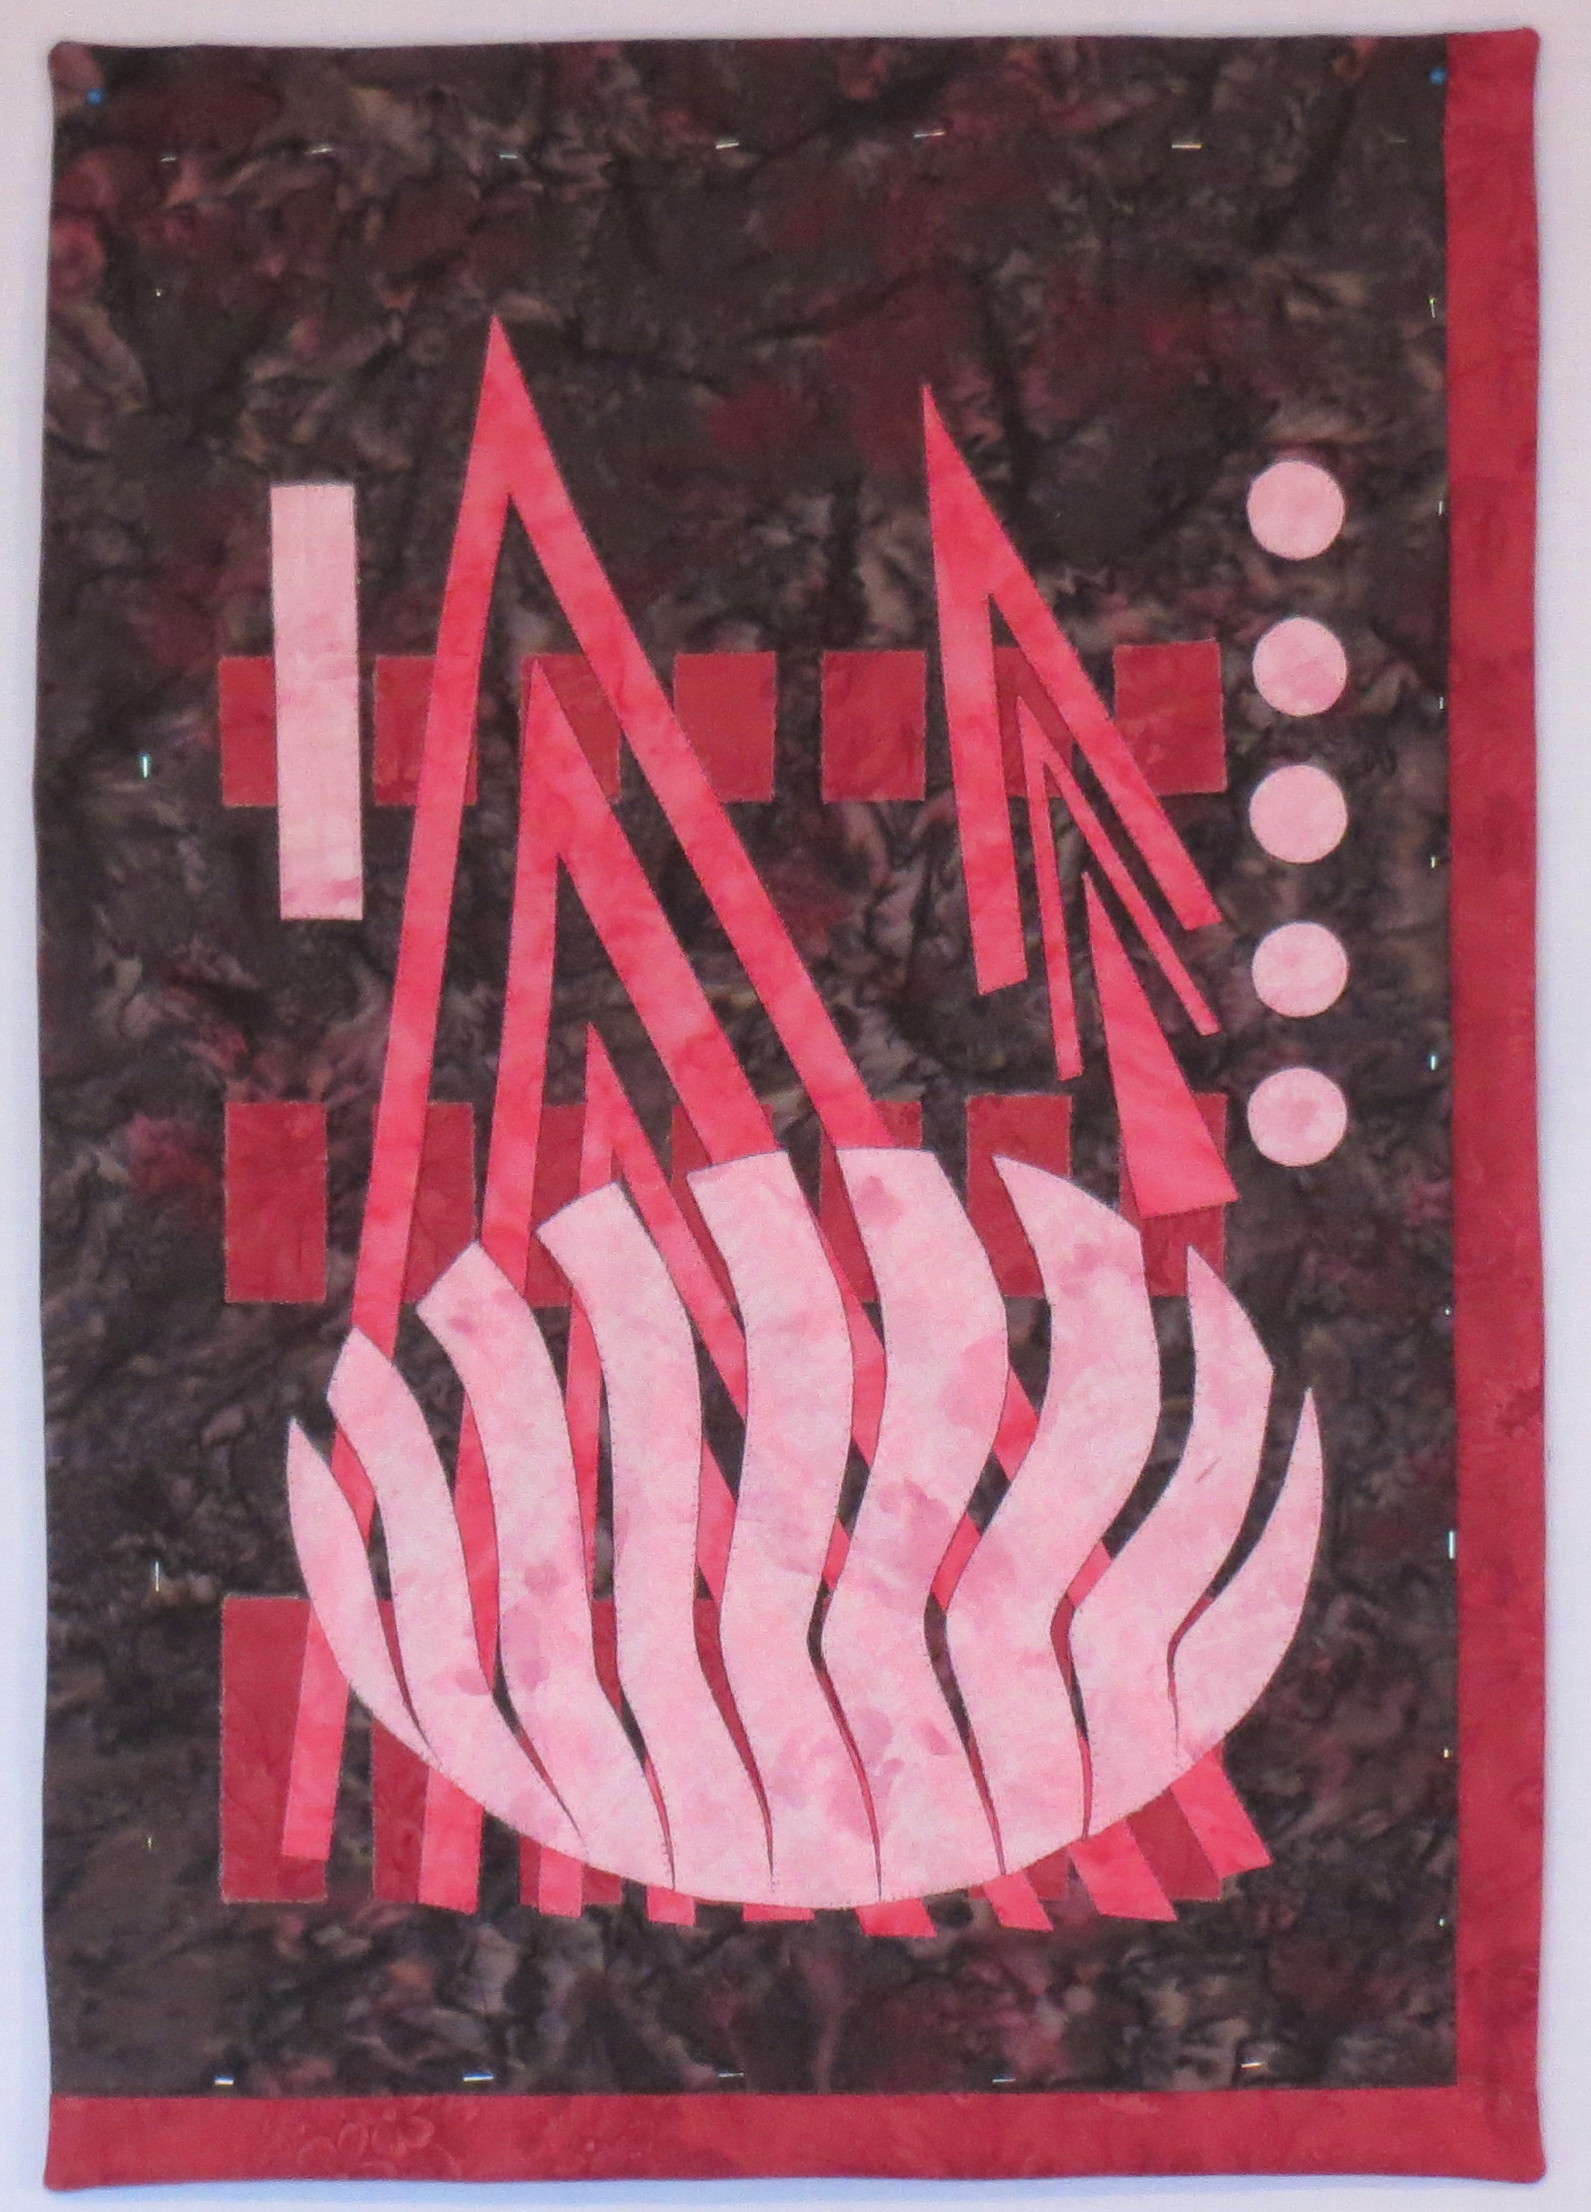
Circles and Triangles
And now one where the assignment was to think of a feeling and express it using simple shapes. The feeling I used was feeling “unbalanced”:

Unbalanced
And the last one was an experiment (I don’t think this was actually a class assignment, but I could be wrong) where I decided to try simplifying an animal shape while retaining the “essence” of the animal so that it would be recognizable. I used bald eagles because they are so recognizable and also because they roost in our trees here and we often see them performing acrobatics in the sky.
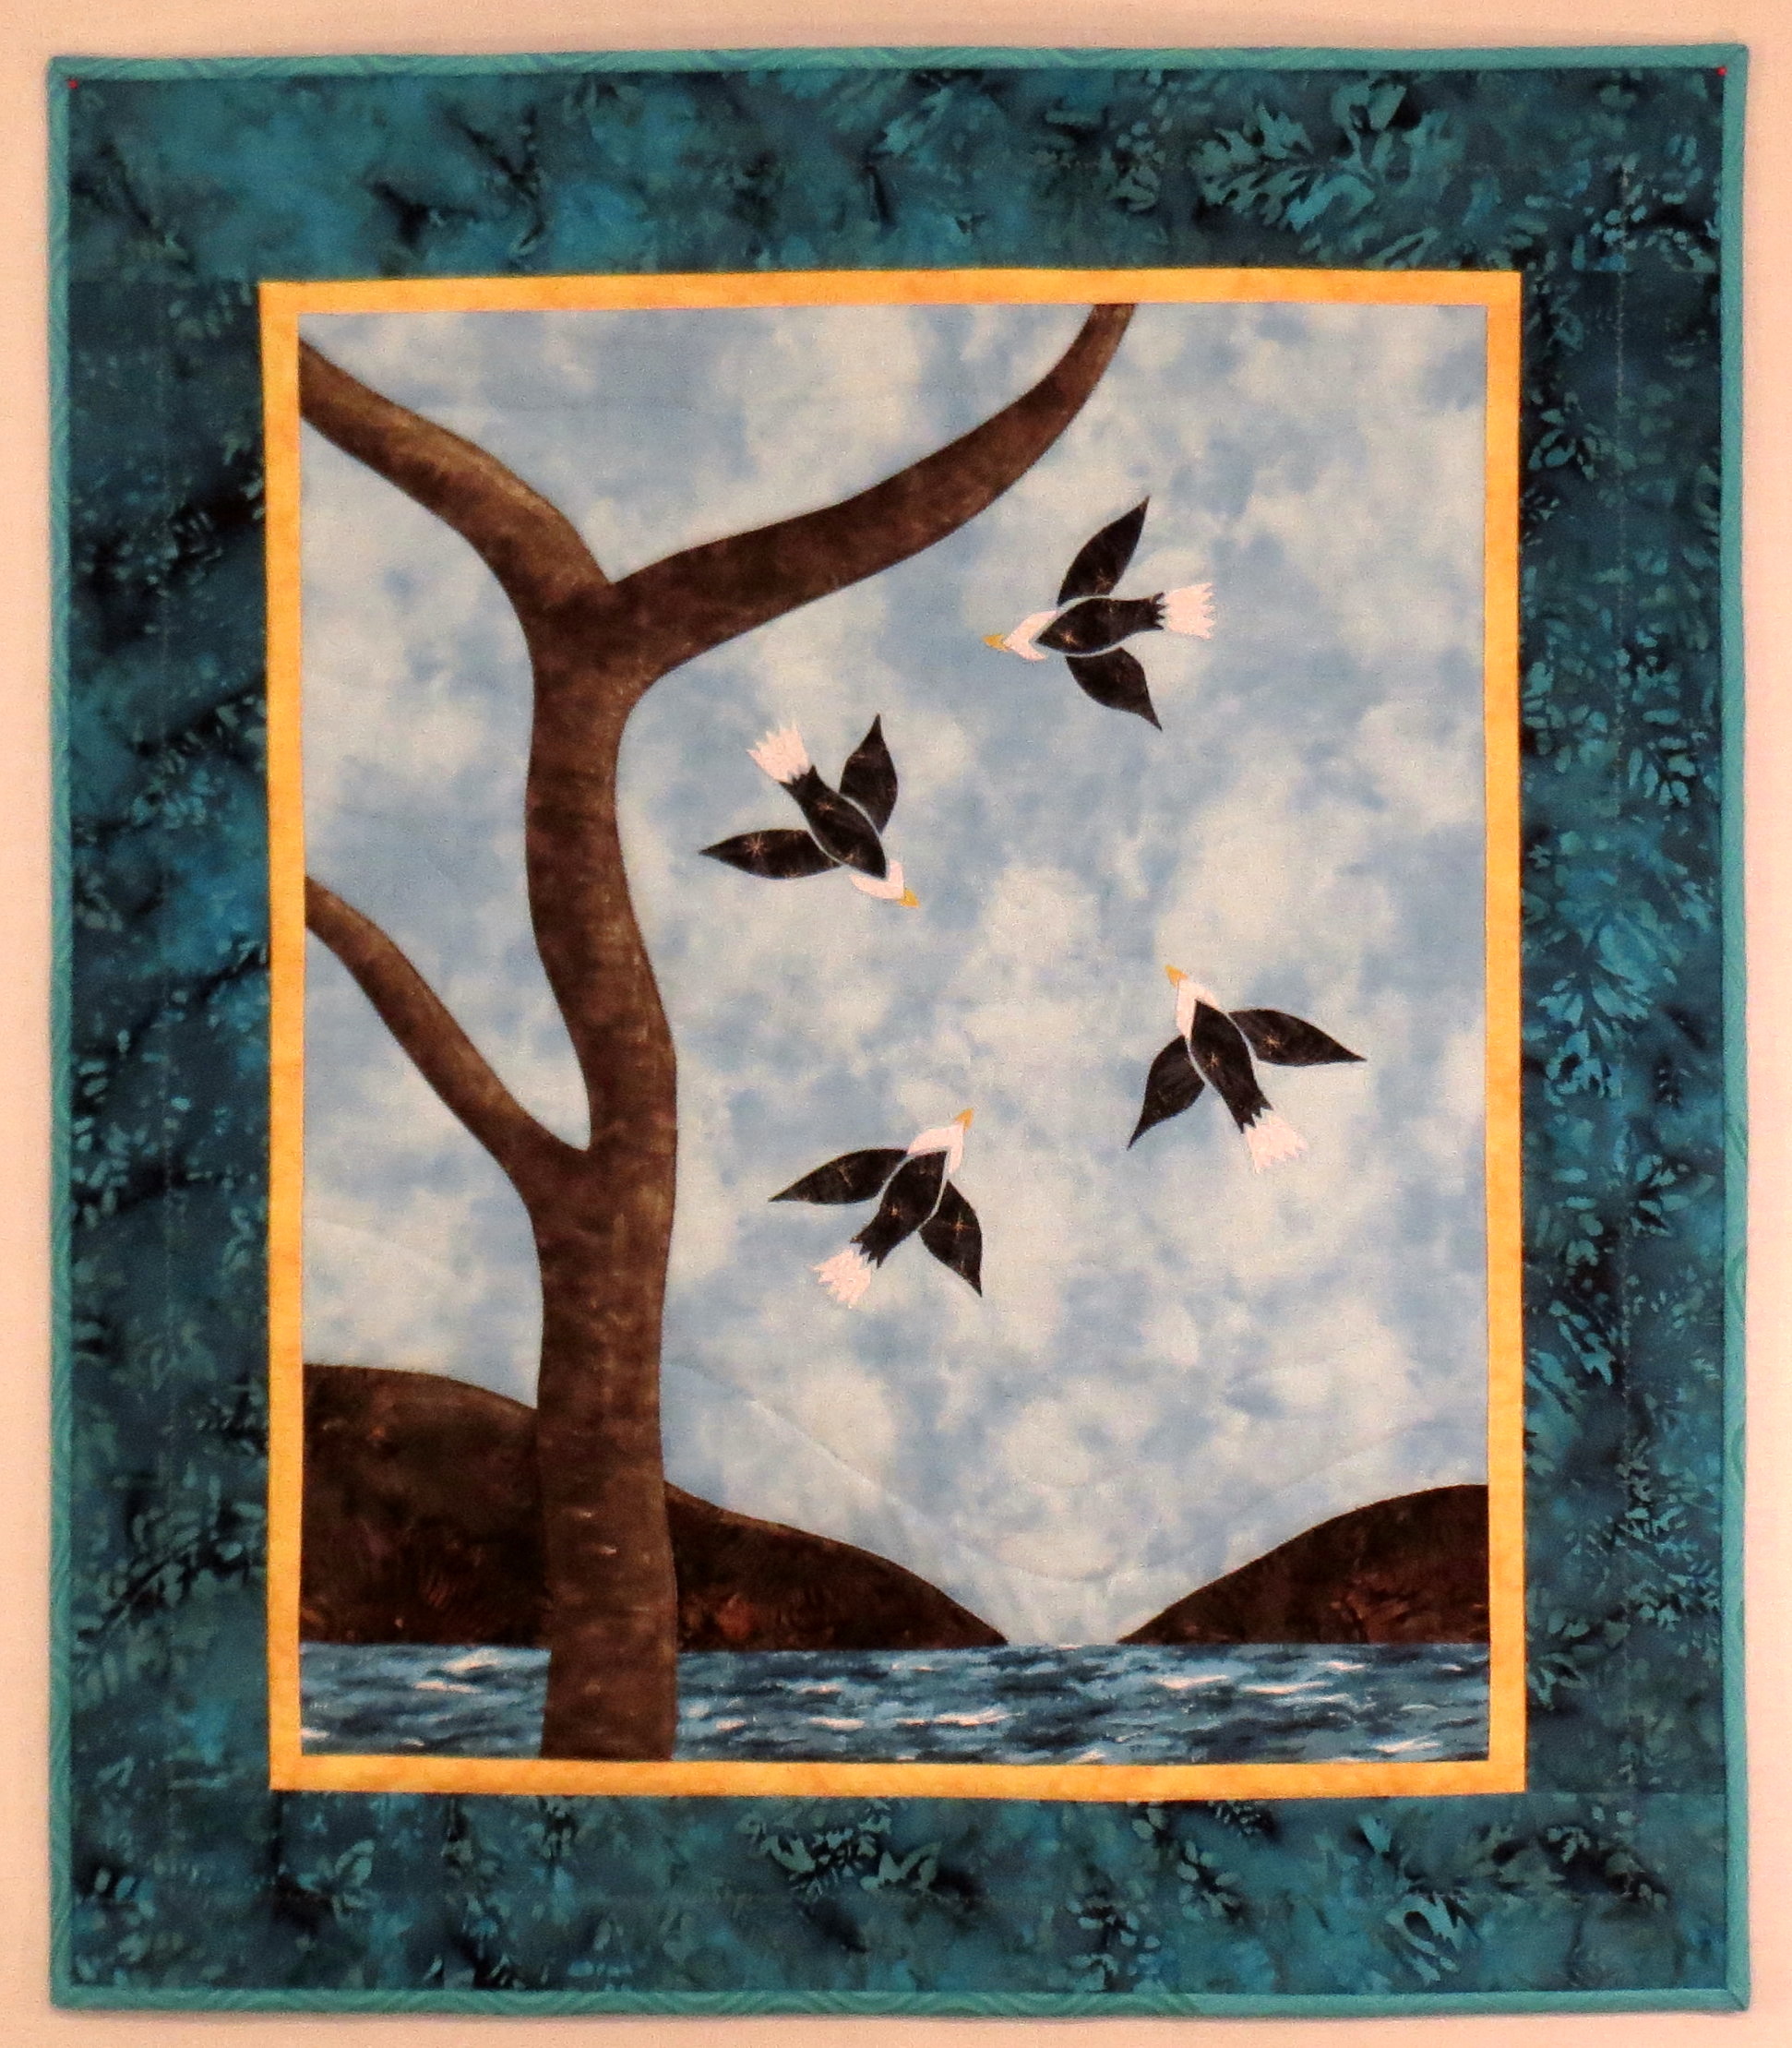
Acrobatic eagles
I used a gold metallic Shiva Paintstik to add some dimension and shading to the tree. It worked fairly well considering my lack of painting experience. The one negative is I can still smell the paint on the quilt — but then it has only been two days, so perhaps it will go away with time.
I really like these little abstract quilts. The question is, what do I do with them now? I don’t believe they are very marketable. My cousin, who is an abstract painter, tells me that abstract art is a tough sell: 90 % of all people aren’t much interested in art; of the remaining 10 % who do like art, 90 % aren’t interested in abstract art. So selling a good landscape painting (or quilt) is going to be a lot easier than selling abstract art quilts. Good thing I don’t have to make a living with my quilts!
I am pleased to announce that the Quality Sewing and Vacuum store in Silverdale, in addition to offering several of my classes this fall, has asked me to present a “Meet the Author” event at the store August 7, 2013 from 10:00 am to 12 noon. I will present a trunk show of quilts and talk about the inspiration behind the quilts, plus briefly demonstrate some binding and quilting techniques that are included in my classes. If you are curious about the classes but not sure they are right for you, this is a good opportunity to get more information.
There will be lots of time to ask questions, and to sign books for those who are interested. I will be offering several books and patterns as door prizes, and the store will offer refreshments. Contact the store directly to reserve a spot or ask any questions about the event.
Quality Sewing and Vacuum 10876 Myhre Place NW, Silverdale 98383
Phone: 360-692-2992. web site: www.qualitysewing.com
I will be teaching my Pieceless Applique class at Sleepy Valley Quilt Company in Port Angeles in September and have been preparing a couple of samples for display in the shop. The first sample is using a block from Liz Jones’ book, Flowers, Hearts and Garlands:
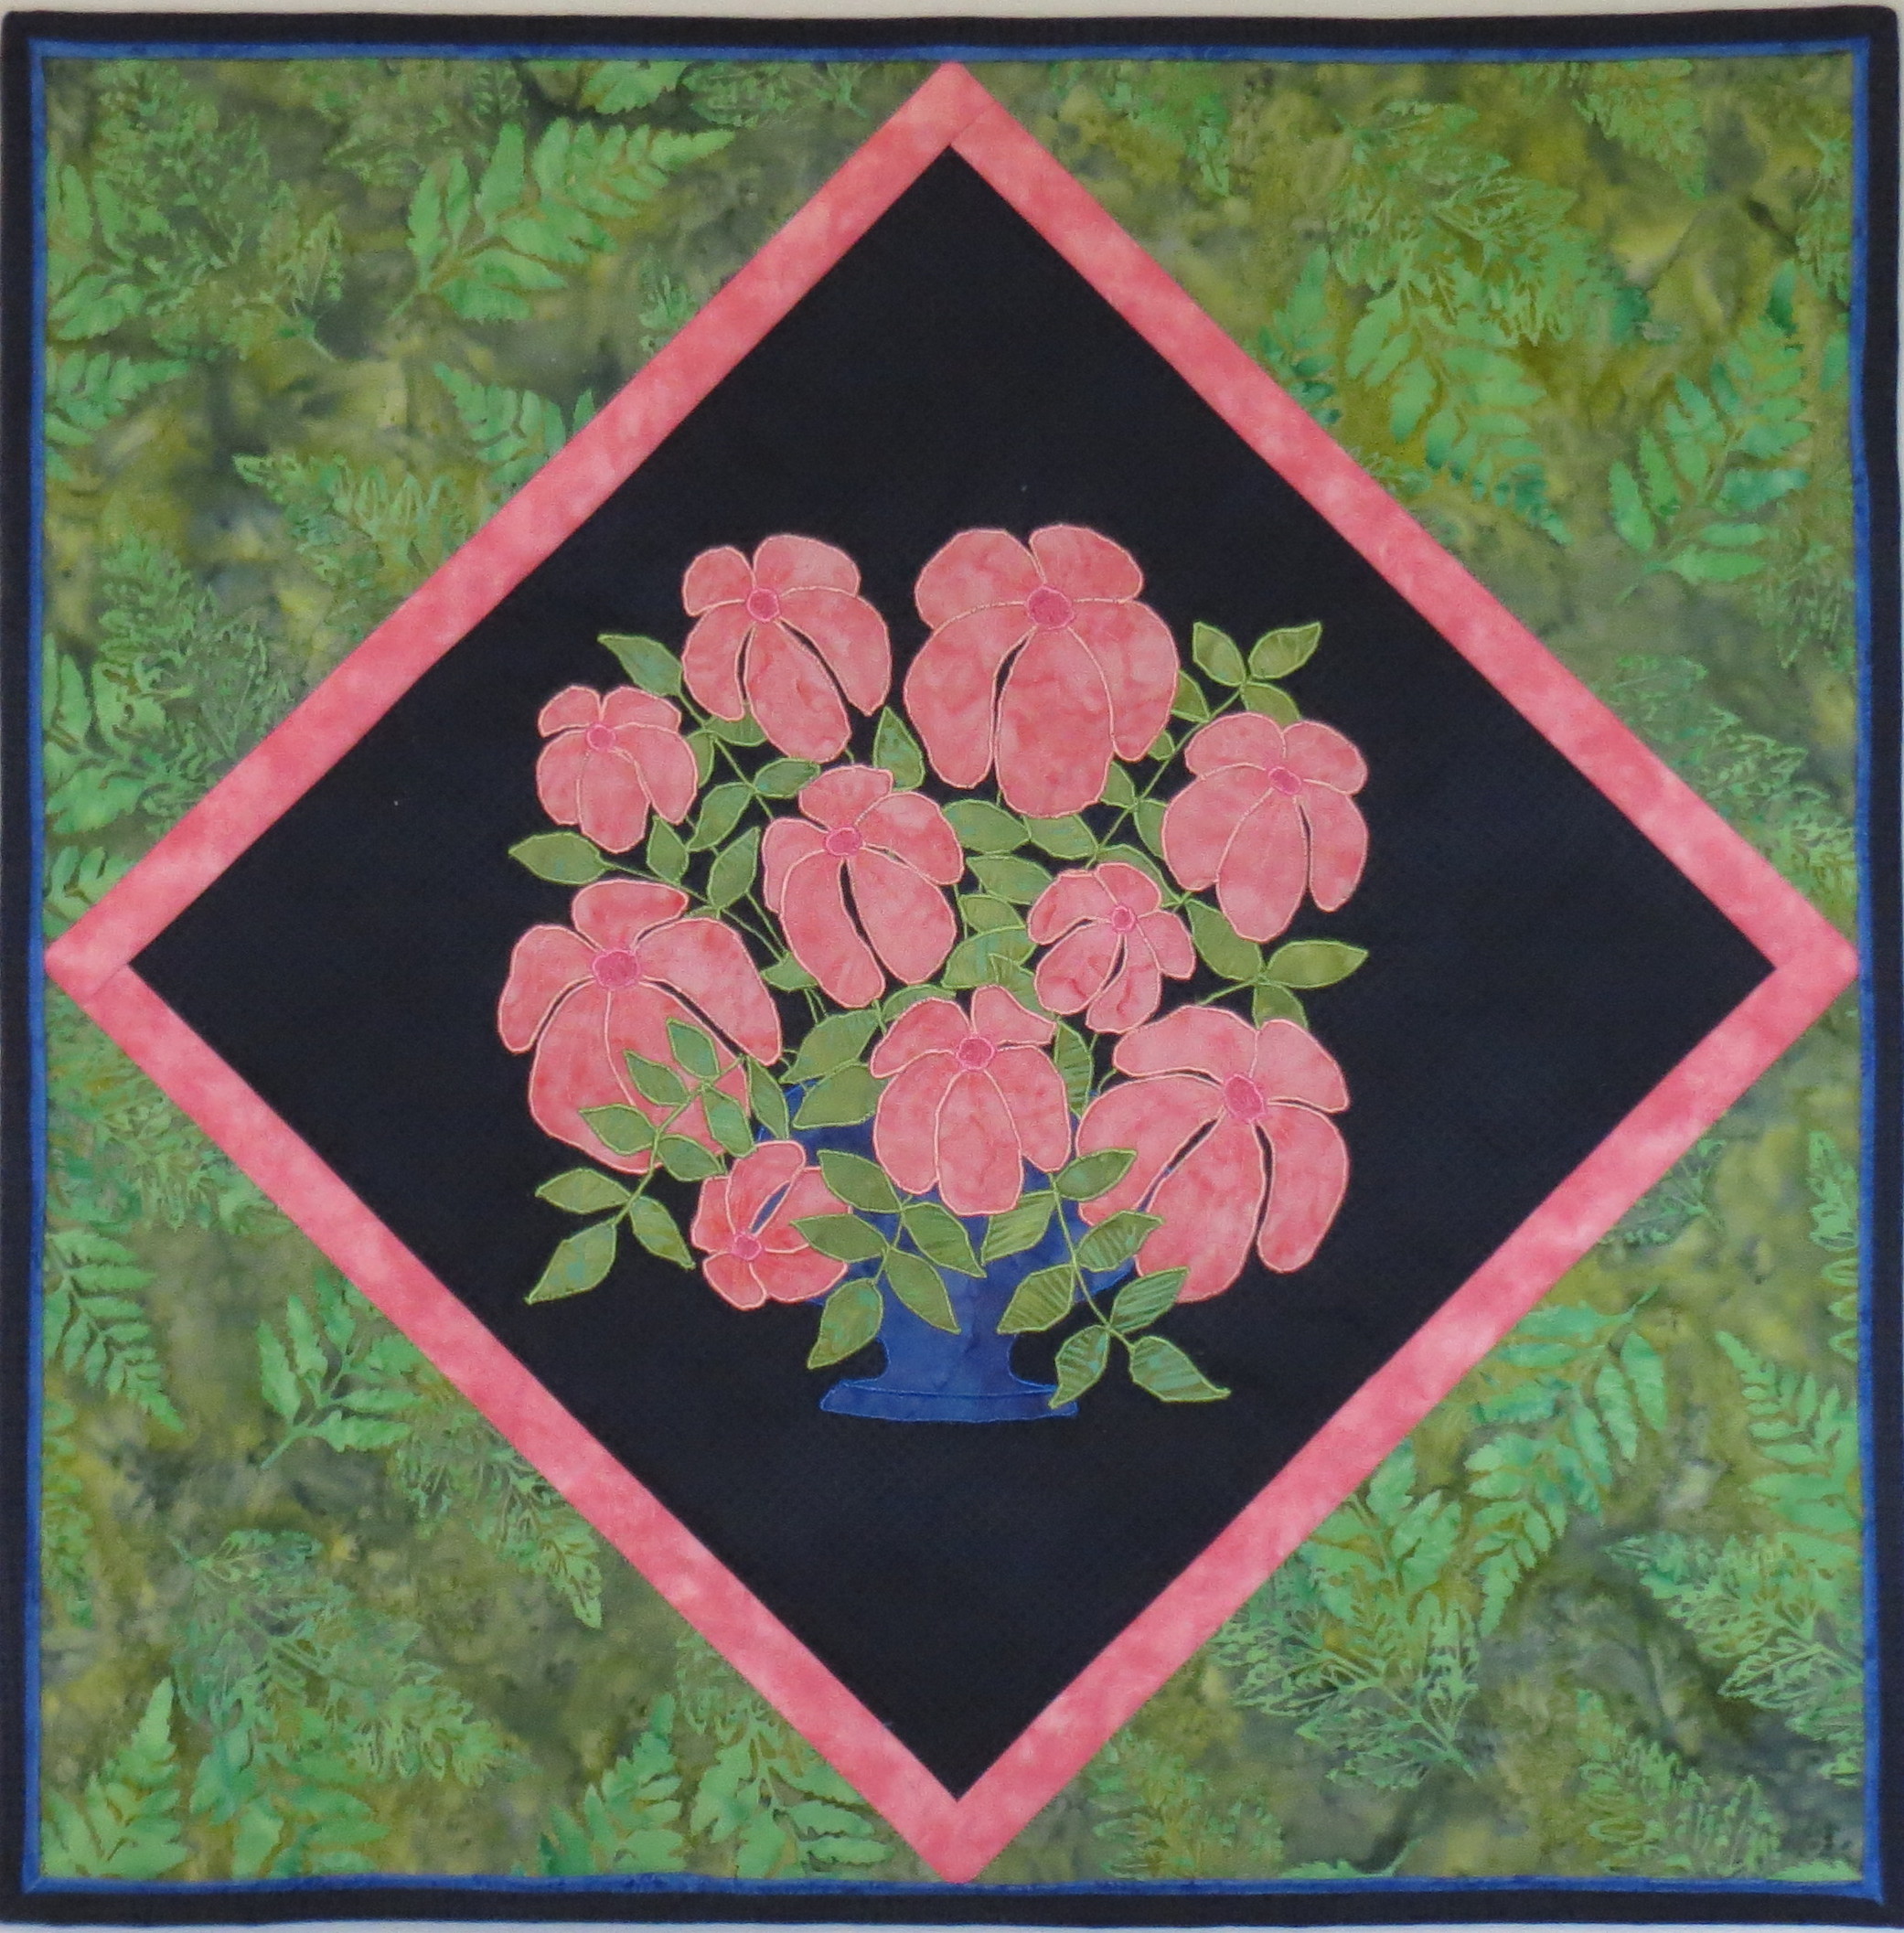
Pieceless Applique Peach Floral sample
The second sample is one I prepared using a simpler design that is more suitable for the students as a practice piece:

I really love the book by Liz Jones where I learned this technique. The applique patterns are really beautiful. Click on the book name here to see more details about the book on Amazon: Flowers, Hearts and Garlands Quilt (Applique Masterpiece)
