Category Archives: Quilting Classes

Landscape Quilt Class prototypes

I will be teaching a beginning landscape quilt class at Quality Sewing in Silverdale in September and I am doing the preparation work for the class.  Recently I taught a practice class at Creative Union in Port Townsend and it was very useful to me, plus my students created some great quilts.

The class uses the book “Lovely Landscapes” by Cathy Geier as the basis. The objective of the quilt design for this class is to make it easy for beginners and simple enough that the students can accomplish most of the assembly process in class.  So I decided to use a sunset scene with a silhouetted tree.

My first prototype is shown below.

landscape quilt 1 Apr 2015

I decided this one was too dark and the tree needed more detail.  Also the water wasn’t right — the horizon was too high and the water wasn’t interesting.

So I altered the foreground design and lightened up the sky some.  Also added a silhouetted sailboat for a little more interest.

landscape quilt 2 Apr 2015

I still think the sky needs to be lighter yet, and the change in the water is more interesting but adds quite a bit of time to the assembly process.  I will need to simplify the design further by reducing the number of strips.  Also the area where the sand meets the horizon line is not good and needs some adjustment.

And here is the quilt made by one of my students and fellow guild members, Susan Sawatsky.  She decided to go with a daylight scene and did some wonderful collage work with embroidery thread to make the leaves in the tree.  Didn’t she do great?

Susan landscape

I will post more later as I evolve the design for the class.

Class Supply Lists and Free Patterns now available here on my blog

I have learned that I can make files available for download here on my blog.  It is so simple I should have done it earlier!

To make things more convenient for the shops I teach at and the students in my classes, I am making the class supply lists available.  They are provided at the bottom of the CLASSES page.  Just click on the link.  As long as you have Adobe Reader on your computer, you should be able to open the file and print it.

I did the same thing with the fourteen free quilt patterns that were previously available only at my Patternspot.com store.  They are available on my PATTERNS page.  Scroll down past the three “for sale” patterns  and you will see the pictures of each free pattern with a file link you can click on to get the free pattern.

Quilting with Decorative Stitches from your sewing machine

Quilting with decorative stitches is a great way to add an accent to your quilt, especially along a border or in place of “stitching in the ditch” on a casual quilt.  Some decorative stitches can be used with your walking foot, but only if the stitching always moves forward.  Some decorative stitches can only be made when the feed dogs force the fabric to move backwards or even sideways.  These stitches cannot be done with the walking foot in place, since the walking foot moves the fabric in the usual front-to-back direction only.

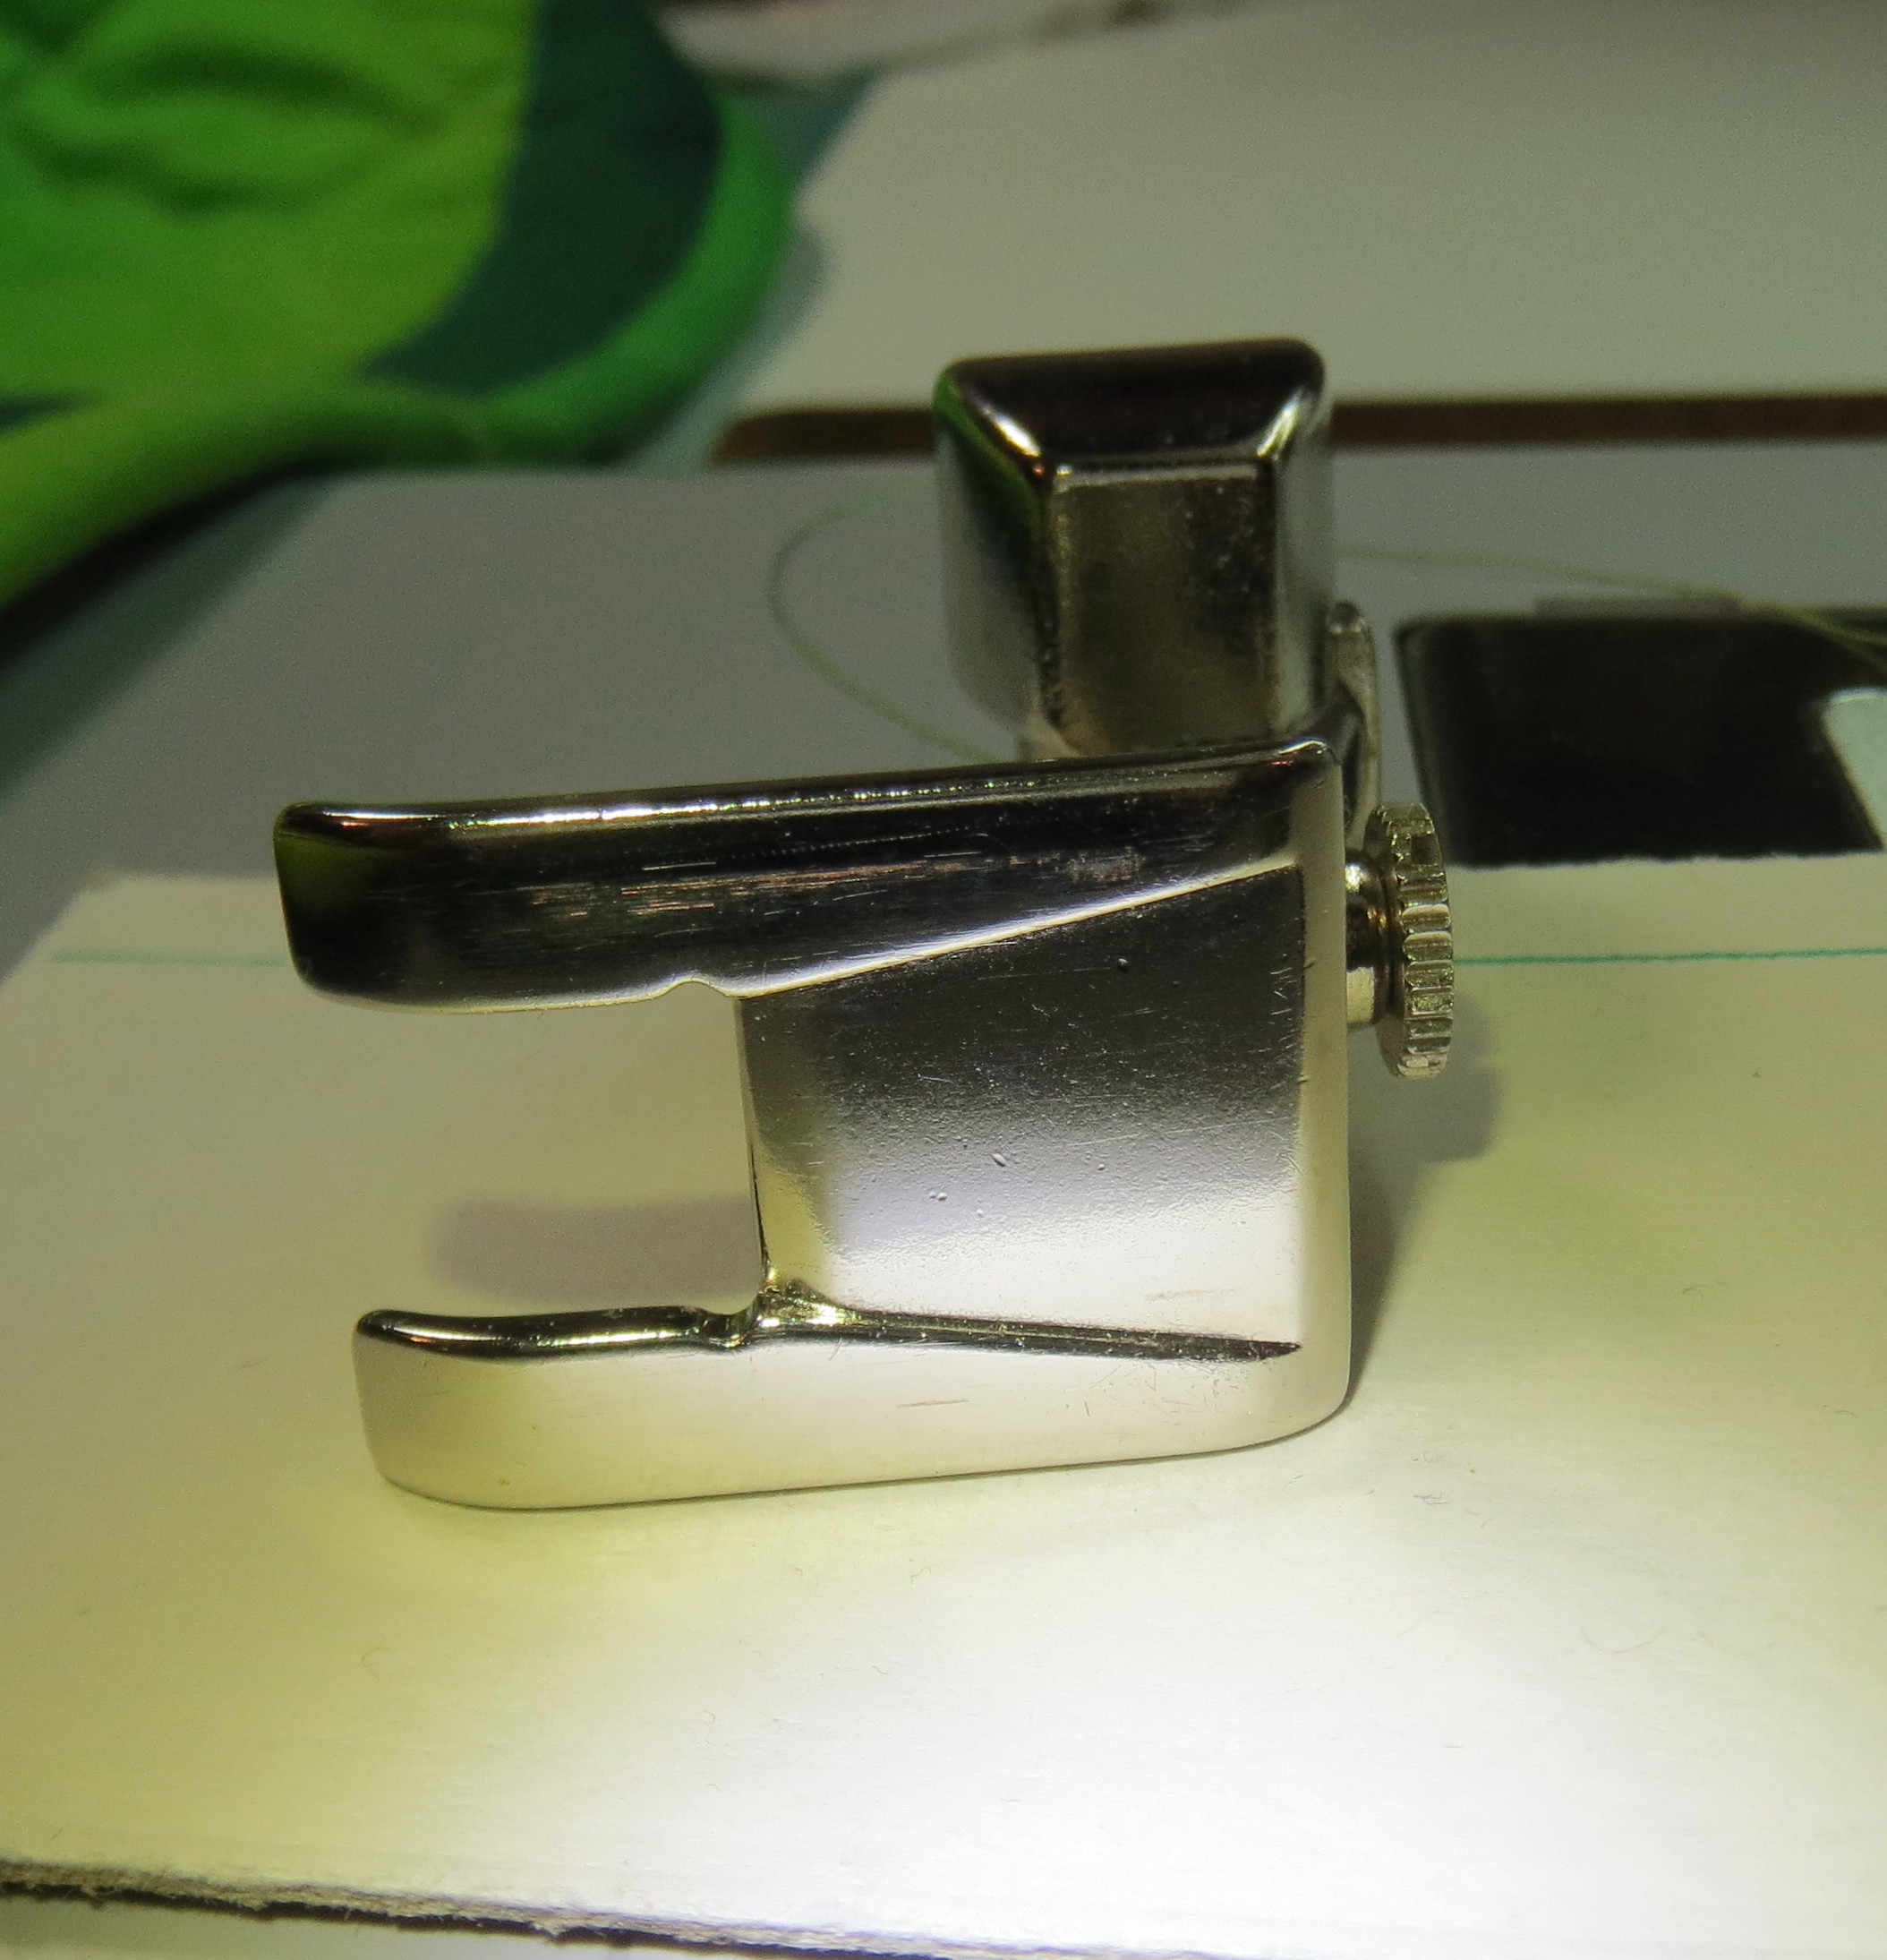
For these decorative stitches, another presser foot must be used.  The best foot to select is an open-toed satin stitch or embroidery foot, such as the one shown below.  The photograph shows a Bernina foot for my machine that has a 9 mm stitch width; if your machine has a narrower stitch width, your foot will also be narrower.  The embroidery foot can be distinguished from other feet by the groove on the bottom, shown in the right hand photo.  The groove allows a dense stitch that stands above the fabric to move under the foot smoothly.

Open toe embroidery foot

Open toe embroidery foot

bottom view, embroidery foot

bottom view, embroidery foot


Without the walking foot, the quilt top fabric will tend to be pushed forward relative to the batting and backing.  Eventually when you reach a previously stitched line this will result in a pucker or fold.  Avoiding puckers requires more careful pinning along the stitching line.  This can be done by pinning the stitching area for six inches or so ahead of the stitching, as shown in the photo below.  I use large pins for this purpose so they are   easy to pull out right before the needle reaches them.  As they are removed, they can be placed further along the stitching line.

Temporary pins ahead of stitching with the embroidery foot

Temporary pins ahead of stitching with the embroidery foot

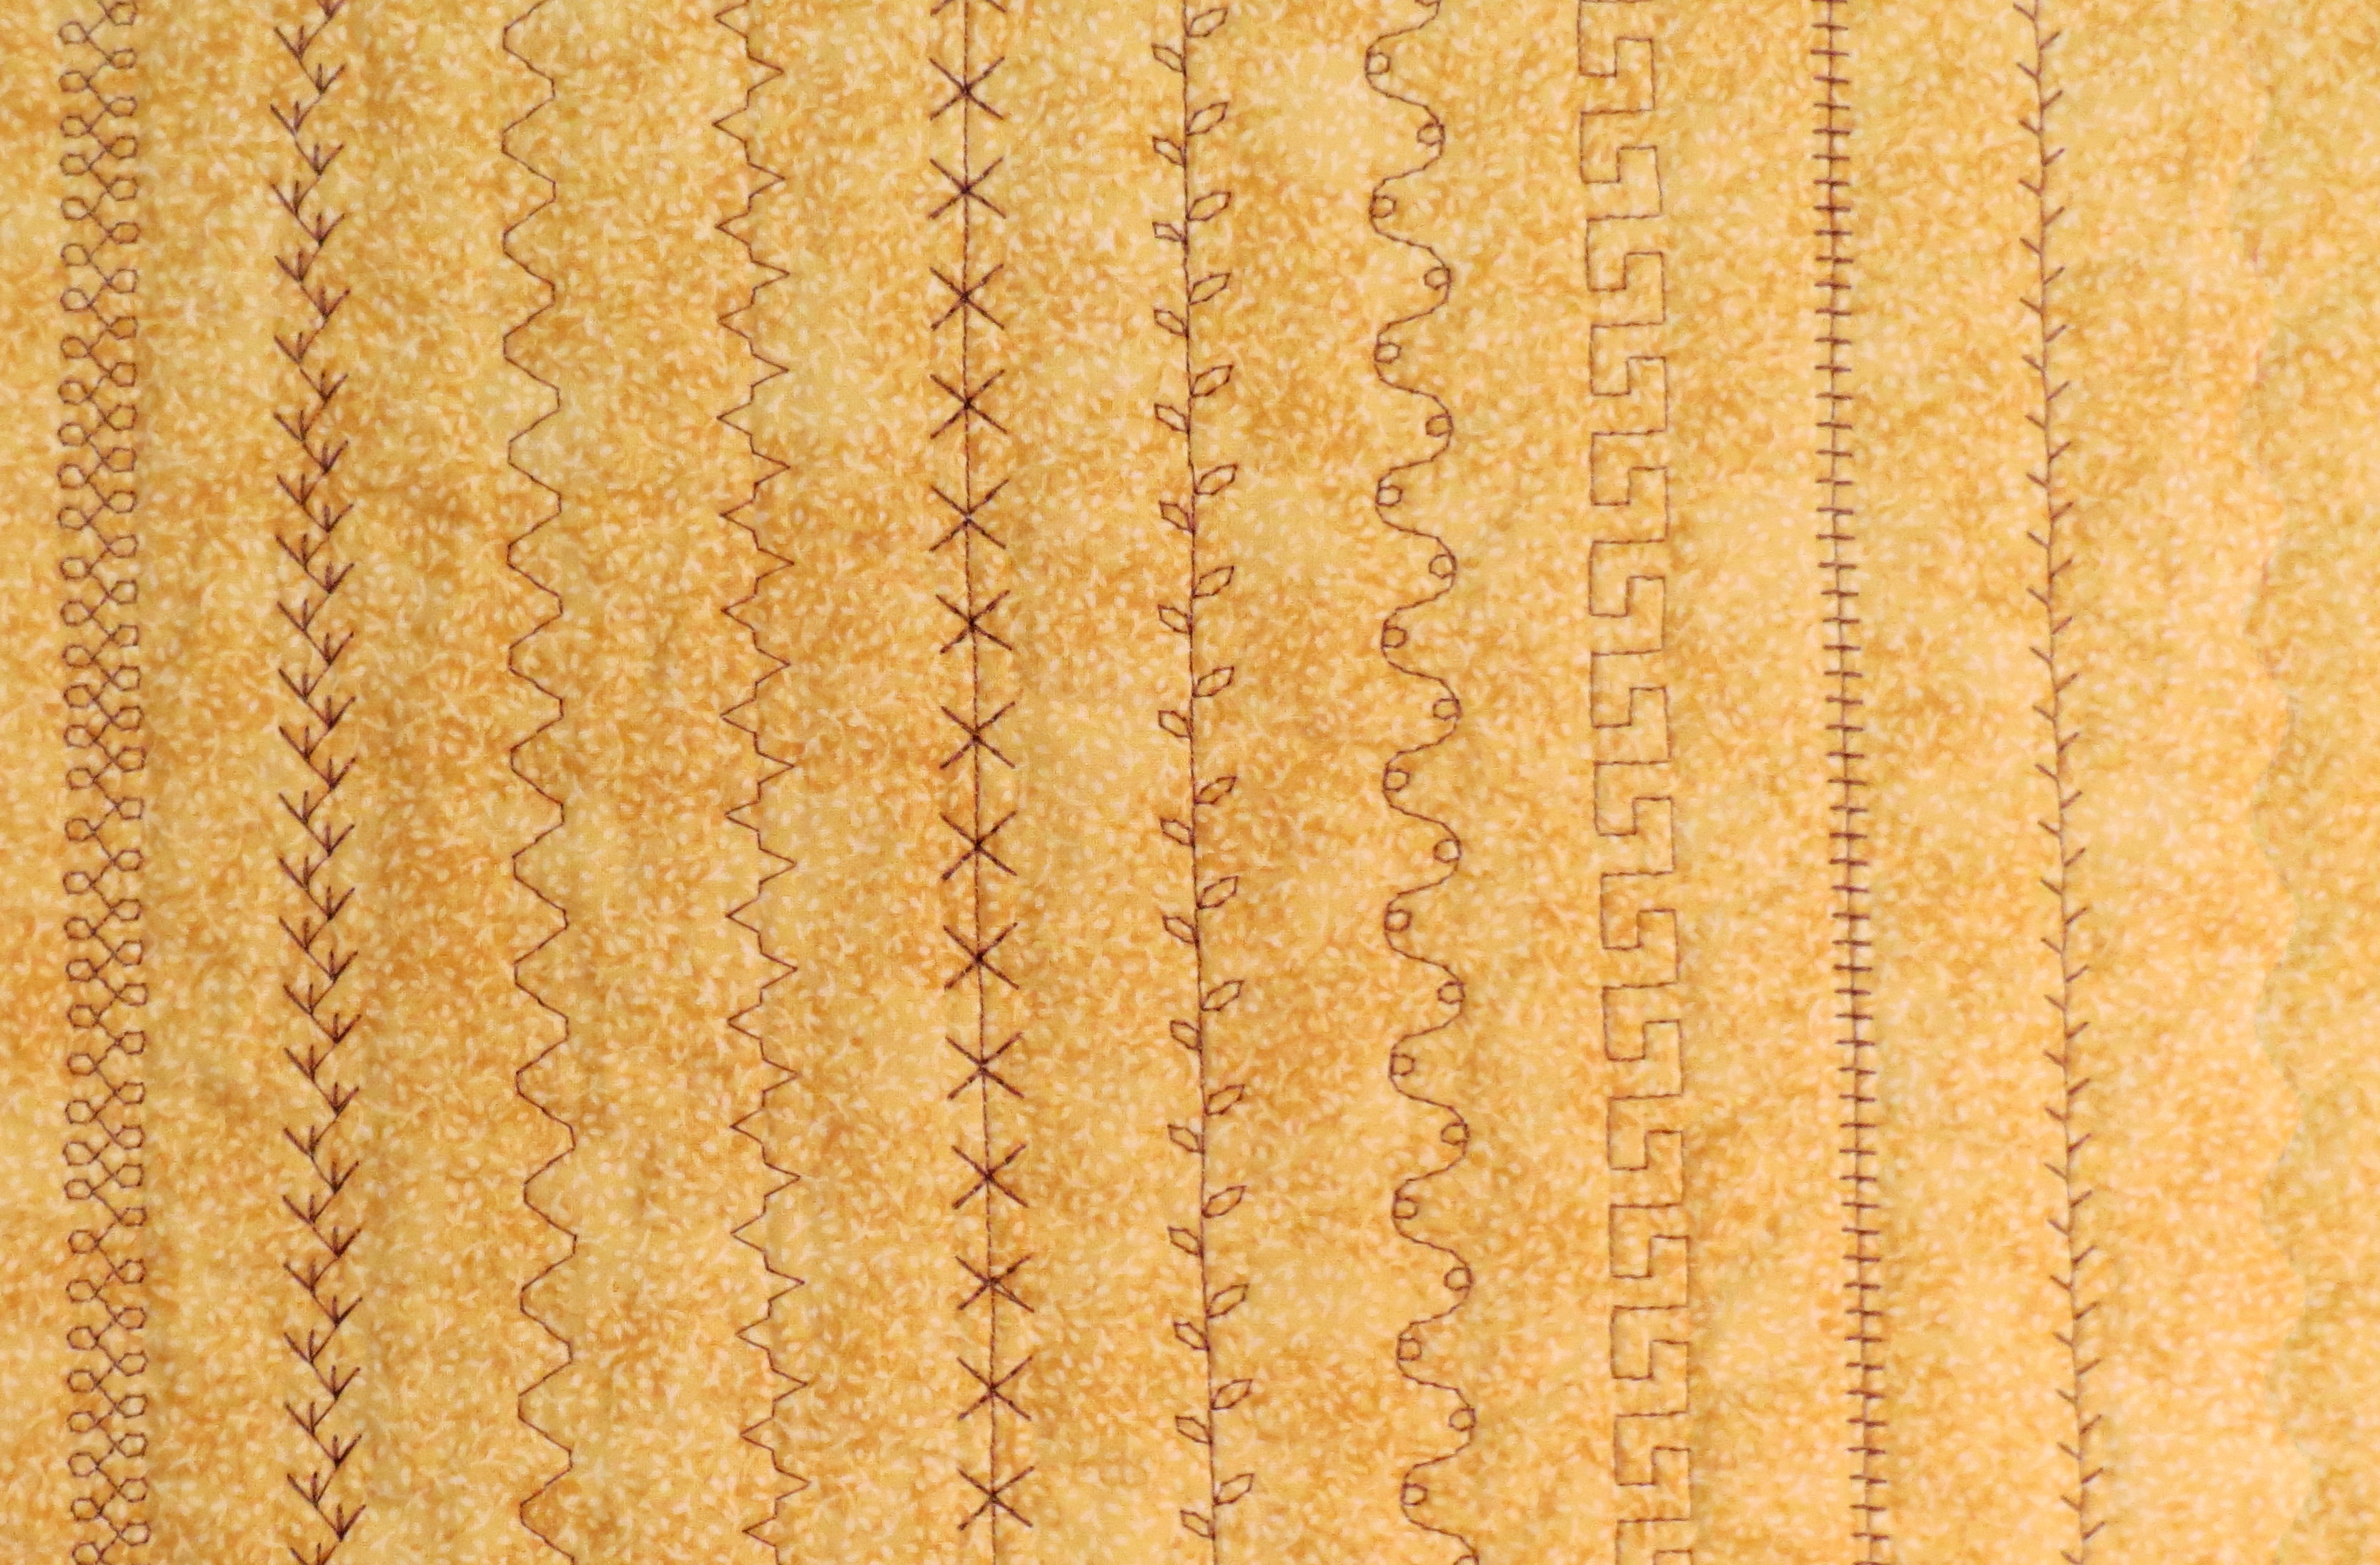
And below is an example of some decorative stitches I like for quilting.  None of these stitches is very dense, so they are relatively fast to stitch and look good on the back of the quilt as well as the front.  I particularly like the serpentine stitch (basically a wavy line), a simple feather stitch, and a simple leaf stitch.  You may need to adjust the stitch width and length before they make an attractive quilting stitch.  Be careful to check your tension on a scrap piece before stitching; sometimes the default tension on a decorative stitch is set loose so the top thread will go to the back and no bobbin thread will show on the top.  Since we will be seeing the quilting stitches on the back as well, we need to balance the tension, especially if the top and bobbin threads are different colors.

Some decorative stitches suitable for machine quilting

Some decorative stitches suitable for machine quilting

If I don’t want to take the time to bury knots at the start and stop, I ensure an attractive start and stop by first stitching 5 or 6 tiny straight stitches.  Then I change to the desired decorative stitch and continue until I am within about a millimeter of the end.  I then change back to a straight stitch and make a few tiny stitches.  The closeup photo below shows this area; the straight stitching is not noticeable and provides the necessary locking of the thread so it won’t unravel.

Begin and end the decorative stitch with 5 or 6 tiny staight stitches to lock the thread

Begin and end the decorative stitch with 5 or 6 tiny staight stitches to lock the thread

Try some decorative stitches on your next quilt.  Several of them are great substitutes for stitching in the ditch, if you have trouble keeping your stitches in the ditch!

Book review: First Steps to free-motion quilting by Christine Cameli

I have just read a new book on Free Motion Quilting.  This book, “First Steps to free-motion quilting” by Christine Cameli and published by Stashbooks, is intended to be just what the title says:  a beginning free motion instruction book.  As a bonus, it includes 24 simple projects that are designed to be quick to make so that you can spend a minimum of time making the project and most of your time practicing your free motion quilting.

The instruction section is short but complete.   The photos are good and the writing clear.  Extensive use is made of bulletized lists so that you can quickly see the important ideas without wading through lots of text.  In fact, as I read the instructions I found the author making all the same points I tell my students in my free motion classes.

Following the instructions, a thoughtfully organized section shows about 65 different free motion designs, all very suitable for beginners.  This section is a wonderful resource for quilting ideas.

The remainder of the book – in fact more than half of it – is devoted to the 24 projects.  There is a wide variety – bags, bowls, placemats, tablerunners, clothing, and quilts.    The last part of the section discusses embroidery – or using the free motion designs on plain cloth or readymade clothing.  Many of the projects have a “modern quilt” feel.  They are young and fresh and are likely to appeal to younger quilters (Judging by her photo, the author  fits in this category!)

In short, I heartily recommend this book.  I will be telling my free motion students that this is the one book they should buy as a reference.  You can  purchase this book at Amazon through the following link: First steps to free-motion quilting

New Free Motion Quilting Design

Last week I taught two sessions of my free motion quilting class at the Silverdale Quality Sewing and Vacuum store.  Both sessions were full and the students were great, so enthusiastic and all made great progress with their free motion work.  We have scheduled another session in October for anyone closeby who missed these two.

One of my students came up with a great modification for one of the designs I was teaching.  The pattern I was teaching is called “Headbands” and I learned it and many other designs from Diane Gaudynski’s Machine Quilting Guidebook.  As an aside, Diane’s book is excellent and well worth the small investment.  The close-up photos really show you how the patterns look when done properly, and the text is excellent.  If you get inspired and want to buy the book, here is a link to the book at Amazon where it can be purchased: Quilt Savvy: Gaudynski’s Machine Quilting Guidebook

And now on to the new design.  First, let’s look at “Headbands”:

Quilting pattern "headbands" from Diane Gaudynski's book

Quilting pattern “headbands”

The new design is very similar but ends up with leaf shapes instead of headbands!  Here I have sketched out the two different basic patterns to show the comparison.  They are both made the same way, and the overall space is filled up the same way, but the leaf shape has a point at the top of the curve.

Drawing of headband and leaves pattern

Drawing of headband and leaves pattern

And here is the stitched out result of what I am going to call “Kathy’s Leaves” in honor of my student Kathy who invented it:

Kathy's Leaves

Kathy’s Leaves

Isn’t it a great design?  It would be a wonderful background filler pattern on many quilts, and I expect to use it in the future.  It could be modified by changing the shape of the leaves, making them larger or smaller, and could probably also be opened up somewhat (leaving some gaps between the leaves) although I haven’t tried that yet.

Trunk Show and “Meet the Author” event August 7

As previously announced, I am doing a book signing/trunk show/demonstration event next week at Silverdale Quality Sewing and Vacuum.  This is a first time for me so I have spent a lot of time in the last few weeks gathering quilts, getting organized, etc.  This week the store put out a very nice promotional email, which I have reproduced below.  Contact the store directly via their website (www.QualitySewing.com)  or phone (360-692-2992) to sign up for the show.

Trunk Show and Signing Event Coming to Silverdale!

Would you like to learn how to free-motion quilt? How about doing a Prairie Point binding?
Come meet Shirley Sandoz, local author, quilt designer, and educator. Author of “Fast Fabulous Bindings” and “Super Swift Quilts,” plus numerous quilt design patterns.

We are fortunate to have Shirley in our Silverdale store August 7th to sign her book and give a demonstration, along with bringing a trunk show full of all her fabulous quilt designs.
Sign up early and receive a $5 shopping spree to use the day of the show.

Shirley Sandoz: Trunk Show & Signing Event Silverdale: Wednesday, 8/7, 10:00 AM to 1:00 PM

Quilt University teachers moving to Academy of Quilting in 2014

My favorite online quilting school,  www.quiltuniversity.com will be closing at the end of the year due to the death earlier this year of its founder Carol Miller.  Carol’s husband Roger has just announced that many of the excellent teachers at Quilt University will be offering their classes through another website:  www.academyofquilting.com starting in 2014.  This new site is run by Ruth Blanchet, one of the long time QU teachers.  I don’t have experience with this website, but there are classes available now and we can expect many more next year from  the QU teachers who join the site.

“Meet the Author” event at Silverdale Quality Sew and Vac

I am pleased to announce that the Quality Sewing and Vacuum store in Silverdale, in addition to offering several of my classes this fall, has asked me to present a “Meet the Author” event at the store August 7, 2013 from 10:00 am to 12 noon.   I will present a trunk show of quilts and talk about the inspiration behind the quilts, plus briefly demonstrate some binding and quilting techniques that are included in my classes.  If you are curious about the classes but not sure they are right for you, this is a good opportunity to get more information.

There will be lots of time to ask questions, and to sign books for those who are interested.  I will be offering several books and patterns as door prizes, and the store will offer refreshments.  Contact the store directly to reserve a spot or ask any questions about the event.

Quality Sewing and Vacuum  10876 Myhre Place NW, Silverdale 98383

Phone: 360-692-2992.  web site:  www.qualitysewing.com

New classes added and one rescheduled

I have just scheduled several new class sessions for the fall at Karen’s Sequim Sewing Center and at Quality Sewing & Vacuum in Silverdale.  Check out the calendar page for the dates and times.

Due to a personal scheduling conflict,  I have had to reschedule the Pieceless Applique class at Sleepy Valley Quilt Company in Port Angeles.  The class is now scheduled for November 9th.


Floating Mode for Free Motion on some sewing machines

Several times recently when I have taught my free motion quilting class, I have had students arrive with what (to me) was the wrong presser foot for their machines. I finally went to Quality Sew and Vac and started asking questions, since these students all said they were told by Quality that the foot they brought to class was the right one for free motion.

Lynn Cassidy at Silverdale Quality S&V solved the mystery. Certain models of Viking and Pfaff have a “floating” free motion mode in addition to a “spring action” free motion mode. The machines must be set to operate in one mode or the other, depending upon which presser foot you use. So it is possible to do free motion without a foot with a spring in it, which is the only way I have ever done it.

Here is a link to an explanation by Viking of the Floating Mode:

http://new.husqvarnaviking.com/en-CA/Accessories/Free-Motion-Echo-Quilting-Foot

and a similar link for Spring Action:

http://new.husqvarnaviking.com/en-US/Accessories/Open-Toe-Free-Motion-Spring-Foot

Thanks to Lynn for her great explanation of this option available on some sewing machines. Now I will be better able to help my quilting students in the future.