Category Archives: Quilting

Scrappy Blue Diamond Quilt

My blue scrap bin has been overflowing, even after I pulled out an assortment of light and dark blues for the pinwheel quilt I posted last time.  Many of my scraps are long strips, so I decided to make a blue quilt using these strips. I also cut more strips, ranging in width from 1 1/2 inches to 2 1/2 inches wide.   All these strips came out of the blue scrap bin, often from wider strips.  The length of the strips varied from 5 inches to 40 inches.

I cut out a bunch of 6 1/2 inch squares from newsprint to use as foundations for the blocks.  The blocks I made used light fabrics on one side and medium/dark on the other side, as shown in the photo below.  I found I had to mark a straight line on the wrong side of the fabric to ensure the seam was straight.  In spite of the spiffy laser line on my new Brother machine (more about that in another post), I couldn’t get a really straight line without marking.

Six inch finished blue diamond block

Six inch finished blue diamond block

After I had 80 blocks made like this, I arranged them into diamond shapes and sewed together the blocks to make the quilt top below.

Scrappy Blue Diamond, 48 by 60 inches

Scrappy Blue Diamond, 48 by 60 inches

There were lots of strips left over so I used them to make the quilt back as shown here.  I had been careful to stay with a limited blue palette in the blocks so the colors would blend, but I used some stronger blue colors in the back.

Strip pieced back for blue diamond quilt

Strip pieced back for blue diamond quilt

And here is what is remaining in my blue scrap bin.  It doesn’t even look like I made a dent in it!  Actually I did, because before I started it was hard to get the top closed.   I used up most of the lights but still have plenty of medium and dark blues left.

My blue scraps after finishing the blue scrappy quilts

My blue scraps after finishing the blue scrappy quilts

I think it is time to either get serious about managing my scraps or give them away!  More about scrap management in another post coming up — several quilters have developed systems for organizing scraps, and I’m going to investigate them to see if I like one.

Hand-pieced Scrappy Triangle Quilt

While I was traveling this summer I took along some hand piecing work.  I cut a bunch of light and dark five inch squares from my green and blue scraps.  I marked lines 1/4 inch to each side of the diagonal on all the light squares, then pinned each light square to a dark one (right sides together, of course).  Then I hand pieced by sewing along the marked lines.  Once the lines on both sides of the diagonal were sewn, I cut down the middle between the stitching and the result was two half square triangle blocks.

After I got home i put the squares up on my design wall and arranged them until I had a pleasing pattern.  I used a sort of expanding pinwheel pattern, but lots of other patterns are possible.

Here is the resulting lap-sized quilt top.  The finished blocks are 4 inches.

Blue Green Scrappy Triangles, 40 by 48 inches

Blue Green Scrappy Triangles, 40 by 48 inches

I like the result and it was nice to have a portable handwork project along.  Not very speedy, though.  I probably could have done the quilt top in a day at home on the machine!

Make a Thread Tension Sampler for Free Motion Quilting

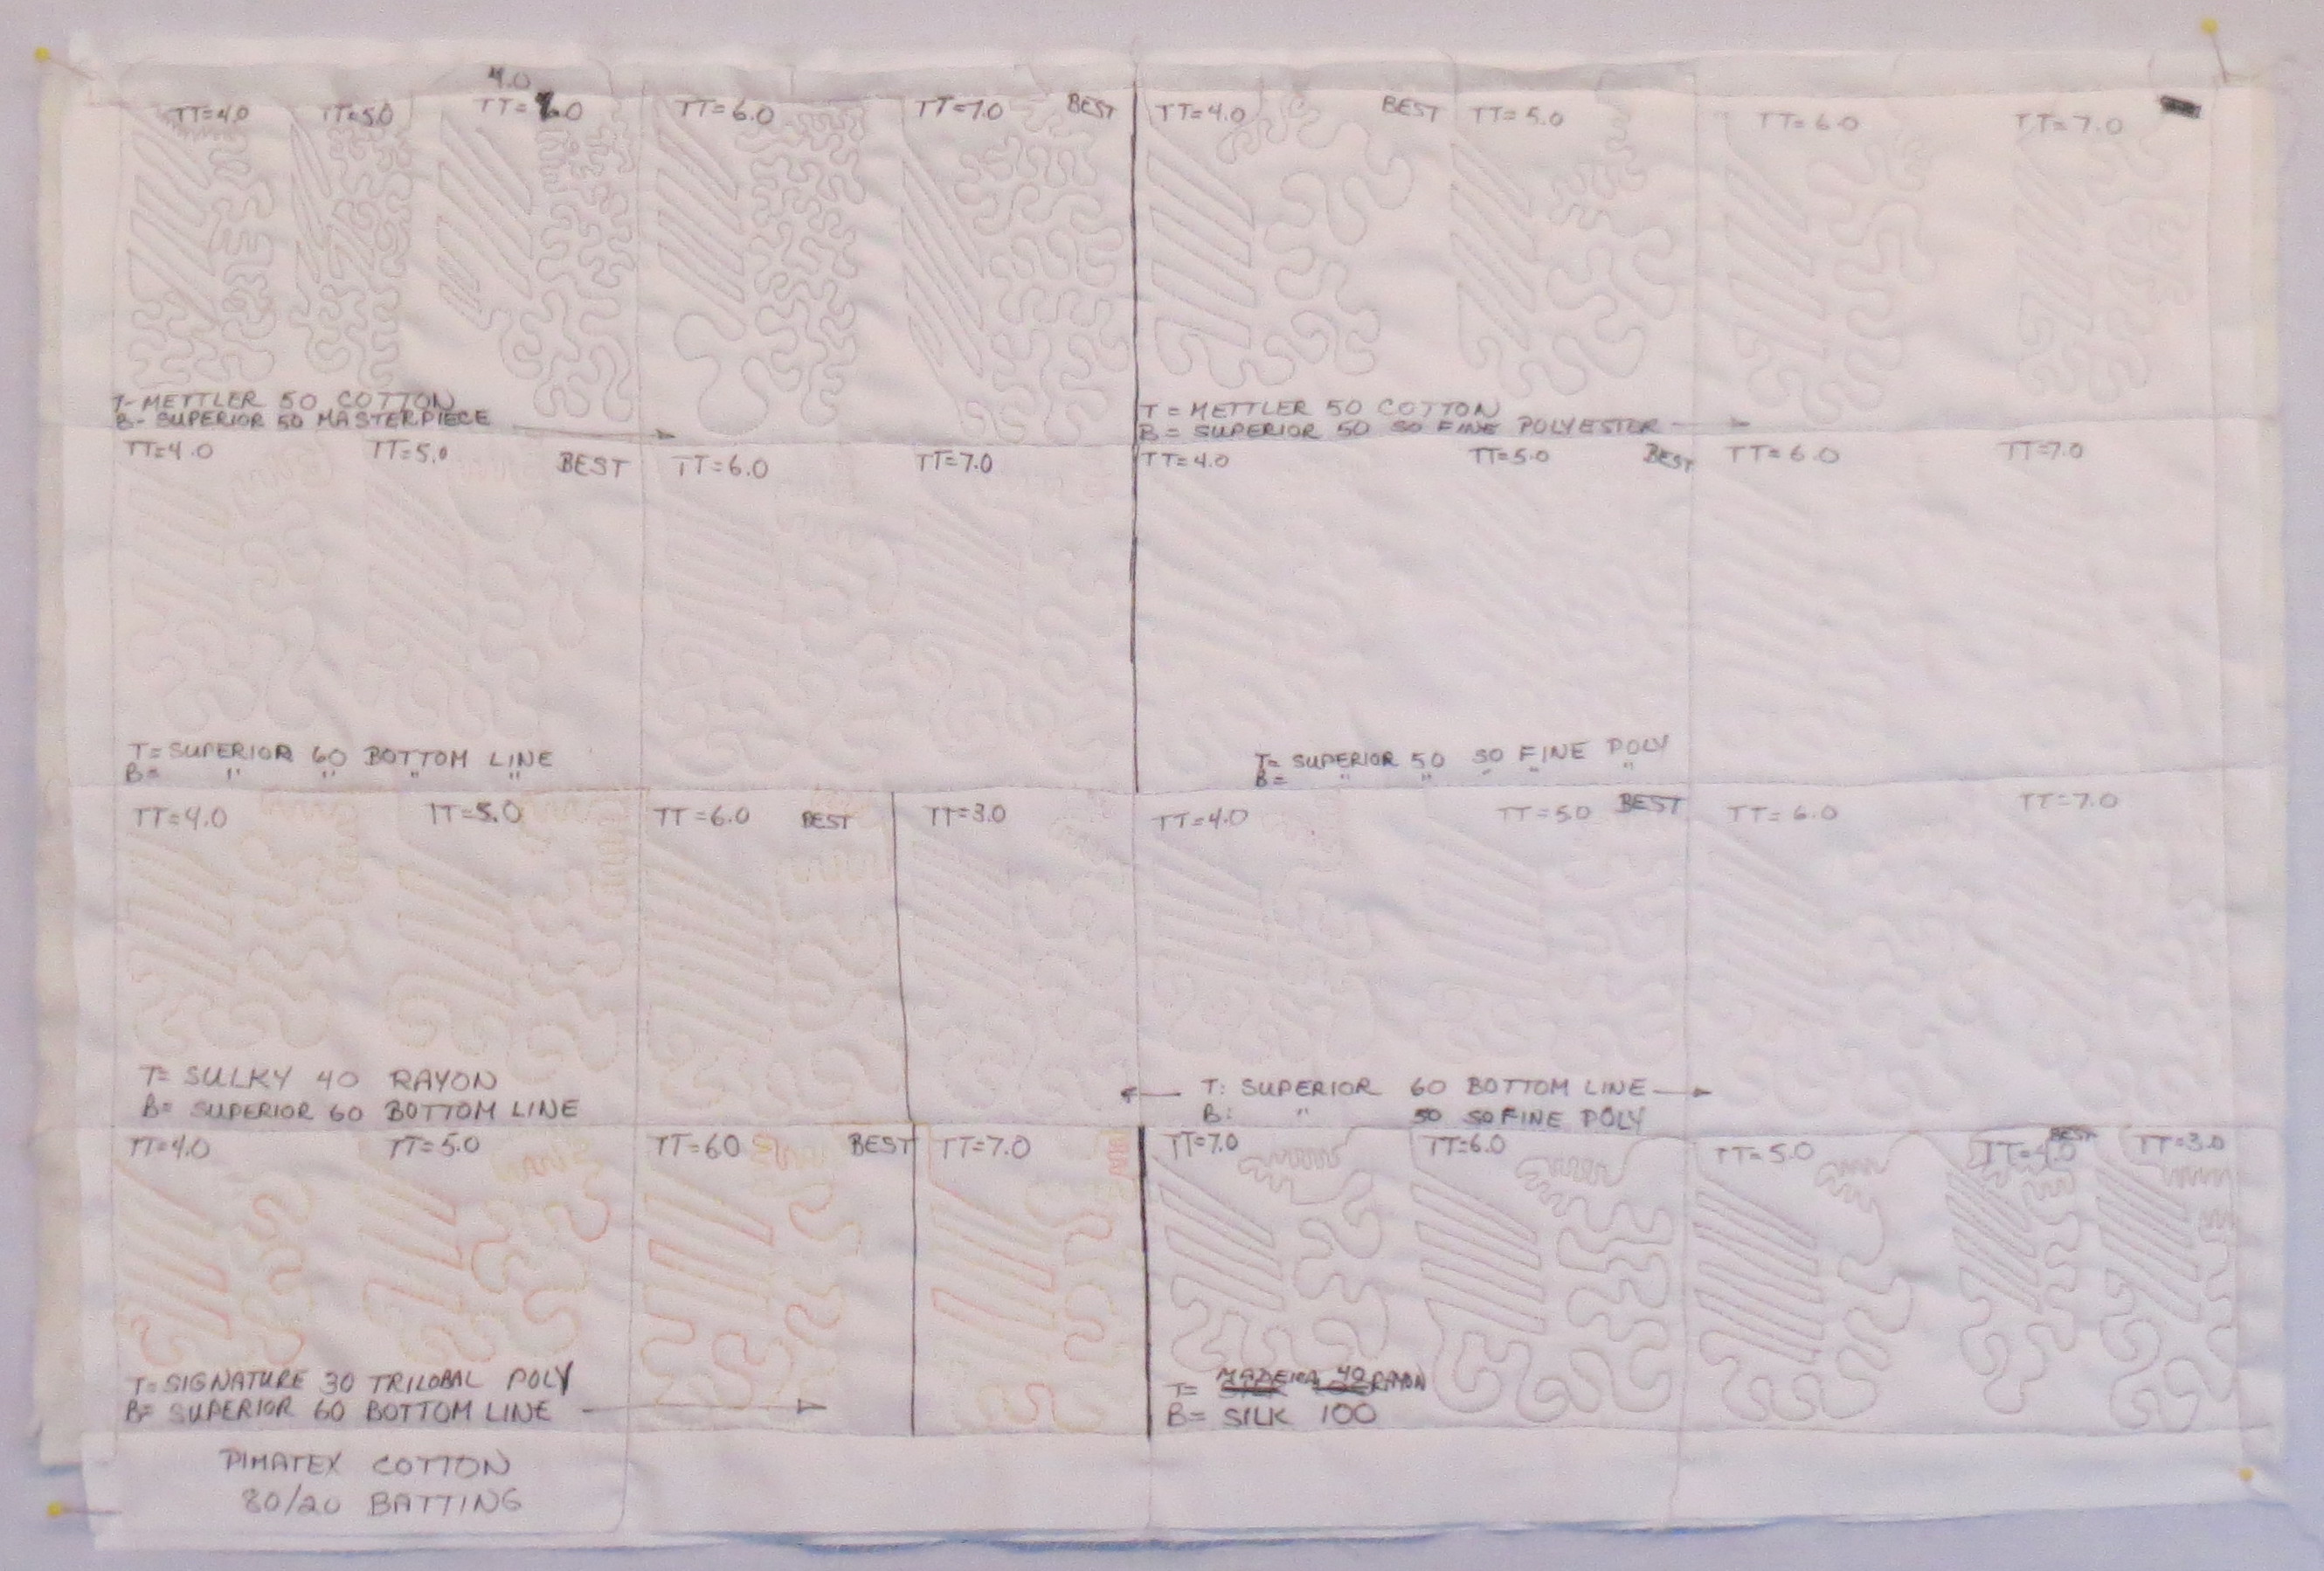
I have taken a break from quilting for a couple of months because I was travelling.  When I started up again things just weren’t working very well.  I couldn’t seem to get the thread tension adjusted so that my free motion quilting looked good.  I decided it was time to go back to basics, do some testing  and create a reference sampler.

I made the sampler from a half yard of  a high thread count fine cotton that I buy by the bolt.  I use this fabric for printing photos onto fabric and for painting.  So it was available.  The test results I got might be different with a regular thread count cotton — perhaps I will do another test.  I just bought a large amount of Moda muslin so if I do another test, I will use that.  But for now here is what I found:

Results vary widely depending upon the thread used, both top and bobbin.  The best tension was 4.0 (the default setting on my machine) for a combination of Madeira size 40 Rayon top thread and size 100 silk bobbin thread.  The best tension for a Mettler size 50 cotton top thread and Superior Masterpiece 50 cotton bobbin thread was 7.0.  I will keep my sampler piece around for reference in the future when starting a new quilting project.

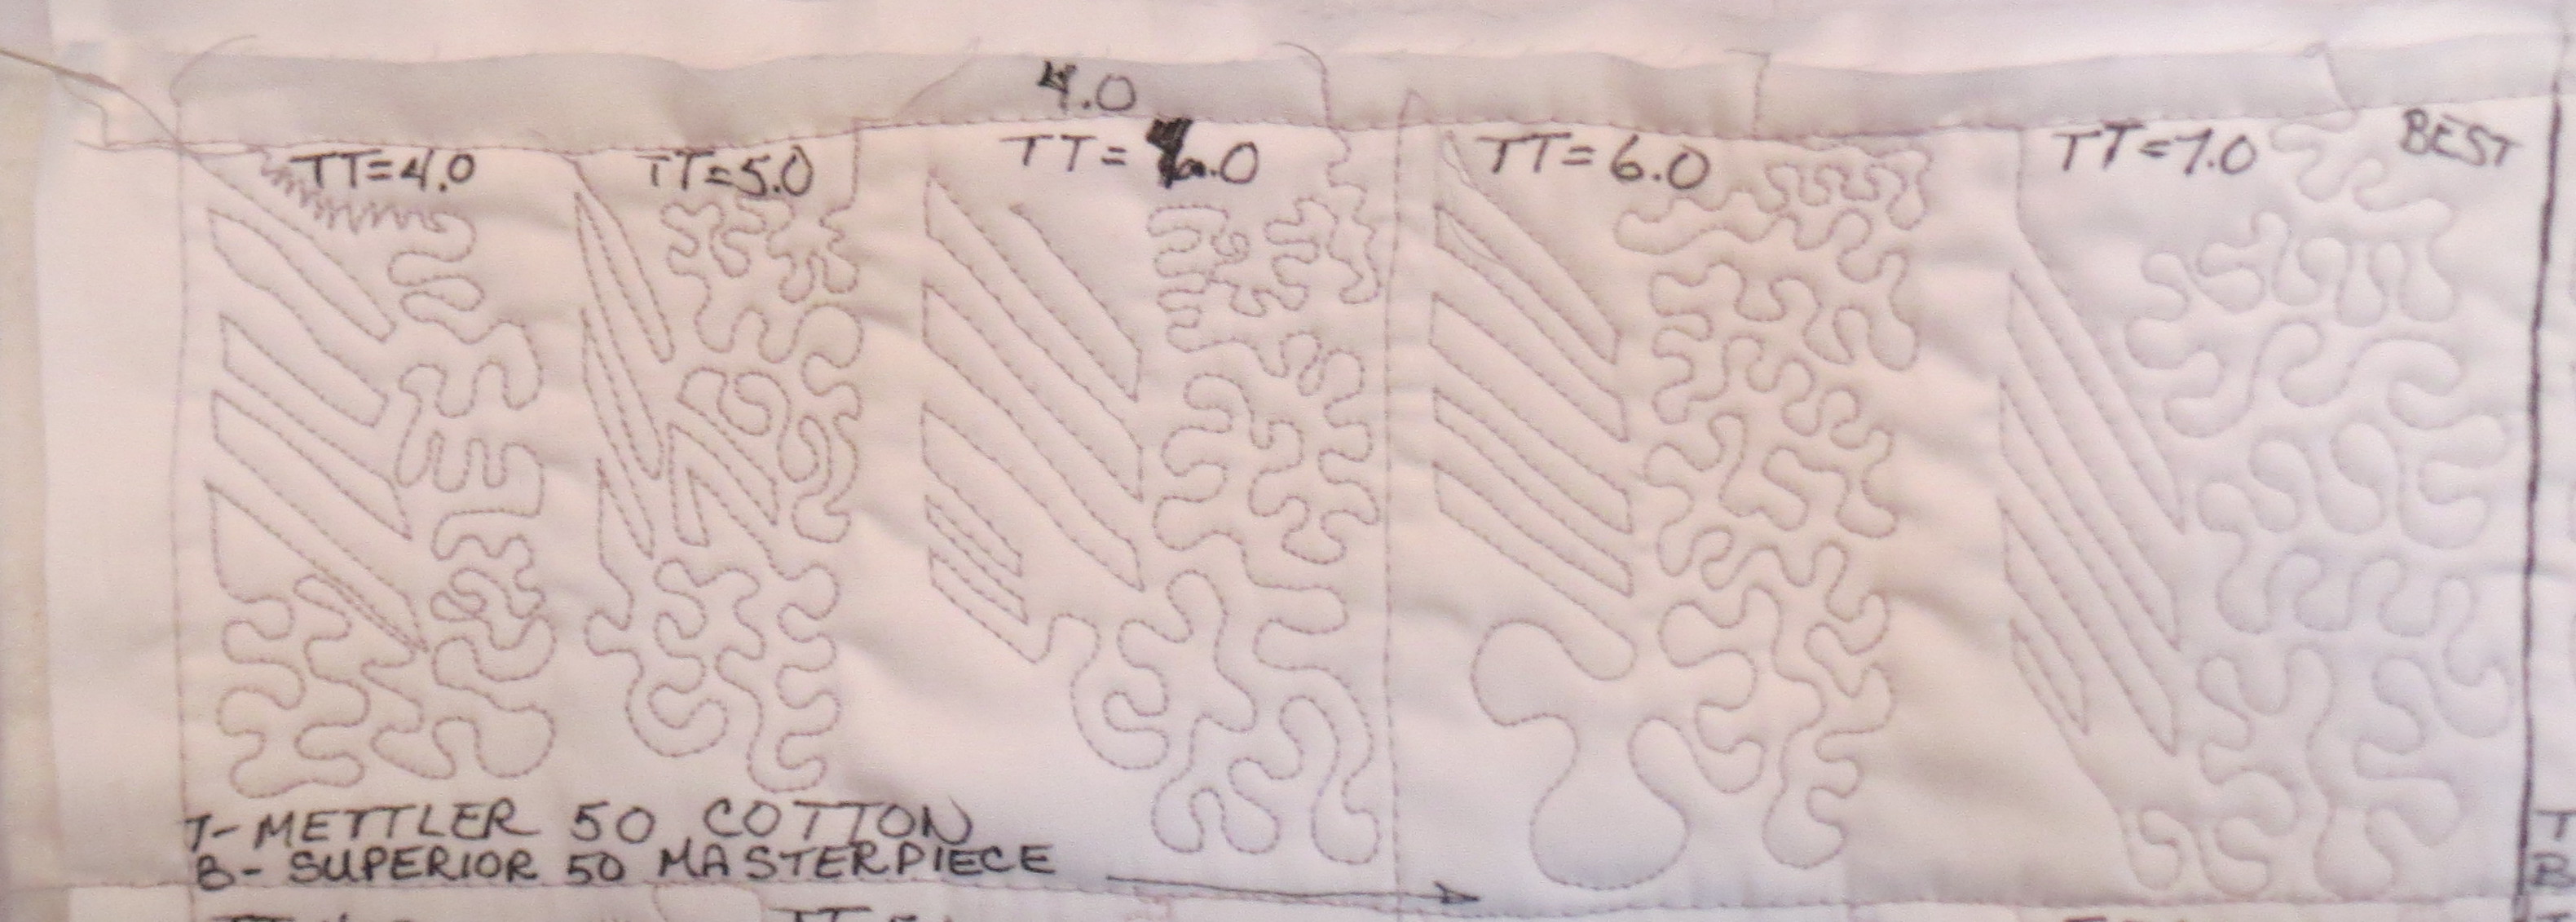
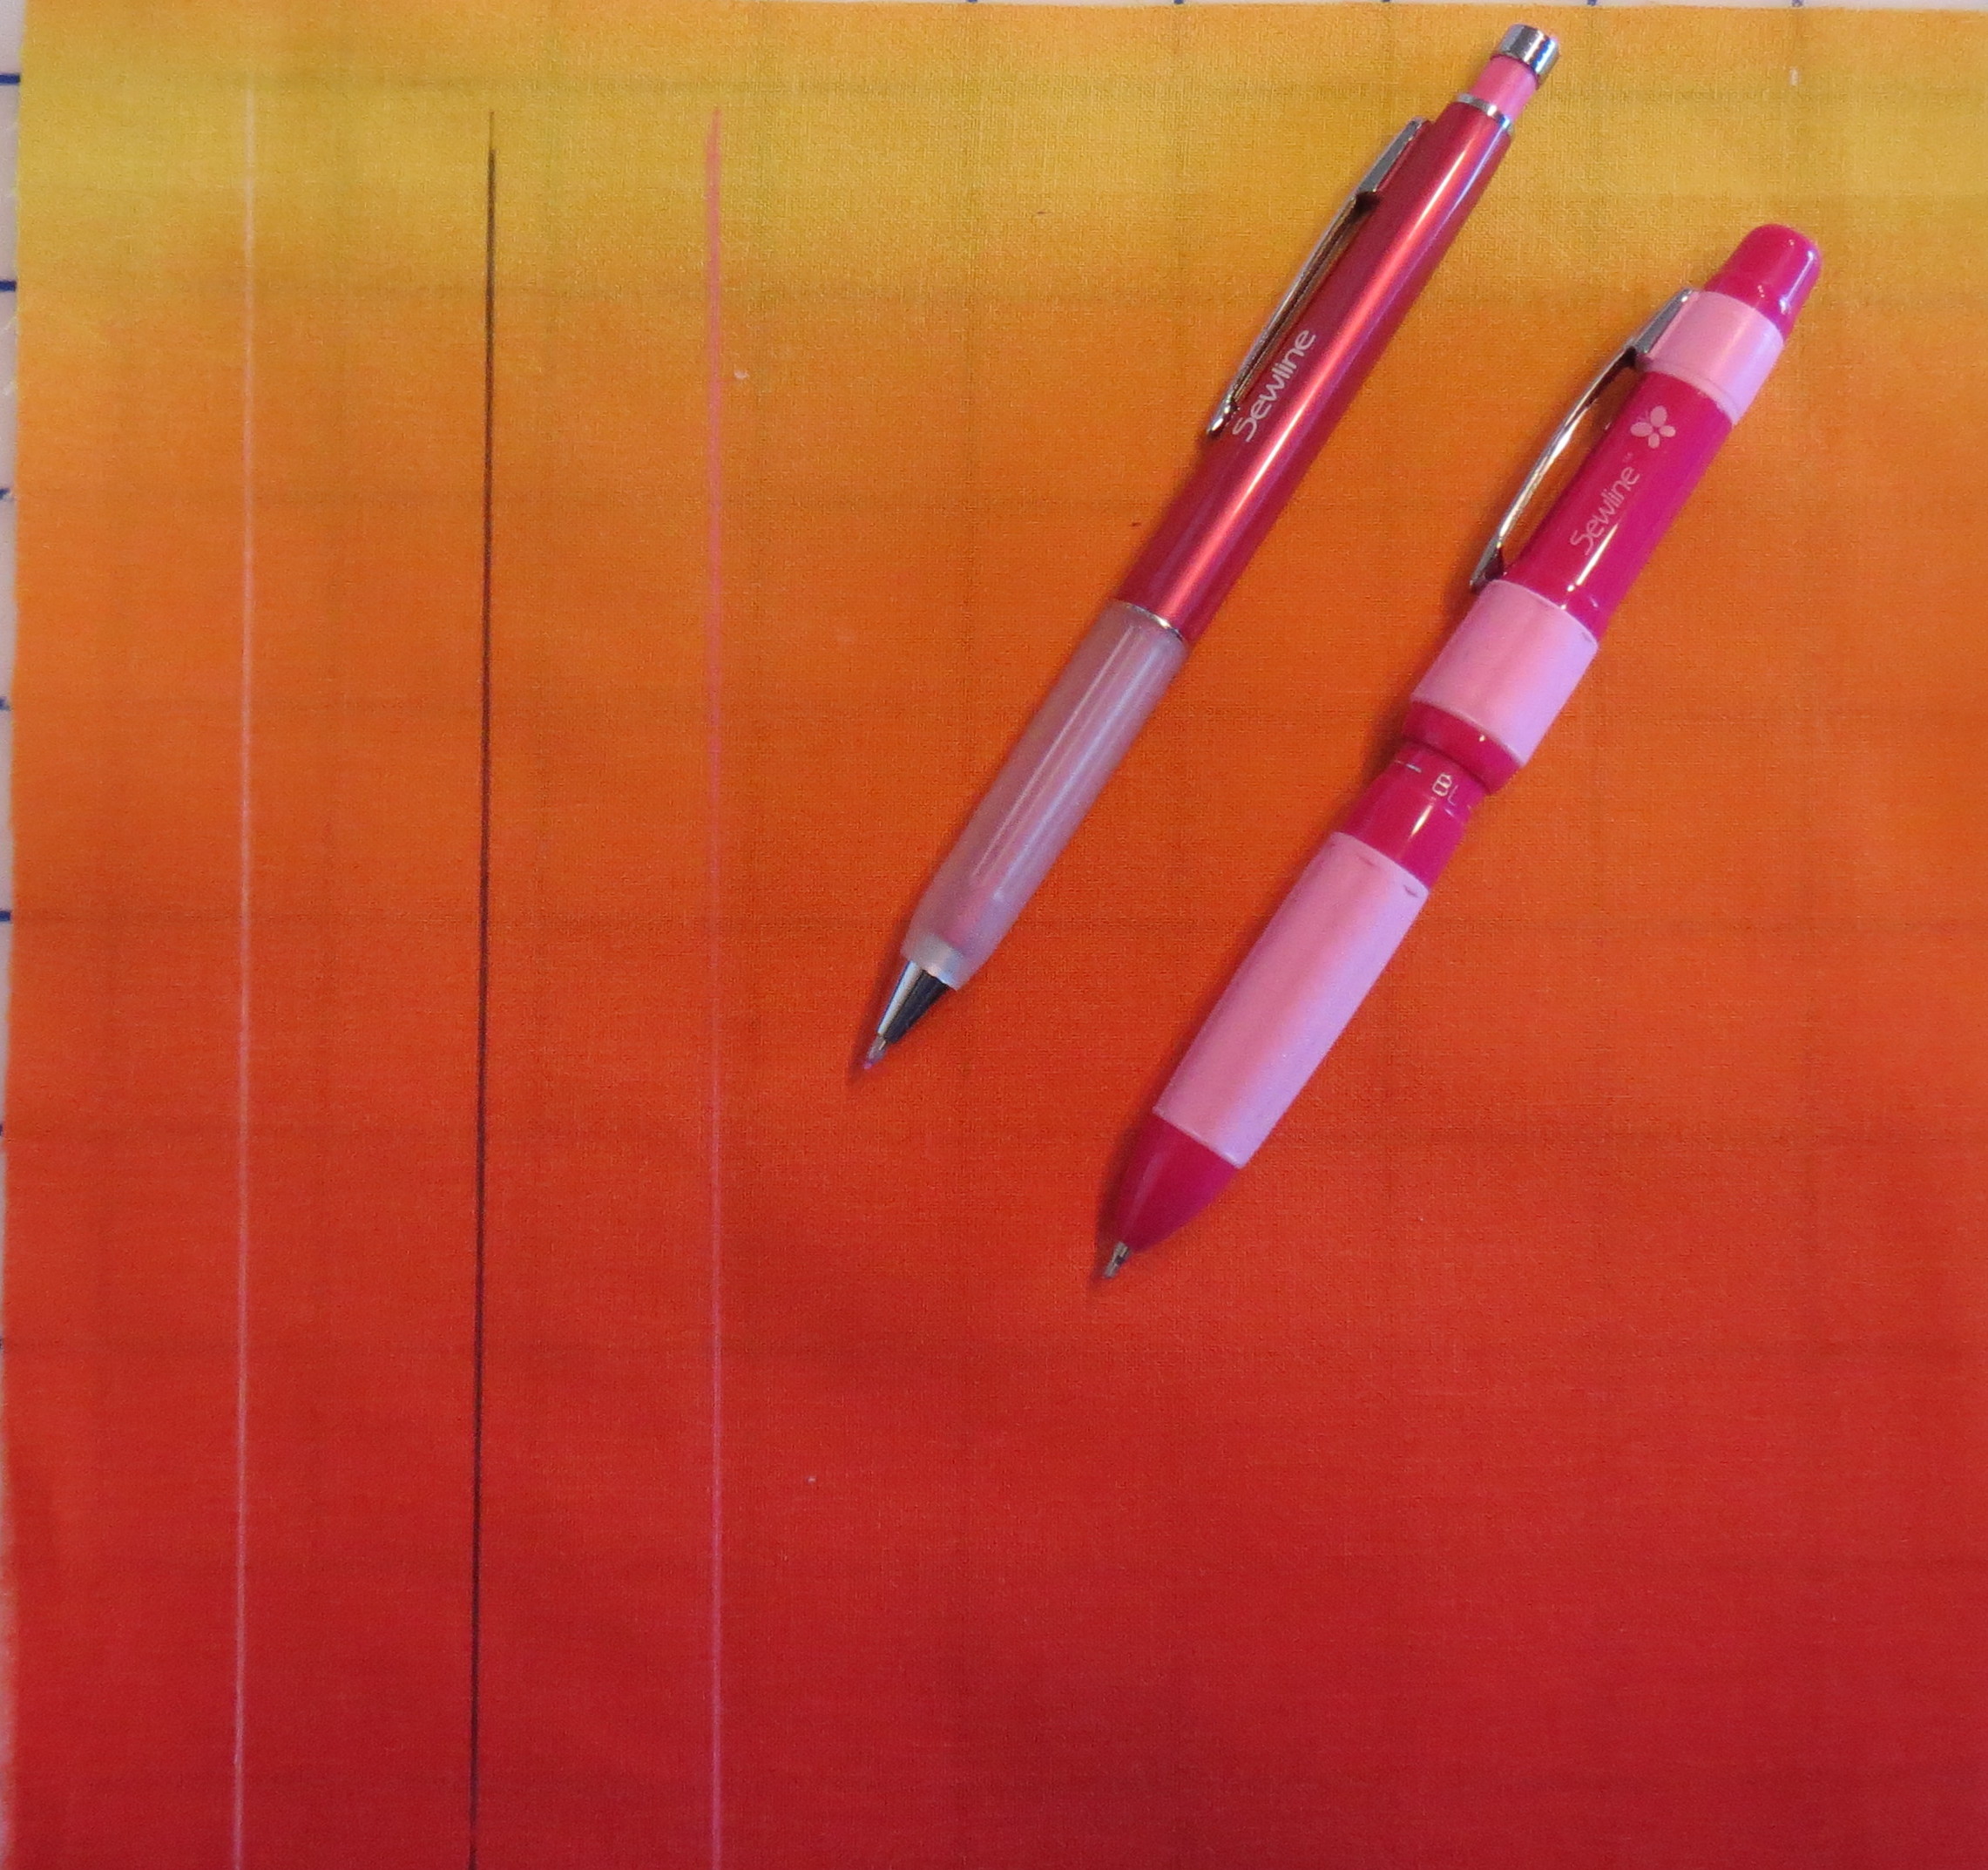
Here is a photo of my sampler, which is about 16 by 20 inches in size.   I used 80/20 batting and quilted a grid with rectangles about 3 1/2 inches high by 5 inches wide.  The exact dimensions don’t matter.  For each thread tension, I stitched in an area about  2 1/2 inches  by 3 1/2 inches, making sure to stitch several straight lines and sharp corners and a number of varying sized loops.  I used a .05  micron Pigma pen, but any fine point permanent marker will do.  It is important to make lots of notes on the fabric so you can remember how you stitched each section.Sampler made from 1/2 yard of fabric.

Sampler made from 1/2 yard of fabric.

As you probably know, there isn’t much consistency in thread sizing.  Mettler makes a rather “fat” size 50 thread.  Superior Masterpiece is a thinner size 50 thread, as are size 50 threads from Aurifil.  Even finer are the Superior “So Fine” polyester threads.  Superior Bottom Line is a size 60 polyester thread, thinner yet and intended for the bobbin.  Size 100 silk is extremely thin and available from both YLI and Superior.   All of these, and many others, are high quality threads that can be used in your quilts.

Here is a closeup of the front side of the Mettler/Masterpiece test.  The top view looked fairly good and about the same for all four of the tension settings I used.

Mettler tension test.  Top thread Mettler size 50 gray.  Bottom thread Superior Masterpiece size 50 white

Mettler tension test. Top thread Mettler size 50 gray. Bottom thread Superior Masterpiece size 50 white

And here is the back of the 4.0 and 5.0 tension settings.  As you can see, the gray top thread has come to the back and looks pretty bad, especially for the 4.0 setting.

Back side of Mettler tension test sampler, for 4.0 and 5.0 thread tensions, showing the gray top thread coming through

Back side of Mettler tension test sampler, for 4.0 and 5.0 thread tensions, showing the gray top thread coming through

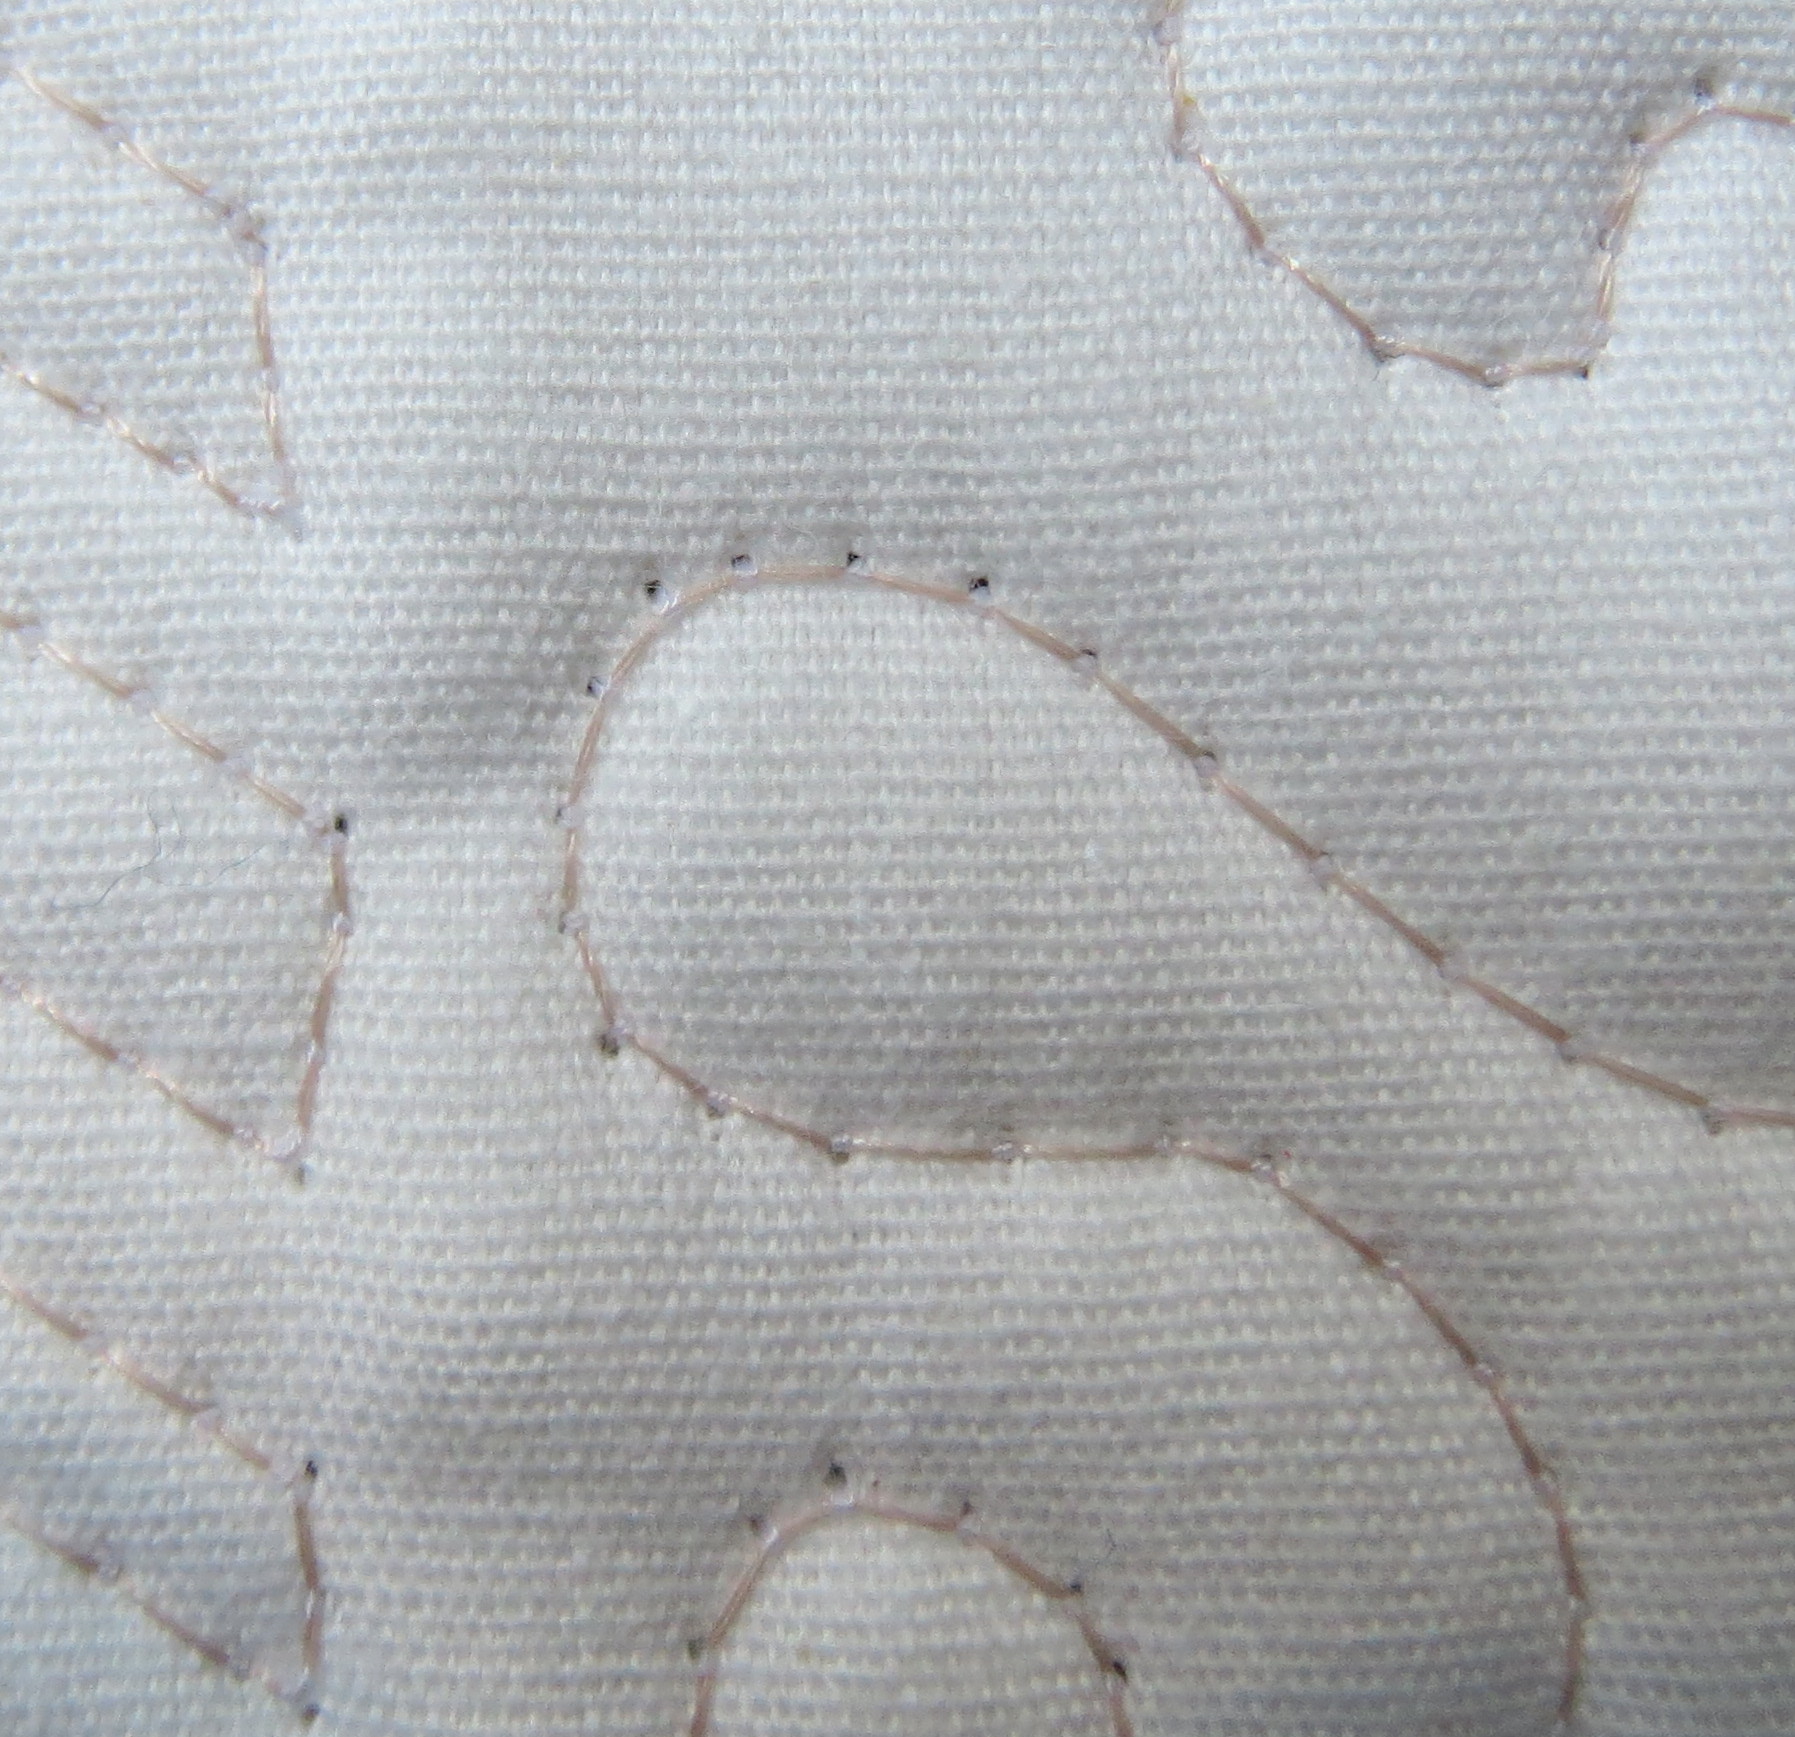
The 6.0 and 7.0 settings look much better.  The 7.0 is the best.  You probably can’t tell that from these photos.  I will show a couple of closeups of another test later that show you a better view, more like what you will see when you look at your own stitching close up.

Mettler test back side for thread tensions 6.0 and 7.0.

Mettler test back side for thread tensions 6.0 and 7.0.

And here is my test using Superior Bottom Line, a size 60 polyester thread, in both top and bobbin.  The best tension setting was 5.0.


Superior Bottom Line front of tension test sample

Superior Bottom Line front of tension test sample

Here is the closeup of the back for the tension 4.0 result.  You can see the top thread coming through and the bobbin thread taking a shorter path around the curve, because the top tension is too loose.

Superior Bottom Line thread tension 4.0 from the back, showing tension is too low.

Superior Bottom Line thread tension 4.0 from the back, showing tension is too low.

And the same effect happened on the front for the tension 7.0 result.  Here the top tension is too tight so it pulls the bobbin thread up, and now the top thread is taking the shorter path around the curve.

Front side of Superior Bottom Line thread tension 7.0 stitching, showing bobbin thread pull through because the top tension is too tight.

Front side of Superior Bottom Line thread tension 7.0 stitching, showing bobbin thread pull through because the top tension is too tight.

These tension problems are less obvious when the top and bobbin threads are the same color, and when the color matches your fabric.  And an occasional tension irregularity will happen in any quilt if the thread doesn’t feed quite smoothly, or you don’t move your quilt smoothly.  But the overall result will be much prettier if you get the initial tension setting right.  A sampler like mine, stitched out on your own machine using the needle, threads, fabric, and batting you use most often, will help you get the setting right on every quilt with a minimum of testing.

Book Review: “The Creative Habit: Learn it and use it for life” by Twyla Tharp.

This book was recommended by Elizabeth Barton in the class I took from her this spring through the Academy of Quilting. I have been slowly reading it ever since. I am still not finished, but I have read enough to highly recommend it.

This book is written in a very conversational, down-to-earth style.  All the concepts are illustrated with real-life examples, and numerous exercises are included to help the reader understand their own creative motivations and how to get started and keep going through the creative process.  The author, who is a dance choreographer, talks about what it is like to face a looming deadline for a performance, knowing that somehow the creative ideas will come and that she will be able to create a dance. She has given a lot of thought to the creative process, and developed many practical tools and habits that facilitate creative development. I particularly like the discussion about “scratching for ideas”.

What I have learned from this book is that understanding the creative process and having the “tools” to use it can make the difference between a craftperson who copies the work of others and an artist who creates genuinely original work. And it helps to understand that all artists, no matter the medium, go through the same intimidating process of coming up with ideas and turning them into finished work.  Importantly, there is plenty of emphasis on the hard work and investment of both time and emotional energy that it takes to get from that vague beginning of an idea to a finished piec of art.

If you have the goal of becoming a creator of truly original art quilts – and it is perfectly OK if you don’t – this book is an excellent resource.

You definitely won’t find this book at your local quilt shop, so here is a link where the book can be purchased at Amazon: The Creative Habit: Learn It and Use It for Life

Quick notions holder made from a placemat

Some years ago (close to ten) one of my friends at my quilt guild was using a small holder she had made from a quilted fabric placemat.  It was so simple that I made two for myself from a couple of old placemats I had at home.  Recently I decided to make a smaller one for travelling.  I had a little demonstration quilt left over from my binding class so decided to use it.

The “full size” version of this holder uses a placemat and four gallon-size zippered freezer bags.  The smaller version I made uses four quart-size zippered freezer bags.  The demonstration quilt I started with is 8 inches by 18 inches.  Here are photos of the outside and inside of the little quilt.

Outside of Notions Holder quilt

Outside of Notions Holder quilt

Inside of notions holder

Inside of notions holder

Working on the inside of the holder, I placed the four freezer bags with the “zippers” on the left and right ends and the zipper edges staggered a little bit as shown in the photo below.  Two bags face to the right and two to the left.  I used painters tape to hold the bags in place.  The bags overlap in the center so I can attach all of them with one seam down the middle.

The four quart sized freezer bags taped in place before sewing

The four quart sized freezer bags taped in place before sewing

Then I sewed through all the bags and the quilt along the center line with a lengthened zigzag stitch.

The bags are attached with a zigzag stitch down the center

The bags are attached with a zigzag stitch down the center

I cut away the bottoms of the bags that were closed off by the stitching, leaving a little edge so the bag wouldn’t tear along the stitching.  This edge will not even be noticeable once the notion holder is finished.  Then I did an optional step, which I didn’t do on my original larger notions holders.  I applied hem tape over the zigzag stitching and stitched it down with a straight stitch on each side.   Use a normal length or slightly lengthed stitch; a very short stitch will puncture the bag more and weaken it.

hem tape covers the zigzag seam

hem tape covers the zigzag seam

The tape makes the whole thing look a little more finished.  I don’t know if this helps strengthen the  attachment of the bags. My original bags, now used for nearly ten years, are still going strong so the tape isn’t really necessary.

After applying the tape, I stitched one side of a two inch strip of Velcro to each edge to close the holder.  You could use a ribbon, a snap,  or a button if you prefer.  Since the Velcro will get used frequently, I stitched it down all the way around so it will be secure.

A strip of Velcro tape on each side provides closure

A strip of Velcro tape on each side provides closure

Here is a photo of the holder with some notions in it.  If the labels on the bags bother you, they will come off easily with a cotton swab and a little rubbing alcohol.  I did that after I took this picture.  Notions in the bags will be more visible with the labels removed.

The inside of the completed notions holder

The inside of the completed notions holder

I am pleased that I was able to make this holder quickly and make use of the little quilt I had.  If you want to make a full size one, most any fabric placemat will work; they don’t have to be quilted.  I prefer quilted ones because I often use the inside of the cover to hold pins and needles.  Of course you can make your own “placemat” also.

I use one of these to hold accessories for the sewing machine I normally take to classes, and use another to hold hand sewing tools and other items that I take to guild meetings.  I’m sure you can think of many uses also.

Completion of “Working In Series” quilts

I have completed six quilts in my Working In Series class, and will show all of them in this post.  The class was very challenging and I recommend it highly for any of you interested in producing more art quilts.  Again, the class is taught by Elizabeth Barton through the Academy of Quilting (www.academyofquilting.com) .

Here are the quilts, in the order I completed them.

1.  Blue spheres.  The background is hand painted.  A variety of white on white fabrics were used for the strips.  The spheres started with circles in several blue and green fabrics.  The shading was produced with a white Paintstik (see earlier post for details).

Blue Spheres

Blue Spheres

2. Purple circles.  Deep purple background fabric, lavender strips (some hand painted), and a variety of purple circles.

Purple on Lavender

Purple on Lavender

3. Purple circles on yellow strips.  Half the yellow strips were painted with a diluted brown paint to darken them slightly to add more depth.  The background is dark purple.  A variety of purple and blue fabrics were used for the circles.

Purple on Yellow Strips

Purple on Yellow Strips

4. Black and white and red.  Black background fabric,  A variety of black and white prints for the strips.  Red-orange circles.

BLack and white strips with orange red circles

BLack and white strips with orange red circles

5. Blue, tan, and red.  Here circles were cut out of the original circles.  I like this idea and want to explore it further.

Blue tan and red

Blue tan and red

6. Cream, Blue gray and brown.  The blue gray strip fabric was a handpainted piece left over from a previous fabric painting class taught by Michelle Scott.


Cream BlueGray and Brown

Cream BlueGray and Brown


I can think of many ways to explore this theme further, and look forward to doing so in the future.

China Blue

I recently finished a quilt top from a kit that has been sitting around my studio for years.  It was a challenging design by Dereck Lockwood that I found intimidating.  I just couldn’t stand having it incomplete any longer, so now it is done and ready for quilting.  Here is the completed top:

China Blue 77 x 77 inches

China Blue 77 x 77 inches

I thought the piecing of all those diamonds was going to be the hard part, but I used Sally Collins’ technique of making templates for all the pieces.  I punched tiny holes in the templates (see my earlier post about making a circle template for a photo of the hole punch I used) to mark the start and stop points of the seams.  Marking all those little tiny diamonds was tedious but not difficult.  Careful attention to all the seam allowances resulted in the diamonds being all consistent in size, so the piecing part went pretty well.

The applique was more difficult, because the fabric had a tendency to ravel and the litle flowers all have lots of notches.  They just didn’t want to behave!  I used freezer paper  for the applique patterns and a little fray check where necessary.  The result is not perfect but acceptable.  I probably wouldn’t select this pattern today, but I am very fond of blue and white so I am pleased with it – except now it has to be quilted!  Another big job, but I will plan that another time — hopefully before my guild’s quilt show in September.

Squares Upon Squares – Playing with Paintstiks

Last month I got out my Paintstiks and rubbing plates and did some playing around.   If you don’t know about Paintstiks, you can Google them and get lots of info.  You can buy them in various sets or individually on Amazon; here is a link to one set: Jack Richeson Shiva Oil Paintstik, Iridescent Colors, Set of 12 .  The rubbing plates – and a book explaining how to use the Paintstiks – came from Cedar Canyon.  Here is a link to the book: Cedar Canyon Textiles Paintstiks On Fabric
and a link to the leaf rubbing plates I used: Artist’s Paintstiks Rubbing Plates 6/Pkg.-Leaves

Here is a photo showing my layout of the six rubbing plates I own – all are leaf designs – taped to my cutting table so they wouldn’t move around:

Rubbing plates taped down in a grid

Rubbing plates taped down in a grid

Then I laid black fabric down on top and taped it off, both to hold it in place and to keep from accidentally getting paint where I didn’t want it.  The photo below shows the results after I rubbed  stencil brushes on the Paintstiks and then transferred the paint to the black fabric, rubbing the brush in one direction diagonally across the plates:

Rubbed leaves colored with gold, bronze, and copper Paintstiks.

Rubbed leaves colored with gold, bronze, and copper Paintstiks.

I used three different color iridescent paintstiks to rub the plates – gold, copper, and bronze.  The stencil brushes keep you from getting globs of paint on your fabric.  And here is the completed fabric:

Completed Paintstik leaf blocks

Completed Paintstik leaf blocks

My photo isn’t great- the actual blocks look very good!  Nice and shiny and the different colors add complexity.

Then, of course, I had to think up something to do with my painted blocks.  So I made up a pattern, bought some coordinating fabrics, and here is the result:

Squares Upon Squares quilt, about 54 by 67 inches

Squares Upon Squares quilt, about 54 by 67 inches

I am pleased with this quilt and, since I wrote up the directions for it before making the quilt, I will probably make it available as a pattern sometime soon.   Here is a closeup that shows the Paintstik blocks better:

Squares Upon Squares closeup

Squares Upon Squares closeup

Coloring fabric with melted crayons

In the online class I am taking at the Academy of Quilting, I was puzzling over how to shade some circles to make them look like spheres.  One of my fellow students provided a link to a video and suggested I try the “melted crayon” technique.  I watched the video and got interested enough to try it.  I am going to put some of my results here.  At the end of this post I will provide links to the video and to a blog post that provides more details.

This technique doesn’t require any expensive investment.  You probably already own most of what you need.  I plan to use this technique for art quilts; the resulting color seems to be reasonably permanent but I would run a sample piece through the washer and dryer several times before I used it on a regular quilt.

Here is what you need:  your fabric (probably a high thread count white or very light fabric, such as Pimatex) and whatever fusible web you normally use; an applique pressing sheet – one intended for use when you are building up a multiple-piece fusible applique (the fusible is  ironed down to this sheet, but can then be peeled up and ironed permanently onto fabric); a box of crayons; some paper napkins; a roll of paper towels for cleanup; and a hot dry iron.  If you are not familiar with applique pressing sheets, you may find one at your local quilt or craft store or here is a link where you can buy one on Amazon: Bear Thread Applique Pressing Sheet .  This is a link to the smaller, less expensive one (About $12).  There is also a bigger one for about twice as much, and there are other brands as well.  This just happens to be the brand I have and it works well for me.

Here is the process, briefly.  You draw whatever shape you intend to use for the applique on the paper side of the fusible web.  Then apply the fusible web to the wrong side of your fabric following the manufacturer’s directions.  Cut out the applique shape.  Press the applique shape onto the applique pressing sheet.  You then use the iron to get the applique shape AND the applique pressing sheet very hot.  You grab a crayon and rub it on the hot pressing sheet.  This makes a little “puddle” of color.  You then pick up the color with the tip of a folded paper napkin and transfer it to your applique shape.  Like magic, you have “painted” your applique.  I am not going to provide more detail about the process because the links I am providing below give you all that.

Here are a couple of photos of the spheres I painted using this technique.

Spheres colored with melted crayons - first try

Spheres colored with melted crayons – first try

And I tried again the next day and found I was more comfortable with the technique, and was able to do it more quickly and got slightly better results:

Spheres colored with melted crayons - second try

Spheres colored with melted crayons – second try

After completing the coloring, I placed a paper towel over top of the shapes and ironed them to remove any residual color.  Then I washed them in hot soapy water; none of the color came out.  As always, your results may be different so be sure to run your own test and make sure this process is suitable for your particular project.

I also tried a couple of other techniques for coloring the spheres.  When I was colored white fabric as shown above, I got the best results with the crayon technique.  For colored or dark fabrics, I got better results using Shiva Paintstiks (opaque solid oil paints).

I tried some liquid fabric paints also but didn’t get very good results.  I suspect that has more to do with my lack of skill than with the products.

I recently did a project using the Shiva Paintstiks and will be putting up a post about that project next week.  Lots of details and step by step photos in that post, so I am not going to say much else about it here.

The melted crayon technique has some nice advantages.  You can have a full range of colors for the modest price of a big box of crayons.  A small project can be completed quickly with little cleanup since the color is applied with paper – so no brushes to clean.    A second or third color can be layered on top of the first one immediately.  The color is dry right away – no waiting until the next day or several days for the paint to dry.

Here is the link to the video for any of you who are interested:  https://www.youtube.com/watch?v=VJN41E2Akto  .

My friend Charlie, who also took the class, provided a link to a blog post by another quilter, with great photos and useful information about the technique.  I have tried to put the link here, but for unknown reasons it won’t work.  I don’t know why I can get to the link from my email or from a google search, but not when I post it here.  So I can only suggest you also do a google search for “Quilt Whimsy blogspot melted crayons” and it should come right up.  I found it helpful to read this blog post after watching the video; it sort of reinforced the details and I could study the photos more carefully to make sure I understood the process.  The video and blog show using this technique on an apple and a leaf, and used multiple colors to get a very realistic look.  Terrie Kygar, who did the video, also has written a book about the technique, available through Amazon here: Creative Quilts from Your Crayon Box: Melt-n-Blend Meets Fusible Applique

Marking tools for dark fabrics

Recently I posted about removing white marks left from Frixion pen marking on dark fabrics.  I mentioned that I would be discussing other marking tools in the future.  The two tools I am reporting on today are the Sewline Fabric Pencil and white dressmaker’s chalk.

The Sewline Fabric Pencil comes in two versions – a single color version and a three-color version, where all three colors are inside the same holder. The lead can be purchased separately so the pencils can be refilled, and the lead never has to be sharpened. The colors available are white, pink, and black (more of a dark grey).

Sewline pencils and marks with the three colors of "lead"

Sewline pencils and marks with the three colors of “lead”

These pencils come with an eraser, and here is what the marks looked like after I erased them in the center.  The white and pink came off reasonably well, but the black did not.

Marks after using the eraser

Marks after using the eraser

I then washed the fabric with dishwashing detergent and water and dried it.  With some scrubbing, the lines all came off.  So these markers do the job.  I don’t like the idea of having to scrub my quilt, but at least the marks can be removed.  And the light colors came off most easily.

Sewline marks washed away

Sewline marks washed away

The other marking tool I have tested is white chalk. Dressmaker’s chalk comes in several forms, but the kind I am using today is the flat square shape, curved on the sides.  It comes in several colors also, but the white is most easily removed so I don’t recommend the other colors.  There is also an artist’s chalk in pencil form ( the Ultimate Marking Pencil) I recently purchased, as shown in the photos below.  Marks from both these kinds of chalk can be ironed away, as I will show you.  Warning: there are other chalks labeled “dressmaker chalk” on the market.  Some of them will not iron away.  As always, test before using on your quilt!

Here are the chalks I am testing today:

Chalk markers

Chalk markers

Here are the marks made by these tools:

White chalk marks

White chalk marks

And here is what the fabric looks like after ironing:

And the chalk marks disappear with ironing

And the chalk marks disappear with ironing

It’s magic!  The white chalk does not leave as fine a line as the Sewline markers or the Frixion pens I reviewed in an earlier post.  But if you can live with the thicker line and the need to sharpen the chalk marker from time to time, it is a great solution because it can be removed so easily.

You will probably find the Sewline markers at your local quilt shop, and the flat dressmakers chalk at your local sewing/craft store.  The chalk pencil will probably have to be purchased at an artist’s supply store.  If you can’t find these locally, here are some links to Amazon where they can be purchased:

Sewline White Fabric Pencil

Sewline Fabric Mechanical Pencil Trio By The Each

Ultimate Marking Pencil-White

Dritz Tailor’s Chalk and Holder