Creating dimension on applique with colored pencils

I recently picked up a book “Twelve by Twelve: The International Art Quilt Challenge”  about a two year long  challenge conducted by twelve art quilters. (Buy it here: Twelve by Twelve: The International Art Quilt Challenge  ).   The entire challenge was conducted online.  A theme was selected by one member, and all the members had two months to produce a 12 inch by 12 inch quilt based on that theme.  After the challenge was completed, the members published this book.  All the members discuss their thoughts about the challenge and how they arrived at their particular quilt design.  It is very interesting reading, and very thought provoking if you want to be an art quilter.

A number of interesting techniques are described in the book.  One I found intriguing — and compatible with some of the things I have been doing this year – was a technique described by Terry Grant.  She used pastel pencils to add shading to commercial fabrics to get a more realistic result.  I just played around with this idea today and can see how it works.  According to Terry, after you are satisfied with the result, the shading is made permanent by painting over it with a dilute solution of acrylic textile medium and water.  I haven’t tried that part yet, but here is the result from spending 30 minutes or so adding the shading with  white, navy blue, and black pencils .

fused applique pieces have a flat appearance
dimensionality added with pencil shading

dimensionality added with pencil shading

Interesting!  This is much like what I was doing last spring with my sliced circle pieces with crayons and Shiva Paintstiks.  At that time I settled on a  white Paintstik to get the best white highlight on the spheres.  The pencil result here is quite good and much faster, if it will truly be permanent after covering with the textile medium.

Scrap Management

Recently I have been thinking about how to plan  and organize my scraps.    I have them stored in bins sorted by color but it is very labor intensive to use them, because each piece has to be taken out,pressed, and cut to the desired size.  Today I led a discussion at my quilt guild about scrap management.  Here are some thoughts I had and some ideas contributed by other members.

  1. What is a scrap?   – Anything much less than a fat quarter or equivalent. What is too small to be a scrap? Your choice, but if it is smaller than 1 ½ inches square I wouldn’t save it.
  2. Should you keep your scraps? You decide. I keep them and use them (although they are accumulating faster than I use them up).   If you don’t use them, give them to someone who will!
  3. If you keep them, how should you keep them? Sorted or unsorted? Boxes, bags, bins, drawers?
  4. Sorted is best for me; I store in plastic bins for easy accessibility.
  5. Some quilters sort by value (light, medium, dark); others by color.   Would you mix up lots of colors in a scrap quilt? Then value may be best. If you would tend to make scrappy quilts with a limited color palette, then color sorting may be best. Another option would be to sort by brights, tints, and muted colors – if you would make scrappy quilts along those themes.
  6. Scrap management systems. There are probably many, but here are three possibilities:
  7. Bonnie K. Hunter scrap management system, described at http://quiltville.com/scrapusersystem.shtml . Basically Bonnie keeps scraps as strips (anything longer than 12 inches) that are 1 ½ inches, 2 inches, 2 ½ inches, and 3 ½ inches wide; also as squares of the same dimensions or rectangles that are2 by 3 ½, 2 ½ by 4 ½, 3 ½ by 6 ½. These sizes “play well together”
  8. Quilter’s Lumberyard™. This is a system developed by Cheryl Coffman and Patty Bowers, who teach it in workshops.  The basic idea is to cut your scraps into 2 ½ in squares, 2 ½ by 4 ½ in rectangles, 2 ½ by 6 ½ rectangles, 2 ½ by 8 ½ rectangles, and 4 ½ by 4 ½ in squares (and maybe some other sizes). These sizes can be assembled into blocks and the storage should be a little simpler than Bonnie’s system, but also a little less flexible.
  9. Scrap Therapy™.   Developed by Joan Ford. Website is www.scrap-therapy.com . This is the simplest system for storage, because there are only three sizes of squares: 2 inches, 3 ½ inches, and 5 inches. These sizes will also play well with charm packs and precut strips. Joan has written several books about this topic. First book is Scrap Therapy: Cut the Scraps.
  10. Another member suggested a method of storing “nickels, dimes, and quarters”  — 5 by 5 inch squares, 10 by 10 inch squares, and 2 1/2 inch strips.  These are fairly simple to store and very flexible sizes — as well as being the sizes marketed as precut strips and squares.  Some members store smaller “miscellaneous” pieces in plastic bags hanging on a wall.  One member saves strips and has them pinned to a chain hanging behind her sewing room door — they can be easily seen and accessed when needed.
  11. How to get started?
    1. decide on some ground rules, such as the sizes you are going to save and what you will throw away.
    2. arrange a scrap sorting party with a friend; set a manageable goal such as just sorting by value or color. Start with bags or cardboard boxes as storage containers; don’t buy any containers until you know how much you have to save.
    3. Set a fixed amount of time to work on your scraps each day – 15 minutes, 30 minutes.
    4. Pick a pattern for a scrap quilt you like and pull out and cut scraps for that quilt.
  12. What do you think?

Brother Dreamweaver sewing machine

Last spring I purchased a new Brother sewing machine because my dear old Bernina – after 14 years and over 10 million stitches –  is just getting worn out.  I looked at the new Berninas – they are beautiful – but decided on the Brother because it had a couple of features I really liked and seemed a little more cost effective.

My new machine has an 11 1/2 inch space to the right of the needle, making it very useful for free motion quilting.  The other feature I really like is the large touch screen for selecting stitches and settings.  It has all the bells and whistles you would expect from a higher end machine.  I did not get the embroidery version since I have seldom used the embroidery capability on my old Bernina.  Here is a photo of the machine:

Brother Dreamweaver 3000 sewing machine

Brother Dreamweaver 3000 sewing machine

And here is a closeup of the touch screen, which makes selection of stitches, tension, etc. so easy.  It even has tutorials for filling a bobbin, threading the machine, etc.

Dreamweaver touchcreen

Dreamweaver touchcreen

It has a beautiful selection of decorative stitches – here are a couple of pages where I stitched some out so I would have a reference book of all the stitches.

Dreamweaver decorative stitches 1

Dreamweaver decorative stitches 1

Dreamweaver Decorative stitches 2

Dreamweaver Decorative stitches 2

This machine even lets you design your own decorative stitches and save them in the machine, as well as download new stitches through a USB port.  As with the rest of the machine, these features are straightforward and easy to do.  The automatic needle threading works very well, as does the thread cutting feature when I use it (great for piecing with cotton thread and of course would be terrific for garment sewing, not so good for free motion quilting or work with specialty threads such as monofilament ).

And the last feature I especially like is the excellent manual, which has very clear explanations about how to use the machine to accomplish various tasks.  It is really well done.  I took it to the print shop and had it spiral bound, since I know I will use it frequently.

I am still developing my skills with this machine, and generally I like it very much.  It has a couple of negatives compared to my old Bernina, but they are minor.  They mostly have to do with the feet.  Bernina presser feet are really quick to change – no screws required – and I miss that feature, especially when switching from a regular foot to the walking foot and back to a regular foot, which I do frequently.  Of course the extra convenience of the Bernina feet means they are more expensive — always a trade-off!  And I miss the Bernina walking foot, which seems to perform better with less noise.  I am referring here to a “regular” type walking foot that I bought as an add on to the Brother; the Brother comes with a very unique walking foot intended for use with specialty fabrics.  I haven’t even tried that foot out, because the sole is so wide and has such poor visibility that I know I won’t use it for quilting.  The regular walking foot on the Brother works fine; I just don’t like it quite as well as the Bernina one.

As I get better at using some of the special features of the Brother, I will post the results here.  I especially want to do some stitch designs and see what new decorative stitches I can invent!


Pattern Page Reorganized and New Quilt Galleries added

I decided a couple of my pages here on my site – Patterns and  Gallery – were not very user friendly, because they were just one long page that required scrolling down to read.  I reorganized the Pattern Page with sub pages for the first three patterns.  Now you just click on the thumbnail image of the quilt and it will take you to the page for that pattern.

The second change is to the Gallery.  I have added several sub-galleries:  Abstract Quilts, Black and White Quilts, Oriental Quilts, Landscape and Portrait Quilts, and Traditional Quilts.  If you put your cursor over the “Gallery” title you will see these sub-Galleries listed.  Click on the name of the sub-Gallery and you can see thumbnails of each quilt.  Click on one of the thumbnail photos and you will be taken to an large photo of that quilt and can also view a slideshow of all the quilts in that sub-gallery.

I haven’t deleted the content in the main Gallery page yet because I haven’t figured out how to add comments to the sub galleries (techniques used, size of quilt, etc.).  But I wanted to quickly post about the changes, since they are now up and running!

New Pattern – Squares Upon Squares – available

I now have another pattern available.  It is shown, along with the link to my PatternSpot.com “store” where all my patterns are available for purchase.  Just as a reminder, there are a bunch of free patterns shown on my pattern page in this blog that you can download directly if you need an easy pattern for a lap quilt.

Here is Squares Upon Squares.  The focus blocks were made with Shiva Paintstiks and rubbing plates, as I described in a post last spring.  A great pattern for showcasing those small blocks you like a lot but don’t know quite what to do with!  All those little borders in the blocks allow size adjustments as necessary to fit your particular block.  Or just leave out a border or two if your special blocks are bigger.

Squares Upon Squares 51 by 64 inches

Squares Upon Squares 51 by 64 inches

Cabin Fever Quilt Show Sept 26-27

My guild’s biannual quilt show was last weekend.  We all enjoyed it; it is a great group experience to present our work to the public and our friends and family. Chris Bates, the husband of our current guild president, took photos of the quilts on display and prepared a slide show.  It is posted on our guild website at:   http://www.cabinfeverquilterswa.com .   To see the slide show of our quilt show, go to the website link, then click on the tab “Our Quilt/Our Show” at the top.   

My new thread storage cart

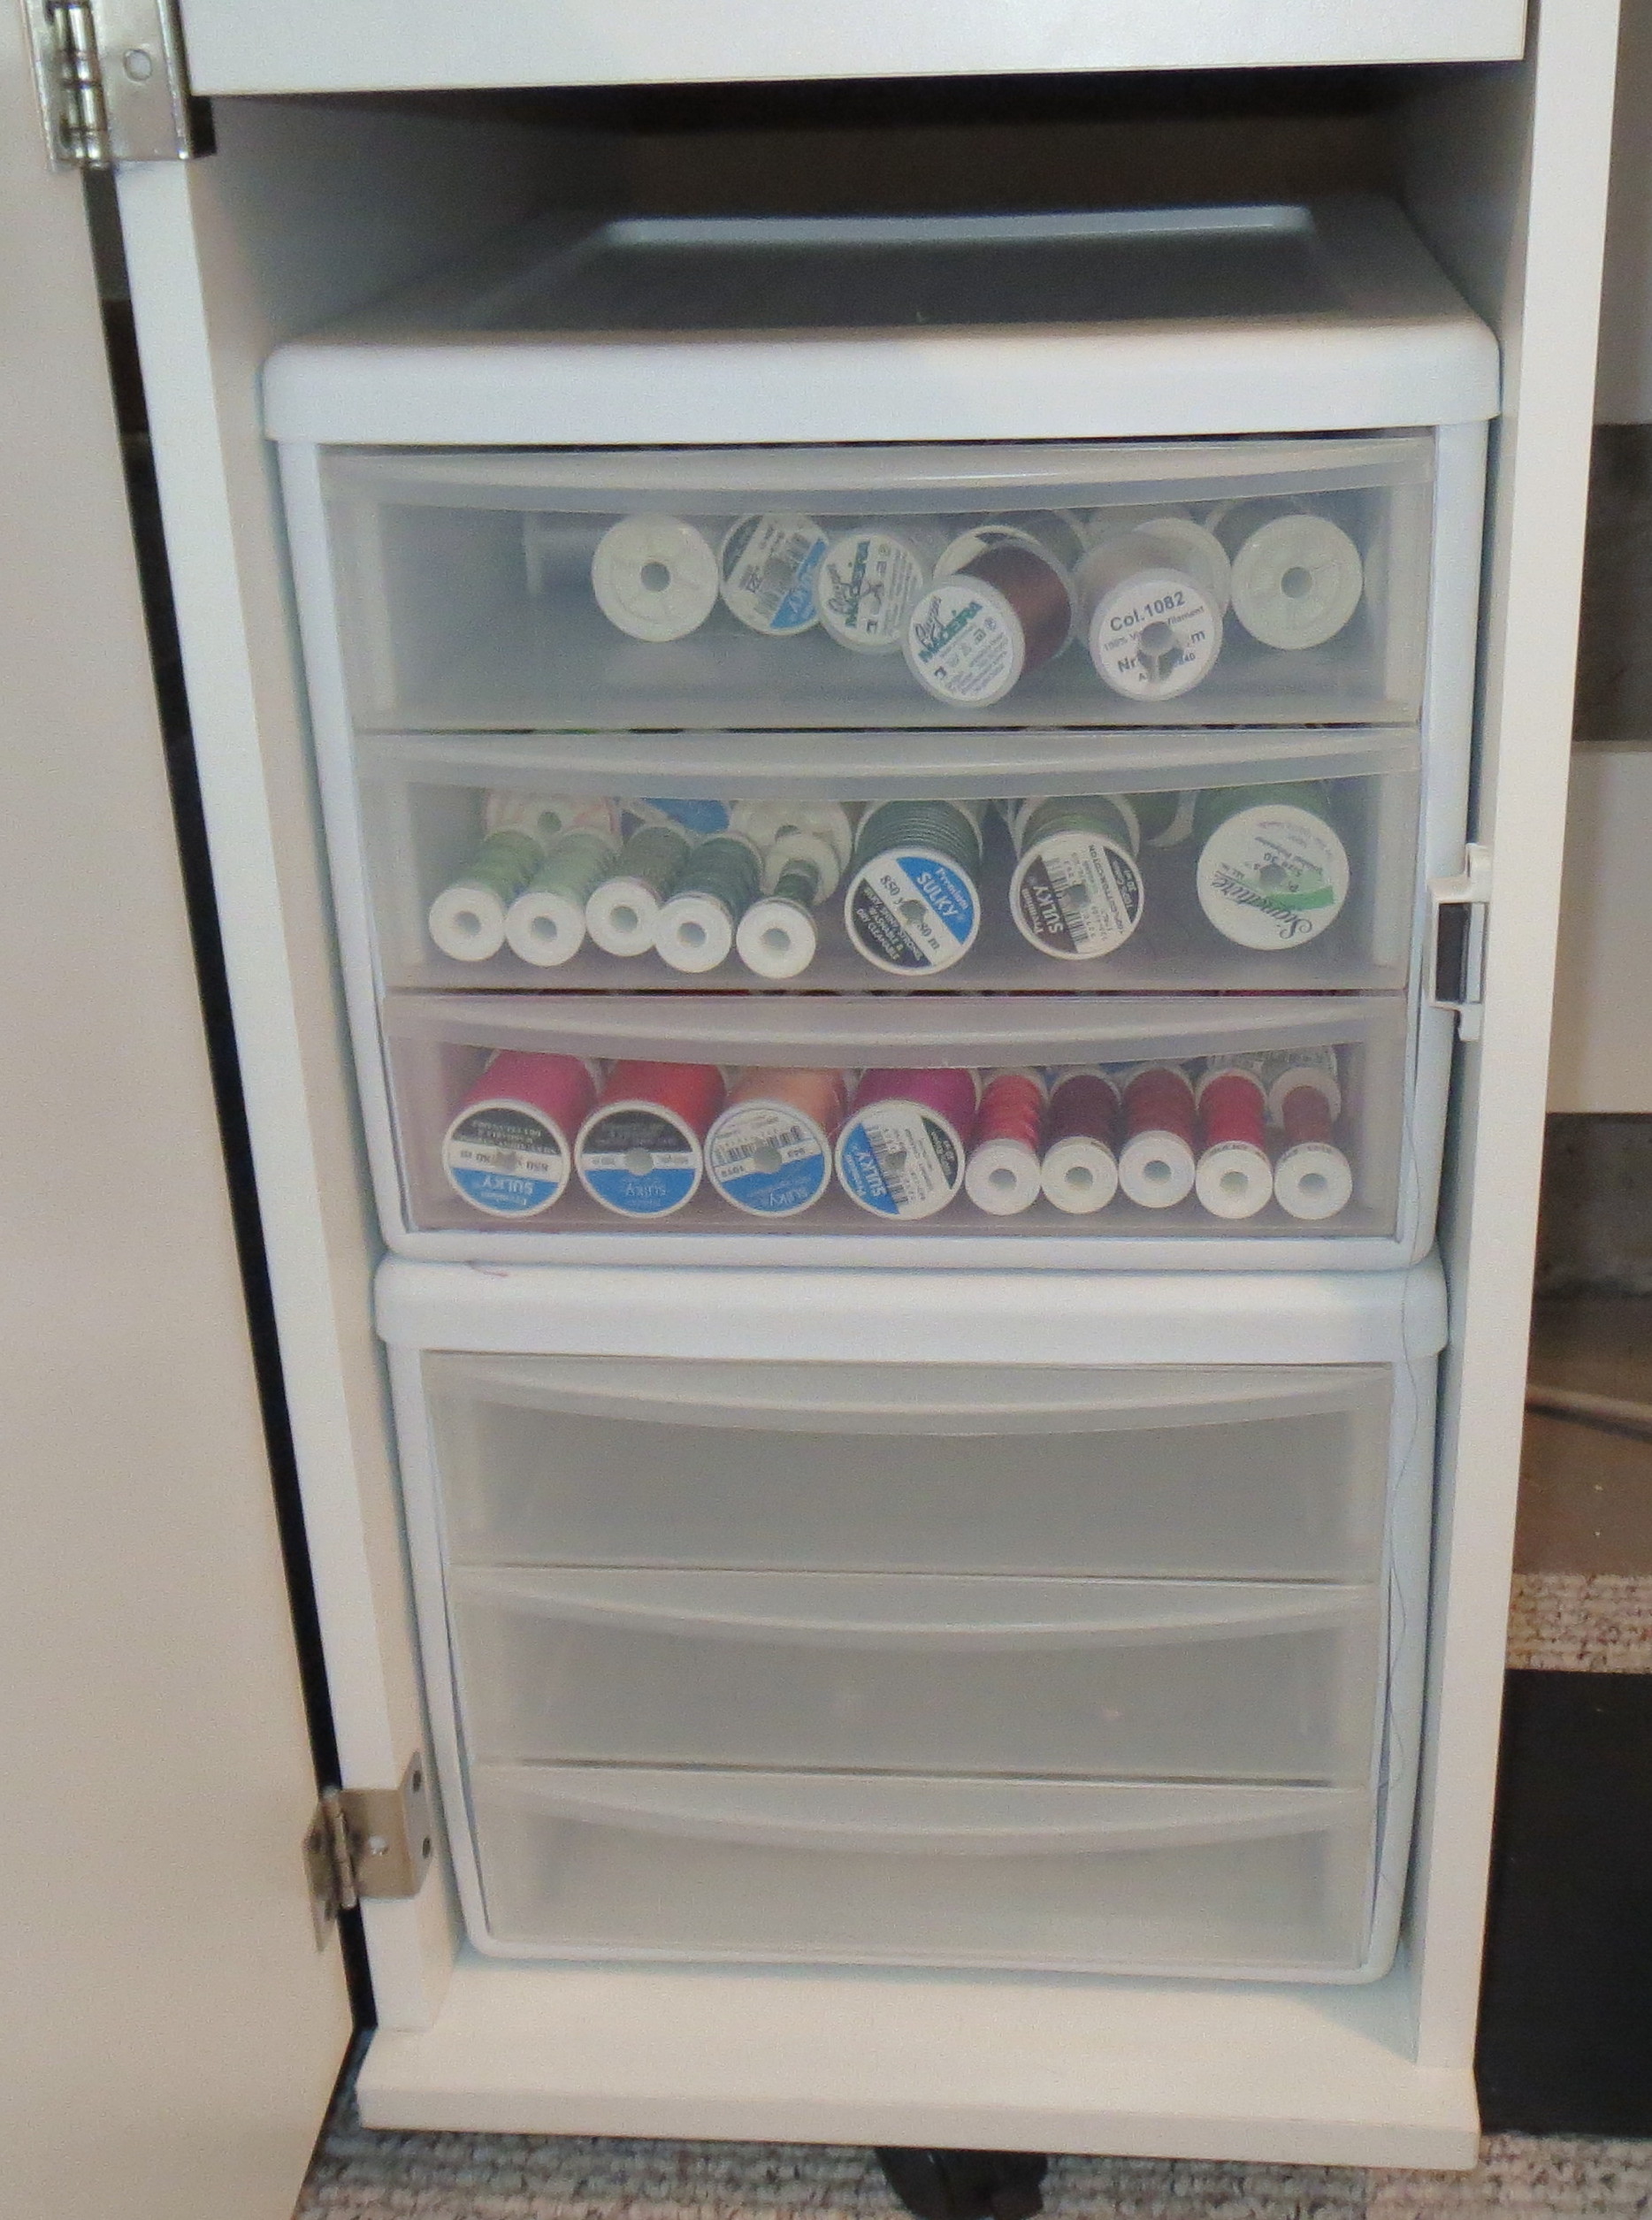
My fabric stash is pretty big, but fairly well organized.  My thread stash has been out of control for some time — various threads tucked away in drawers and boxes.  My old sewing machine cabinet had only one drawer and a large empty space where I was able to slip in a couple of those plastic drawer stacks, and I used that for some of my threads.  Here is a photo of the stacks inside my old cabinet.

My previous thread storage bins

My previous thread storage bins

Recently I purchased a new Brother Dreamweaver sewing machine and a new Koala cabinet to put it in.  My old thread storage system wasn’t going to work.  I also wanted more capacity so I could get all the thread consolidated in one place.

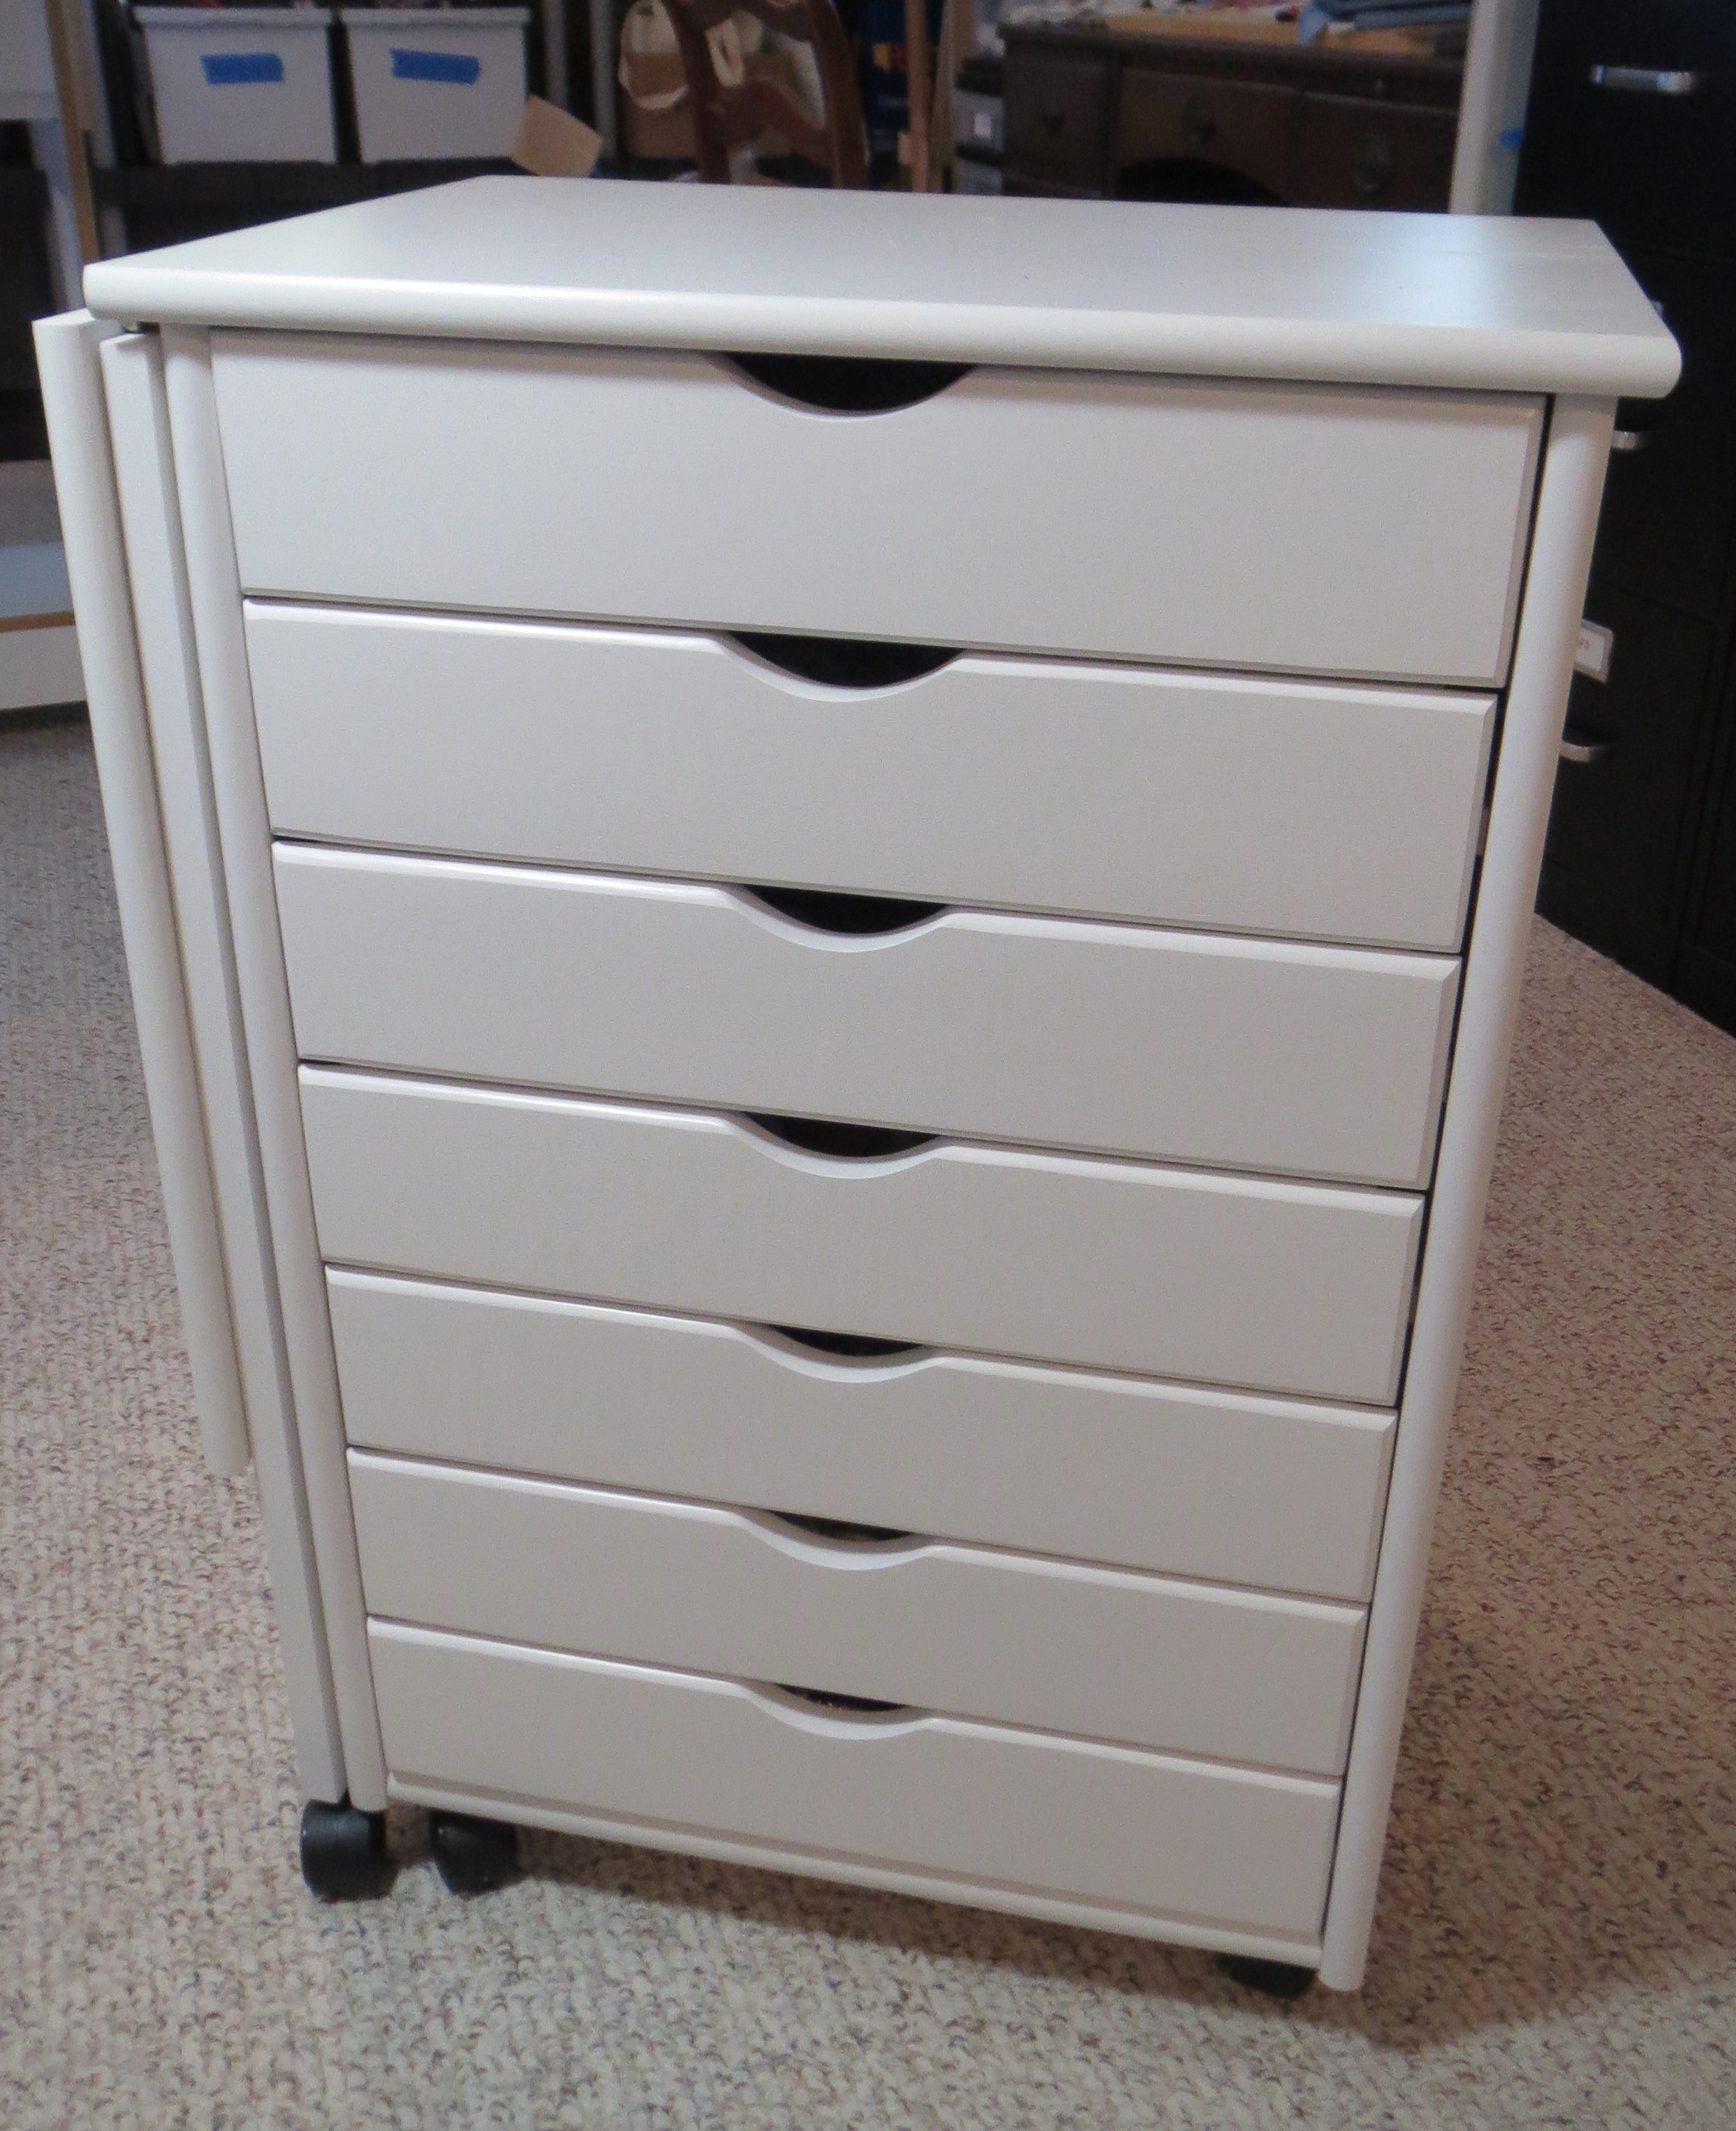
I checked out drawer stacks at my local sewing machine store and online but didn’t find anything suitable, since I wanted lots of skinny drawers.  Finally I found a roll around storage cart made by Stanton that works well.  Here is a photo of it:

My new thread storage cart

My new thread storage cart

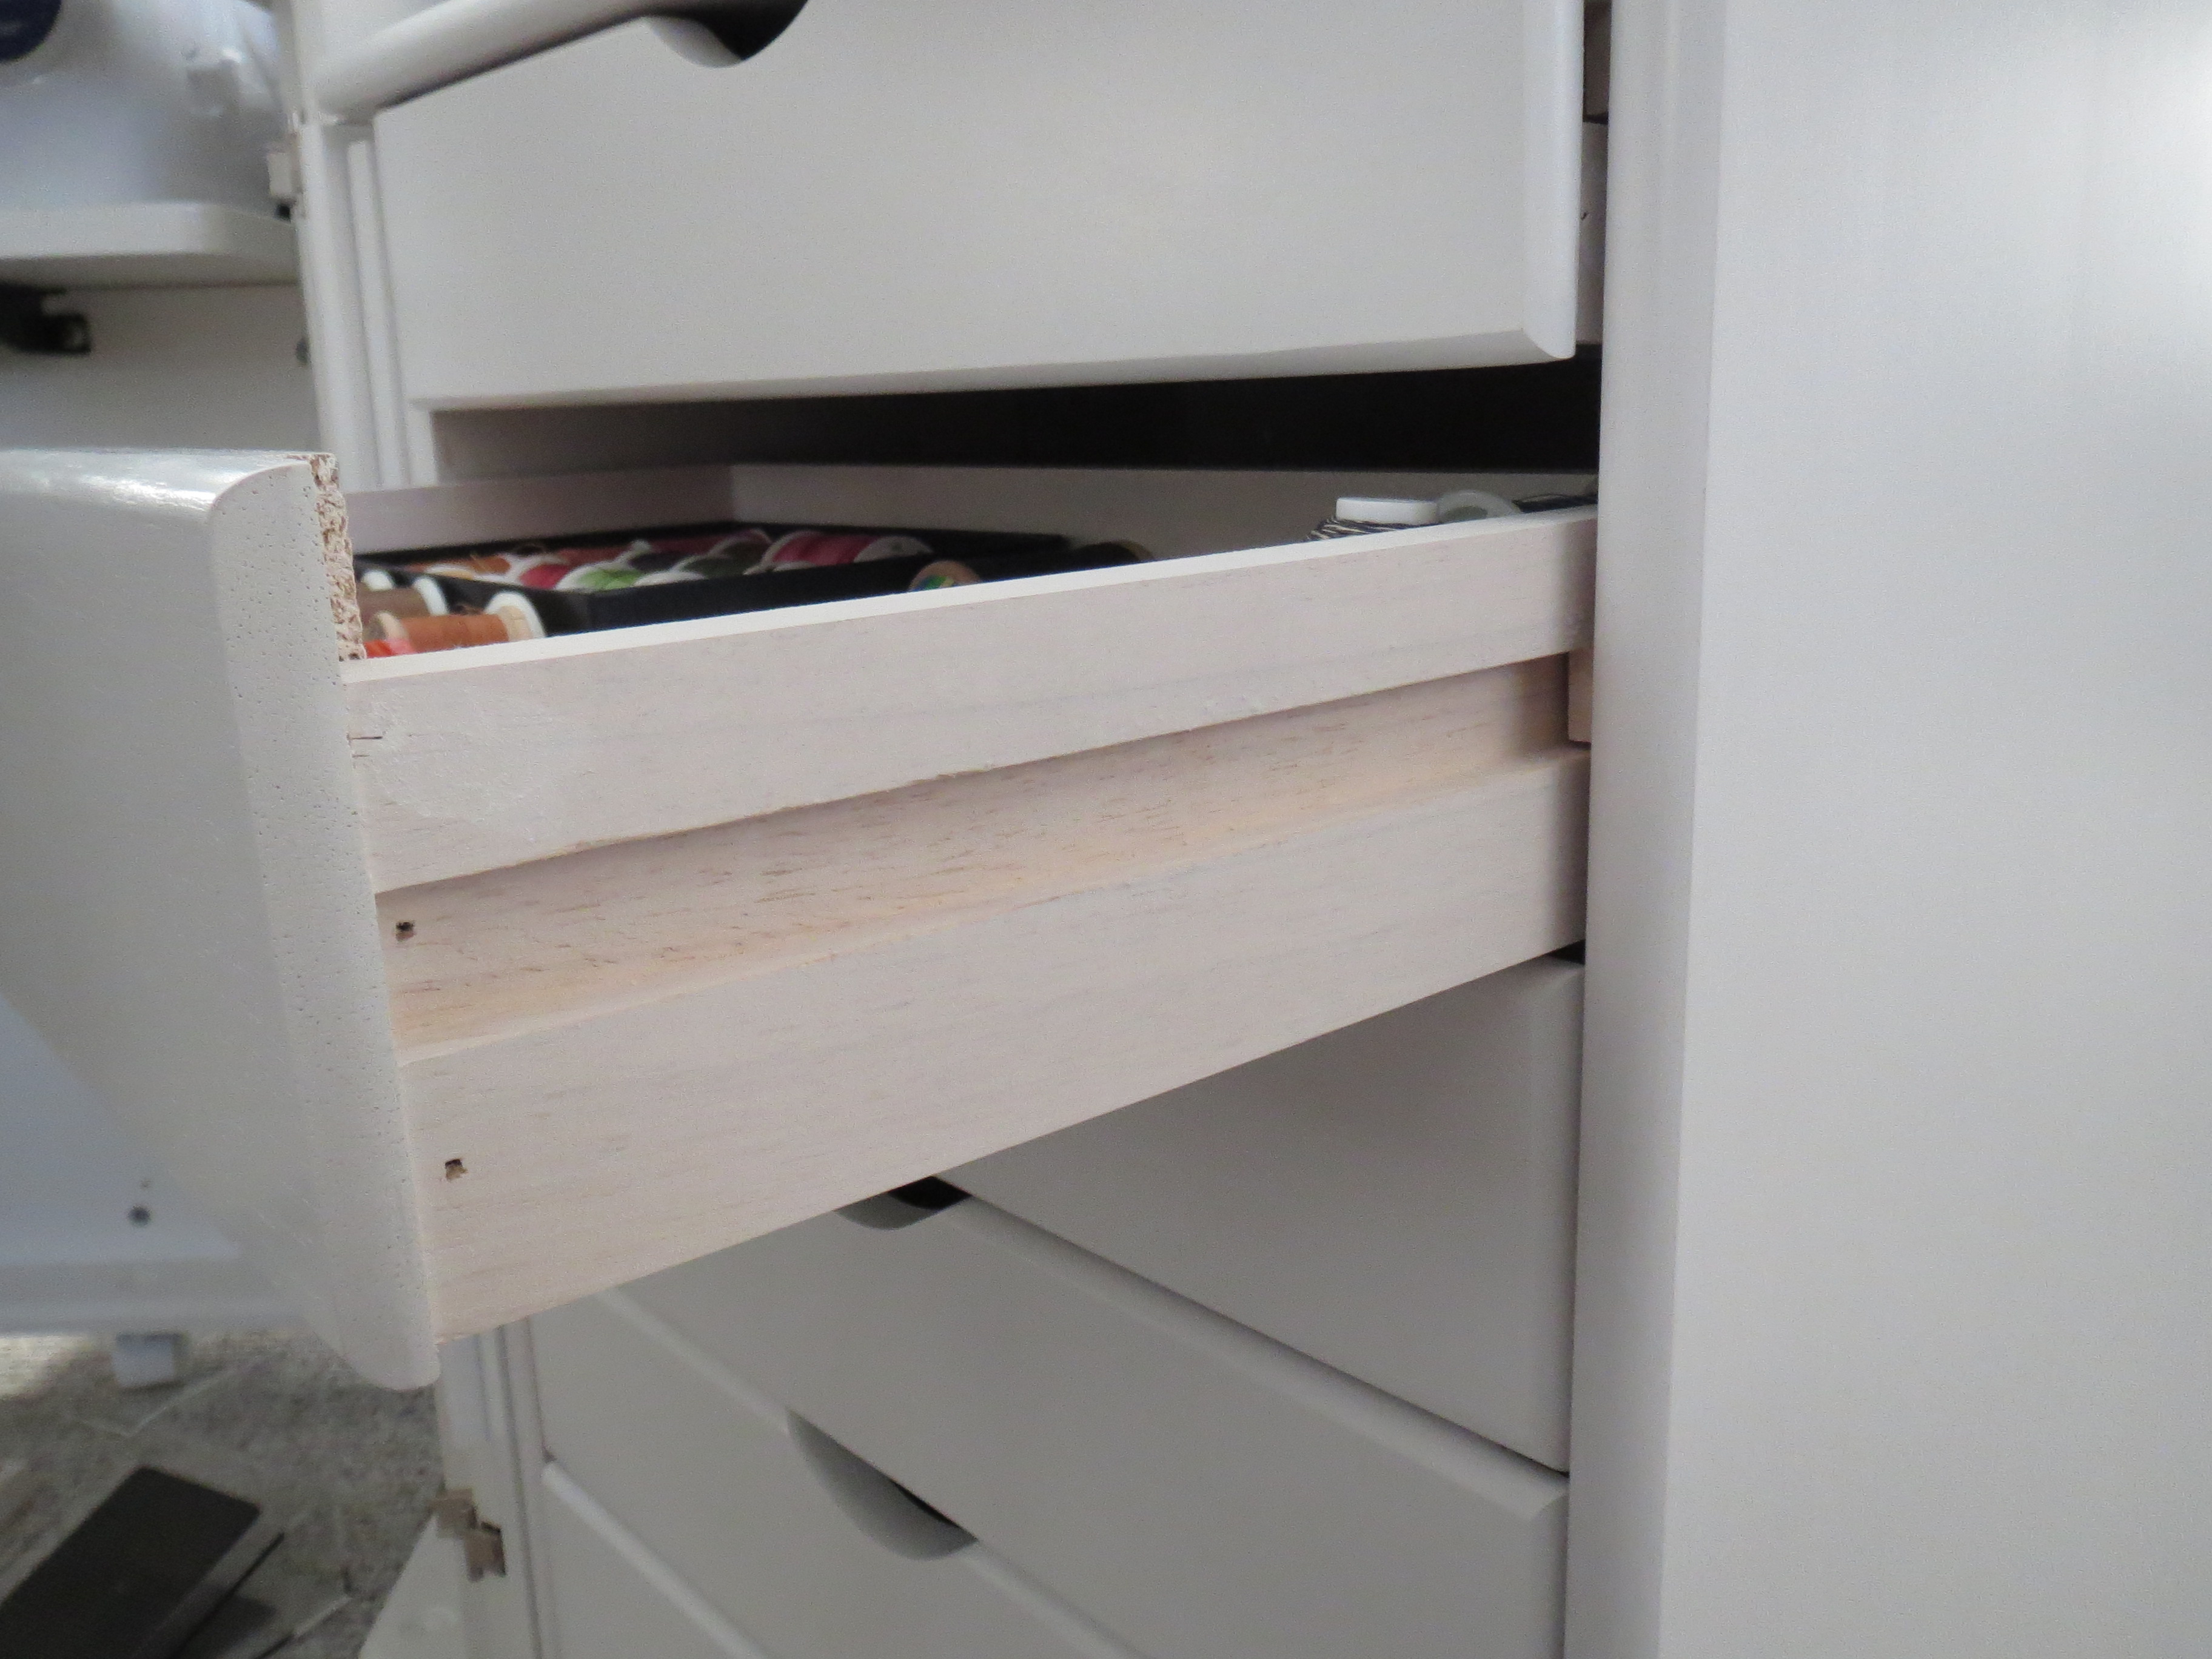
It is designed with a dropleaf on the left side that can be put up to make a larger work surface.  I will probably never use that feature, but it doesn’t get in my way.   The unit is 30 inches tall, 21 inches wide, and 14 inches deep.  The drawers have a slot in the sides that hold them rather than metal slides, as you can see here:

Drawers slide on side tracks

Drawers slide on side tracks

This unit came fully assembled except for the casters on the bottom; they were easy to attach with screws.  I also sanded the slots on the drawers and rubbed a little paraffin on them to make them slide smoother — they would probably have been OK without that, but I decided to do it before I filled up the cabinet.   And each drawer holds a lot of thread:

Piles of thead begging to be organized!

Piles of thead begging to be organized!

Someday (soon, I hope) the thread drawers will be organized and nicely divided.  I purchased some really slick custom DIY drawer dividers  from The Container Store and so far have only divided the top drawer as you see here to hold various pens and tools that I use frequently:

Custom drawer dividers from The Container Store

Custom drawer dividers from The Container Store

You can accomplish the same drawer divisions using foam core board –  there are YouTube videos explaining how to do that, as well as how to use these fancier ones.  The videos are useful for deciding which way you want to go; I watched them before deciding to purchase the ones I am using.

This storage cart was a good value compared to the drawer stacks available to match sewing room furniture — less than half the price as well as giving me the size and number of drawers I wanted — but it is still not cheap.   The  cost was about $280 .  I purchased it through Amazon so the shipping was free; here is the link to Amazon where it is available: Stanton Single Gate Leg Storage Cart, 30″Hx21″Wx14″D, WHITE.  It is also available through homedecorators.com, but was cheaper at Amazon the day I made my purchase.

One of my goals is to settle on one brand of cotton thread on one spool size so my storage is easier and occupies less space.  My goal will be to have every color of that one kind of thread and no others.  More about that subject in another post in the future!


Quilt Show in Jefferson County Sept 26-27

My quilt guild, Cabin Fever Quilters, is having their biannual show at  the Jefferson County Fairgrounds on Friday and Saturday, September 26th and 27th . The show opens at 10 a.m., and closes at 5 p.m. daily. The fairgrounds are located at 4907 Landes Street in Port Townsend. Parking is free.

We’ll have lots of quilts and quilted clothing items made by our nearly 100 members to see. In addition, we’ll have vendors of various quilt-related and sewing items, a wonderful display of antique sewing machines, and demonstrations of various quilting techniques. And last but not least, you’ll be able to see our beautiful Opportunity Quilt, and have a chance to purchase a ticket for the drawing on Saturday afternoon. Tickets are just $1.00 apiece, and proceeds go toward supporting our efforts to promote the art and craft of quilting, while making and donating over 100 comfort quilts a year to Hospice of Jefferson County and to Child Protective Services.   Breakfast and lunch are available for purchase on site. We’re asking for a $5 donation for entry, children are free.

I will be demonstrating free motion quilting at the show each day from 10 am to 2 pm.  Come by for a visit; the demo is very informal so there will be lots of opportunity for asking questions or just having a chat.  Hope to see you there!